转载自博客园https://www.cnblogs.com/leffss/p/15598094.html 原作者:https://home.cnblogs.com/u/leffss/
一、规划 主机规划 1 2 3 4 5 6 7 8 9 10 11 12 13 14 15 16 17 10.10.10.21 ha01 10.10.10.22 ha02 10.10.10.31 controller01 10.10.10.32 controller02 10.10.10.33 controller03 10.10.10.41 compute01 10.10.10.42 compute02 10.10.10.51 ceph01 10.10.10.52 ceph02 10.10.10.53 ceph03
ha-node 使用 haproxy + keepalived 实现高可用,vip 10.10.10.10
controller-node 部署控制节点相关组件以及网络节点 neutron 的 sever 与 agent 组件
系统:centos 7.9 ,内核:5.4.152-1.el7.elrepo.x86_64
系统拓扑
congtroller节点运行keystone,glance,horizon,nova&neutron&cinder管理相关组件,另外openstack相关的基础服务;
compute节点运行nova-compute,neutron-openvswitch-agent(只有openvswitch支持分布式路由),cinder-volume(后经验证,如果后端使用共享存储,建议部署在controller节点,可通过pacemaker控制运行模式,但写文档时,此验证环境的cinder-volume部署在compute节点)等
控制+网络节点
控制节点和网络节点部署在相同机器,也可以控制节点和网络节点分开(控制节点部署neutron-server;网络节点部署neutron-agent)
管理网络(红色):含host os管理,api等网络,如果生产环境允许,建议各逻辑网络使用独立的物理网络,api区分admin/internal/public接口,对客户端只开放public接口;
外部网络(蓝色,External Network):主要针对guest os访问internet/外部的floating ip;
租户(虚机)隧道网络(与vlan网络共存 或 2选1)(紫色):guest os之间通讯的网络,采用vxlan/gre等方式;
租户(虚机)vlan网络(与隧道网络共存 或 2选1)(黄色,不需要配置ip):guest os之间通讯的网络,采用vlan方式(虽然规划了,但是后面创建实例时是没有使用的);
存储网络(绿色):与存储集群通讯;为了glance和ceph通信;
计算节点网络
管理网络(红色):含host os管理,api等网络;
外部网络(蓝色,External Network):主要针对guest os访问internet/外部的floating ip;
存储网络(绿色):与存储集群通讯;
租户(虚机)隧道网络(与vlan网络共存 或 2选1)(紫色):guest os之间通讯的网络,采用vxlan/gre等方式;
租户(虚机)vlan网络(与隧道网络共存 或 2选1)(黄色,不需要配置ip):guest os之间通讯的网络,采用vlan方式(虽然规划了,但是后面创建实例时是没有使用的);
存储节点
管理网络(红色):含host os管理,api等网络;
存储网络(绿色):与外部存储客户端通信;
存储集群网络(黑色):存储集群内部通讯,数据复制同步网络,与外界没有直接联系;
无状态的服务,如xxx-api,采取active/active的模式运行;有状态的服务,如neturon-xxx-agent,cinder-volume等,建议采取active/passive的模式运行(因前端采用haproxy,客户端的多次请求可能会被转发到不同的控制节点,如果客户端请求被负载到无状态信息的控制节点,可能会导致操作请求失败);自身具有集群机制的服务,如rabbitmq,memcached等采用本身的集群机制即可;
Vmware 虚拟机网络配置 虚拟网络设置
因为外部网络ens34是连接在VMnet2上的,按理说应该是VMnet2是NAT模式(vmware只能设置一个NAT网络),但是因为所有主机需要yum安装软件,所以暂时把管理网络VMnet1设置为NAT模式,后面测试外部网络功能的时候会把VMnet2设置为NAT模式
ha node
controller + network node
compute node
ceph node
整体规划 hostipserviceremarkha01-02ens33:10.10.10.21-221.haproxy
2.keepalived1.高可用 vip:10.10.10.10controller01-03ens33:10.10.10.31-33
ens34:10.10.20.31-33
ens35:10.10.30.31-33
ens36:Vlan Tenant Network
ens37:10.10.50.31-331. keystone
2. glance-api , glance-registry
3. nova-api, nova-conductor, nova-consoleauth, nova-scheduler, nova-novncproxy
4. neutron-api, neutron-openvswitch-agent, neutron-dhcp-agent, neutron-metadata-agent, neutron-l3-agent
5. cinder-api, cinder-schedulera
6. dashboard
7. mariadb, rabbitmq, memcached等1.控制节点: keystone, glance, horizon, nova&neutron管理组件;
2.网络节点:虚机网络,L2(虚拟交换机)/L3(虚拟路由器),dhcp,route,nat等;
3.openstack基础服务compute01-02ens33:10.10.10.41-42
ens34:10.10.50.41-42
ens35:10.10.30.41-42
ens36:Vlan Tenant Network
ens37:10.10.50.41-421. nova-compute
2. neutron-openvswitch-agent, neutron-metadata-agent, neutron-l3-agent
3. cinder-volume(如果后端使用共享存储,建议部署在controller节点)
1.计算节点:hypervisor(kvm);
2.网络节点:虚机网络 L2(虚拟交换机)/L3(虚拟路由器)等;ceph01-03ens33:10.10.10.51-53
ens34:10.10.50.51-53
ens35:10.10.60.51-531. ceph-mon, ceph-mgr
2. ceph-osd1.存储节点:调度,监控(ceph)等组件;
2.存储节点:卷服务等组件
网卡配置参考 1 2 3 4 5 6 7 8 9 10 11 12 13 14 15 16 17 18 19 20 21 22 23 24 25 26 27 28 29 30 31 32 33 34 35 36 37 38 39 40 41 42 43 44 45 46 47 48 49 50 51 52 53 54 55 56 57 58 59 60 [root@controller01 ~] ==> /etc/sysconfig/network-scripts/ifcfg-ens33 <== IPV6_FAILURE_FATAL=no IPV6_ADDR_GEN_MODE=stable-privacy NAME=ens33 UUID=7fff7303-8b35-4728-a4f2-f33d20aefdf4 DEVICE=ens33 ONBOOT=yes IPADDR=10.10.10.31 NETMASK=255.255.255.0 GATEWAY=10.10.10.2 DNS1=10.10.10.2 ==> /etc/sysconfig/network-scripts/ifcfg-ens34 <== IPV6_AUTOCONF=yes IPV6_DEFROUTE=yes IPV6_FAILURE_FATAL=no IPV6_ADDR_GEN_MODE=stable-privacy NAME=ens34 UUID=8f98810c-a504-4d16-979d-4829501a8c7c DEVICE=ens34 ONBOOT=yes IPADDR=10.10.20.31 NETMASK=255.255.255.0 ==> /etc/sysconfig/network-scripts/ifcfg-ens35 <== IPV6_AUTOCONF=yes IPV6_DEFROUTE=yes IPV6_FAILURE_FATAL=no IPV6_ADDR_GEN_MODE=stable-privacy NAME=ens35 UUID=ba3ac372-df26-4226-911e-4a48031f80a8 DEVICE=ens35 ONBOOT=yes IPADDR=10.10.30.31 NETMASK=255.255.255.0 ==> /etc/sysconfig/network-scripts/ifcfg-ens36 <== IPV4_FAILURE_FATAL=no IPV6INIT=yes IPV6_AUTOCONF=yes IPV6_DEFROUTE=yes IPV6_FAILURE_FATAL=no IPV6_ADDR_GEN_MODE=stable-privacy NAME=ens36 UUID=d7ab5617-a38f-4c28-b30a-f49a1cfd0060 DEVICE=ens36 ONBOOT=yes ==> /etc/sysconfig/network-scripts/ifcfg-ens37 <== IPV6INIT=yes IPV6_AUTOCONF=yes IPV6_DEFROUTE=yes IPV6_FAILURE_FATAL=no IPV6_ADDR_GEN_MODE=stable-privacy NAME=ens40 UUID=662b80cb-31f1-386d-b293-c86cfe98d755 ONBOOT=yes IPADDR=10.10.50.31 NETMASK=255.255.255.0
升级内核 1 2 3 4 5 6 7 8 9 10 11 12 13 14 15 16 17 18 19 rpm --import https:// www.elrepo.org/RPM-GPG-KEY-elrepo.org rpm -Uvh http:// www.elrepo.org/elrepo-release-7.0 -3 .el7.elrepo.noarch.rpm yum --disablerepo=\* --enablerepo=elrepo-kernel repolist yum --disablerepo=\* --enablerepo=elrepo-kernel list kernel* yum --disablerepo=\* --enablerepo=elrepo-kernel install -y kernel-lt.x86_64 yum remove kernel-tools-libs.x86_64 kernel-tools.x86_64 -y yum --disablerepo=\* --enablerepo=elrepo-kernel install -y kernel-lt -tools.x86_64 awk -F\' ' $1=="menuentry " {print $2}' /etc/grub2.cfg #默认启动的顺序是从0开始,新内核是从头插入(目前位置在0,而4.4.4的是在1),所以需要选择0。 grub2-set-default 0
内核:5.4.152-1.el7.elrepo.x86_64
配置firewalld、selinux、ntp时间同步、hostname、hosts文件 1 2 3 4 5 6 7 8 9 10 11 12 13 14 15 16 17 18 echo "# ha-node 10.10.10.21 ha01 10.10.10.22 ha02 # controller-node 10.10.10.31 controller01 10.10.10.32 controller02 10.10.10.33 controller03 # compute-node 10.10.10.41 compute01 10.10.10.42 compute02 # ceph-node 10.10.10.51 ceph01 10.10.10.52 ceph02 10.10.10.53 ceph03 " >> /etc/hosts
配置集群 ssh 信任关系 1 2 3 4 5 6 7 8 9 10 11 12 13 14 15 16 17 ssh-keygen -t rsa -P '' ssh-copy-id -i .ssh/id_rsa.pub root@localhost scp -rp .ssh/ root@ha01 :/root scp -rp .ssh/ root@ha02 :/root scp -rp .ssh/ root@controller01 :/root scp -rp .ssh/ root@controller02 :/root scp -rp .ssh/ root@controller03 :/root scp -rp .ssh/ root@compute1 :/root scp -rp .ssh/ root@compute2 :/root scp -rp .ssh/ root@ceph01 :/root scp -rp .ssh/ root@ceph02 :/root scp -rp .ssh/ root@ceph03 :/root
完成后,集群中所有主机可以互相免密登录了
优化 ssh 登陆速度 1 2 sed -i 's/#UseDNS yes/UseDNS no/g' /etc/ssh/sshd_config systemctl restart sshd
内核参数优化 所有节点
1 2 3 4 5 6 7 echo 'modprobe br_netfilter' >> /etc/rc.d/rc.localchmod 755 /etc/rc.d/rc.localmodprobe br_netfilter echo 'net.ipv4.ip_forward = 1' >> /etc/sysctl.confecho 'net.bridge.bridge-nf-call-iptables=1' >> /etc/sysctl.confecho 'net.bridge.bridge-nf-call-ip6tables=1' >>/etc/sysctl.confsysctl -p
在 ha01 和 ha02 节点上添加,允许本地不存在 IP 绑定监听端口,允许运行中的 HAProxy 实例绑定端口到VIP
1 2 echo 'net.ipv4.ip_nonlocal_bind = 1' >> /etc/sysctl.confsysctl -p
安装基础软件包 所有节点
1 2 3 4 5 yum install epel- release - y yum install centos- release - openstack- train - y yum clean all yum makecache yum install python- openstackclient - y
openstack-utils能够让openstack安装更加简单,直接在命令行修改配置文件(全部节点)
1 2 3 4 mkdir -p /opt/toolsyum install wget crudini -y wget --no-check-certificate -P /opt/tools https://cbs.centos.org/kojifiles/packages/openstack-utils/2017.1/1.el7/noarch/openstack-utils-2017.1-1.el7.noarch.rpm rpm -ivh /opt/tools/openstack-utils-2017.1-1.el7.noarch.rpm
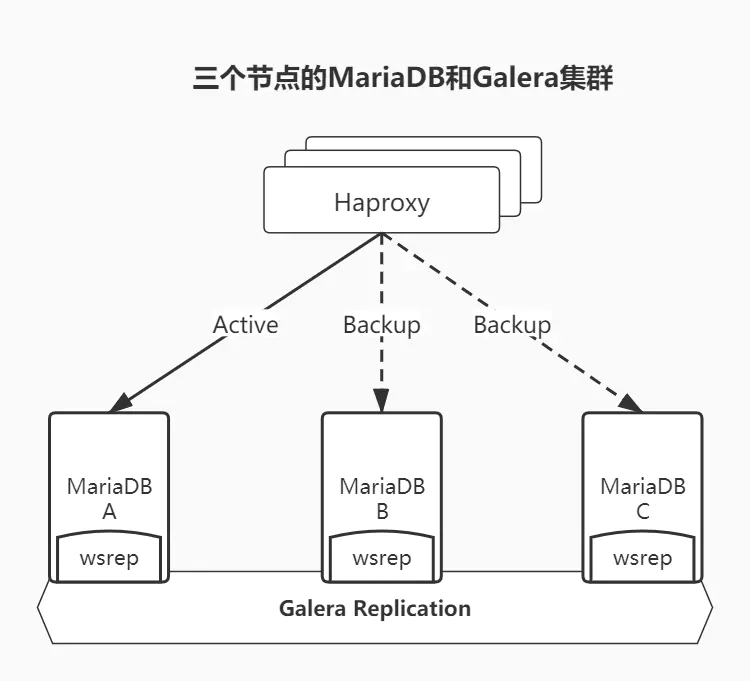
二、基础服务 MariaDB集群 采用 MariaDB + Galera 组成三个Active节点,外部访问通过Haproxy的active + backend方式代理。平时主库为A,当A出现故障,则切换到B或C节点。 目前测试将MariaDB三个节点部署到了控制节点上。
官方推荐:三个节点的MariaDB和Galera集群,建议每个集群具有4个vCPU和8 GB RAM
安装与配置修改 在全部controller节点安装mariadb,以controller01节点为例
1 yum install mariadb mariadb-server python2-PyMySQL -y
在全部controller节点安装galera相关插件,利用galera搭建集群
1 2 3 4 yum install mariadb-server-galera mariadb-galera-common galera xinetd rsync -y systemctl restart mariadb.service systemctl enable mariadb.service
在全部controller节点初始化mariadb数据库密码,以controller01节点为例
1 2 3 4 5 6 7 8 9 10 11 12 13 14 15 16 17 [root@controller01 ~] Enter current password for root (enter for none): Set root password? [Y/n] y New password: Re-enter new password: Remove anonymous users ? [Y/n] y Disallow root login remotely? [Y/n] n Remove test database and access to it? [Y/n] y Reload privilege tables now? [Y/n] y
修改mariadb配置文件
在全部控制节点/etc/my.cnf.d/目录下新增openstack.cnf配置文件,主要设置集群同步相关参数,以controller01节点为例,个别涉及ip地址/host名等参数根据当前节点实际情况修改
创建和编辑 /etc/my.cnf.d/openstack.cnf 文件
1 2 3 4 5 6 7 8 9 10 11 12 13 14 15 16 17 18 19 20 21 22 23 24 25 26 27 28 29 30 31 32 33 34 35 36 [server] [mysqld] bind-address = 10.10 .10.31 max_connections = 1000 datadir =/var/lib/mysqlsocket =/var/lib/mysql/mysql.socklog-error =/var/log/mariadb/mariadb.logpid-file =/run/mariadb/mariadb.pidmax_allowed_packet = 500 Mnet_read_timeout = 120 net_write_timeout = 300 thread_pool_idle_timeout = 300 [galera] wsrep_on =ON wsrep_provider =/usr/lib64/galera/libgalera_smm.sowsrep_cluster_name ="mariadb_galera_cluster" wsrep_cluster_address ="gcomm://controller01,controller02,controller03" wsrep_node_name ="controller01" wsrep_node_address ="10.10.10.31" binlog_format =ROWdefault_storage_engine =InnoDBinnodb_autoinc_lock_mode =2 wsrep_slave_threads =4 innodb_flush_log_at_trx_commit =2 innodb_buffer_pool_size =1024 Mwsrep_sst_method =rsync[embedded] [mariadb] [mariadb-10.3]
构建集群 停止全部控制节点的mariadb服务,以controller01节点为例
在controller01节点通过如下方式启动mariadb服务
1 /usr/libexec/mysqld --wsrep-new-cluster --user=root &
其他控制节点加入mariadb集群
1 2 systemctl start mariadb.service systemctl status mariadb.service
启动后加入集群,当前节点会从 controller01 节点同步数据,查看 mariadb 日志 /var/log/mariadb/mariadb.log
回到controller01节点重新配置mariadb
1 2 3 4 5 6 7 8 9 10 pkill -9 mysqld rm -rf /var/lib/mysql/*chown mysql:mysql /var/run/mariadb/mariadb.pidsystemctl start mariadb.service systemctl status mariadb.service
查看集群状态
1 2 3 4 5 6 7 8 9 10 11 12 13 14 15 16 17 18 19 20 21 22 23 24 25 26 [root@controller01 ~ ]# mysql - uroot - p123456 Welcome to the MariaDB monitor. Commands end with ; or \g. Your MariaDB connection id is 13 Server version: 10.3 .20 - MariaDB MariaDB Server Copyright (c) 2000 , 2018 , Oracle, MariaDB Corporation Ab and others. Type 'help;' or '\h' for help. Type '\c' to clear the current input statement. MariaDB [(none )]> show status like "wsrep_cluster_size"; + | Variable_name | Value | + | wsrep_cluster_size | 3 | + 1 row in set (0.001 sec)MariaDB [(none )]> show status LIKE 'wsrep_ready' ; + | Variable_name | Value | + | wsrep_ready | ON | + 1 row in set (0.000 sec)MariaDB [(none )]>
在controller01创建数据库,到另外两台节点上查看是否可以同步
1 2 3 4 5 6 7 8 9 10 11 12 13 [root@controller01 ~ ]# mysql - uroot - p123456 MariaDB [(none )]> create database cluster_test charset utf8mb4; Query OK, 1 row affected (0.005 sec) MariaDB [(none )]> show databases; + | Database | + | cluster_test | | information_schema | | mysql | | performance_schema | +
另外两台查看
1 2 3 4 5 6 7 8 9 10 11 12 13 14 15 16 17 18 19 [root@controller02 ~]# mysql -uroot -p123456 -e 'show databases;' +--------------------+ | Database | +--------------------+ | cluster_test | √ | information_schema | | mysql | | performance_schema | +--------------------+ [root@controller03 ~]# mysql -uroot -p123456 -e 'show databases;' +--------------------+ | Database | +--------------------+ | cluster_test | √ | information_schema | | mysql | | performance_schema | +--------------------+
设置心跳检测clustercheck 在全部控制节点下载修改 clustercheck 脚本
1 wget -P /extend/shell/ https://raw.githubusercontent.com/olafz/percona-clustercheck/master/clustercheck
在任意一个控制节点的数据库中创建 clustercheck_user 用户并赋权; 其他两台节点会自动同步
1 2 3 4 mysql -uroot -p123456 GRANT PROCESS ON *.* TO 'clustercheck' @'localhost' IDENTIFIED BY '123456' ; flush privileges; exit ;
修改所有控制节点 clustercheck 脚本,注意账号/密码与上一步新建的账号/密码对应
1 2 3 4 5 6 7 8 9 10 $ vi /extend/shell /clustercheck MYSQL_USERNAME="clustercheck" MYSQL_PASSWORD="123456" MYSQL_HOST="localhost" MYSQL_PORT="3306" ... $ chmod +x /extend/shell /clustercheck $ cp /extend/shell /clustercheck /usr/bin/
最新下载的 clustercheck 脚本好像不用设置 MYSQL_HOST 与 MYSQL_PORT 参数
/usr/bin/clustercheck 参考
1 2 3 4 5 6 7 8 9 10 11 12 13 14 15 16 17 18 19 20 21 22 23 24 25 26 27 28 29 30 31 32 33 34 35 36 37 38 39 40 41 42 43 44 45 46 47 48 49 50 51 52 53 54 55 56 57 58 59 60 61 62 63 64 65 66 67 68 69 70 71 72 73 74 75 76 77 78 79 80 81 82 83 84 85 86 87 88 89 90 91 92 93 94 95 96 97 98 99 100 101 102 103 104 105 106 107 108 109 110 111 112 113 #!/bin/bash if [[ $1 == '-h' || $1 == '--help' ]];then echo "Usage: $0 <user> <pass> <available_when_donor=0|1> <log_file> <available_when_readonly=0|1> <defaults_extra_file>" exit fi if [ -e "/var/tmp/clustercheck.disabled" ]; then echo -en "HTTP/1.1 503 Service Unavailable\r\n" echo -en "Content-Type: text/plain\r\n" echo -en "Connection: close\r\n" echo -en "Content-Length: 51\r\n" echo -en "\r\n" echo -en "Percona XtraDB Cluster Node is manually disabled.\r\n" sleep 0.1exit 1fi set -eif [ -f /etc/sysconfig/clustercheck ]; then . /etc/sysconfig/clustercheck fi MYSQL_USERNAME="clustercheck" MYSQL_PASSWORD="123456" MYSQL_HOST="localhost" MYSQL_PORT="3306" AVAILABLE_WHEN_DONOR=${AVAILABLE_WHEN_DONOR:-0} ERR_FILE="${ERR_FILE:-/dev/null} " AVAILABLE_WHEN_READONLY=${AVAILABLE_WHEN_READONLY:-1} DEFAULTS_EXTRA_FILE=${DEFAULTS_EXTRA_FILE:-/etc/my.cnf} TIMEOUT=10 EXTRA_ARGS="" if [[ -n "$MYSQL_USERNAME " ]]; then EXTRA_ARGS="$EXTRA_ARGS --user=${MYSQL_USERNAME} " fi if [[ -n "$MYSQL_PASSWORD " ]]; then EXTRA_ARGS="$EXTRA_ARGS --password=${MYSQL_PASSWORD} " fi if [[ -r $DEFAULTS_EXTRA_FILE ]];then MYSQL_CMDLINE="mysql --defaults-extra-file=$DEFAULTS_EXTRA_FILE -nNE --connect-timeout=$TIMEOUT \ ${EXTRA_ARGS} " else MYSQL_CMDLINE="mysql -nNE --connect-timeout=$TIMEOUT ${EXTRA_ARGS} " fi WSREP_STATUS=$($MYSQL_CMDLINE -e "SHOW STATUS LIKE 'wsrep_local_state';" \ 2>${ERR_FILE} | tail -1 2>>${ERR_FILE} ) if [[ "${WSREP_STATUS} " == "4" ]] || [[ "${WSREP_STATUS} " == "2" && ${AVAILABLE_WHEN_DONOR} == 1 ]]then if [[ $AVAILABLE_WHEN_READONLY -eq 0 ]];then READ_ONLY=$($MYSQL_CMDLINE -e "SHOW GLOBAL VARIABLES LIKE 'read_only';" \ 2>${ERR_FILE} | tail -1 2>>${ERR_FILE} ) if [[ "${READ_ONLY} " == "ON" ]];then echo -en "HTTP/1.1 503 Service Unavailable\r\n" echo -en "Content-Type: text/plain\r\n" echo -en "Connection: close\r\n" echo -en "Content-Length: 43\r\n" echo -en "\r\n" echo -en "Percona XtraDB Cluster Node is read-only.\r\n" sleep 0.1 exit 1 fi fi echo -en "HTTP/1.1 200 OK\r\n" echo -en "Content-Type: text/plain\r\n" echo -en "Connection: close\r\n" echo -en "Content-Length: 40\r\n" echo -en "\r\n" echo -en "Percona XtraDB Cluster Node is synced.\r\n" sleep 0.1exit 0else echo -en "HTTP/1.1 503 Service Unavailable\r\n" echo -en "Content-Type: text/plain\r\n" echo -en "Connection: close\r\n" echo -en "Content-Length: 44\r\n" echo -en "\r\n" echo -en "Percona XtraDB Cluster Node is not synced.\r\n" sleep 0.1exit 1fi
创建心跳检测服务
在全部控制节点新增心跳检测服务配置文件/etc/xinetd.d/galera-monitor,以controller01节点为例
1 2 3 4 5 6 7 8 9 10 11 12 13 14 15 16 17 18 19 20 $ vi /etc/xinetd.d/galera-monitor service galera-monitor { port = 9200 disable = no socket_type = stream protocol = tcp wait = no user = root group = root groups = yes server = /usr/bin/clustercheck type = UNLISTED per_source = UNLIMITED log_on_success = log_on_failure = HOST flags = REUSE }
修改 /etc/services
1 2 3 4 ... #wap-wsp 9200/tcp # WAP connectionless session service galera-monitor 9200/tcp # galera-monitor ...
启动 xinetd 服务
1 2 3 4 5 systemctl daemon-reload systemctl enable xinetd systemctl start xinetd systemctl status xinetd
测试心跳检测脚本
在全部控制节点验证,以controller01节点为例
1 2 3 4 5 6 7 $ /usr/bin/clustercheck HTTP/1.1 200 OK Content-Type: text/plain Connection: close Content-Length: 40 Percona XtraDB Cluster Node is synced.
异常关机或异常断电后的修复 当突然停电,所有galera主机都非正常关机,来电后开机,会导致galera集群服务无法正常启动。以下为处理办法
1 2 3 4 5 6 7 8 9 10 11 12 13 14 15 16 17 18 19 20 21 22 23 24 第1步:开启galera集群的群主主机的mariadb服务。 第2步:开启galera集群的成员主机的mariadb服务。 异常处理:galera集群的群主主机和成员主机的mysql服务无法启动,如何处理? 第1步、删除garlera群主主机的/var/lib/mysql/grastate.dat状态文件 /bin/galera_new_cluster启动服务。启动正常。登录并查看wsrep状态。 第2步:删除galera成员主机中的/var/lib/mysql/grastate.dat状态文件 systemctl restart mariadb重启服务。启动正常。登录并查看wsrep状态。 第1步、修改garlera群主主机的/var/lib/mysql/grastate.dat状态文件中的0为1 /bin/galera_new_cluster启动服务。启动正常。登录并查看wsrep状态。 第2步:修改galera成员主机中的/var/lib/mysql/grastate.dat状态文件中的0为1 systemctl restart mariadb重启服务。启动正常。登录并查看wsrep状态。 经过实际发现,以下操作步骤也可以: 第1步、修改garlera群主主机的/var/lib/mysql/grastate.dat状态文件中的0为1 systemctl restart mariadb重启服务 第2步:修改galera成员主机直接使用systemctl restart mariadb重启服务
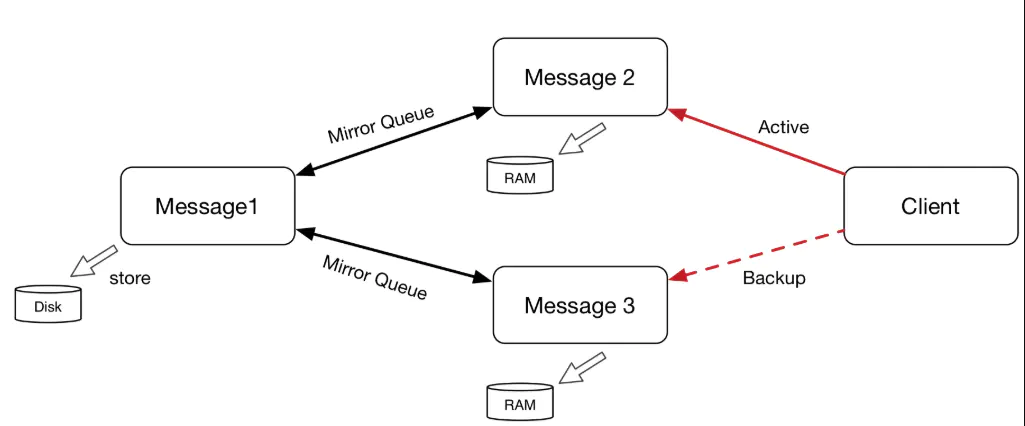
RabbitMQ集群 RabbitMQ采用原生Cluster集群,所有节点同步镜像队列。三台物理机,其中2个Mem节点主要提供服务,1个Disk节点用于持久化消息,客户端根据需求分别配置主从策略。
目前测试将RabbitMQ三个节点部署到了控制节点上。
下载相关软件包(所有控制节点) 以controller01节点为例,RabbbitMQ基与erlang开发,首先安装erlang,采用yum方式
1 2 yum install erlang rabbitmq-server -y systemctl enable rabbitmq-server.service
构建rabbitmq集群 任选1个控制节点首先启动rabbitmq服务
这里选择controller01节点
1 2 systemctl start rabbitmq- server.service rabbitmqctl cluster_status
分发.erlang.cookie到其他控制节点
1 2 scp -p /var /lib/rabbitmq/.erlang .cookie controller02 :/var/ lib/rabbitmq/ scp -p /var /lib/rabbitmq/.erlang .cookie controller03 :/var/ lib/rabbitmq/
修改controller02和03节点.erlang.cookie文件的用户/组
1 2 3 [root@controller02 ~ ]# chown rabbitmq:rabbitmq /var/lib/rabbitmq/.erlang.cookie [root@controller03 ~ ]# chown rabbitmq:rabbitmq /var/lib/rabbitmq/.erlang.cookie
注意:修改全部控制节点.erlang.cookie文件的权限,默认为400权限,可用不修改
启动controller02和03节点的rabbitmq服务
1 2 3 [root@controller02 ~ ]# systemctl start rabbitmq-server [root@controller03 ~ ]# systemctl start rabbitmq-server
构建集群,controller02和03节点以ram节点的形式加入集群
controller02
1 2 3 rabbitmqctl stop_app rabbitmqctl join_cluster --ram rabbit@controller01 rabbitmqctl start_app
controller03
1 2 3 rabbitmqctl stop_app rabbitmqctl join_cluster --ram rabbit@controller01 rabbitmqctl start_app
任意控制节点查看RabbitMQ集群状态
1 2 3 4 5 6 7 8 9 10 $ rabbitmqctl cluster_status Cluster status of node rabbit@controller01 [{nodes,[{disc,[rabbit@controller01]}, {ram,[rabbit@controller03,rabbit@controller02]}]}, {running_nodes,[rabbit@controller03,rabbit@controller02,rabbit@controller01]}, {cluster_name,<<"rabbit@controller01" >>}, {partitions,[]}, {alarms,[{rabbit@controller03,[]}, {rabbit@controller02,[]}, {rabbit@controller01,[]}]}]
创建rabbitmq管理员账号
1
2
3
4
5
6
7
8
9
10
11
12
13
14
15
16
17
# 在任意节点新建账号并设置密码,以controller01节点为例 [root@controller01 ~ ]# rabbitmqctl add_user openstack 123456 Creating user "openstack" # 设置新建账号的状态 [root@controller01 ~ ]# rabbitmqctl set_user_tags openstack administrator Setting tags for user "openstack" to [administrator] # 设置新建账号的权限 [root@controller01 ~ ]# rabbitmqctl set_permissions -p "/" openstack ".*" ".*" ".*" Setting permissions for user "openstack" in vhost "/" # 查看账号 [root@controller01 ~ ]# rabbitmqctl list_users Listing users openstack [administrator] guest [administrator]
镜像队列的ha
设置镜像队列高可用
1 2 [root@controller01 ~ ]# rabbitmqctl set_policy ha- all "^" '{"ha-mode":"all"}' Setting policy "ha-all" for pattern "^" to "{\"ha- mode\":\"all \"}" with priority "0"
任意控制节点查看镜像队列策略
1 2 3 [root@controller01 ~] # rabbitmqctl list_policiesListing policies / ha-all all ^ {"ha-mode":"all" } 0
安装web管理插件
在全部控制节点安装web管理插件,以controller01节点为例
1 2 3 4 5 6 7 8 9 10 11 12 13 14 15 [root@controller01 ~] The following plugins have been enabled: amqp_client cowlib cowboy rabbitmq_web_dispatch rabbitmq_management_agent rabbitmq_management Applying plugin configuration to rabbit@controller01 ... started 6 plugins.[root@controller01 ~] LISTEN 0 128 *: 25672 *:* users: (("beam" ,pid=2222 ,fd=42 ))LISTEN 0 1024 *: 15672 *:* users: (("beam" ,pid=2222 ,fd=54 ))LISTEN 0 128 [: : ]: 5672 [: : ]:* users: (("beam" ,pid=2222 ,fd=53 ))
Memcached集群 Memcached是无状态的,各控制节点独立部署,openstack各服务模块统一调用多个控制节点的memcached服务即可。
安装memcache的软件包 在全部控制节点安装
1 yum install memcached python-memcached -y
设置memcached 在全部安装memcached服务的节点设置服务监听本地地址
1 sed -i 's|127.0.0.1,::1|0.0.0.0|g' /etc/sysconfig/memcached
启动服务 1 2 3 4 systemctl enable memcached.service systemctl start memcached.service systemctl status memcached.service ss -tnlp|grep memcached
高可用 haproxy + keepalived Openstack官网使用开源的pacemaker cluster stack做为集群高可用资源管理软件。但是我没接触过,也不想去研究了,直接使用熟悉的配方:haproxy + keepalived。
vip规划:10.10.10.10
安装软件 两台 ha 节点执行
1 yum install haproxy keepalived -y
配置 keepalived 修改 ha01 节点 keepalived 配置 /etc/keepalived/keepalived.conf:
1 2 3 4 5 6 7 8 9 10 11 12 13 14 15 16 17 18 19 20 21 22 23 24 25 26 27 28 29 30 31 32 33 34 35 36 37 38 39 40 41 ! Configuration File for keepalivedglobal_defs {notification_email {acassen@ firewall.loc failover@ firewall.loc sysadmin@ firewall.loc } notification_email_from Alexandre.Cassen@ firewall.loc smtp_server 127.0 .0 .1 smtp_connect_timeout 30 router_id LVS_DEVEL vrrp_skip_check_adv_addr #vrrp_strict vrrp_garp_interval 0 vrrp_gna_interval 0 } vrrp_script chk_haproxy { script "/data/sh/check_haproxy.sh" interval 2 weight 2 } vrrp_instance VI_1 { state MASTER interface ens33virtual_router_id 51 priority 100 advert_int 1 authentication {auth_type PASS auth_pass 1111 } virtual_ipaddress {10.10 .10 .10 } track_script {chk_haproxy } }
修改 ha02 节点 keepalived 配置 /etc/keepalived/keepalived.conf:
1 2 3 4 5 6 7 8 9 10 11 12 13 14 15 16 17 18 19 20 21 22 23 24 25 26 27 28 29 30 31 32 33 34 35 36 37 38 39 40 41 ! Configuration File for keepalivedglobal_defs {notification_email {acassen@ firewall.loc failover@ firewall.loc sysadmin@ firewall.loc } notification_email_from Alexandre.Cassen@ firewall.loc smtp_server 127.0 .0 .1 smtp_connect_timeout 30 router_id LVS_DEVEL vrrp_skip_check_adv_addr #vrrp_strict vrrp_garp_interval 0 vrrp_gna_interval 0 } vrrp_script chk_haproxy { script "/data/sh/check_haproxy.sh" interval 2 weight 2 } vrrp_instance VI_1 { state BACKUP interface ens33virtual_router_id 51 priority 90 advert_int 1 authentication {auth_type PASS auth_pass 1111 } virtual_ipaddress {10.10 .10 .10 } track_script {chk_haproxy } }
ha01 和 ha02 添加 haproxy 检测脚本:
1 2 3 4 5 6 7 8 9 10 11 12 13 $ mkdir -p /data/sh/$ vi /data/sh/check_haproxy.sh # !/bin/bash # auto check haprox process haproxy_process_count=$(ps aux|grep haproxy|grep -v check_haproxy|grep -v grep|wc -l) if [[ $haproxy_process_count == 0 ]];then systemctl stop keepalived fi $ chmod 755 /data/sh/check_haproxy.sh
启动 haproxy 与 keepalived 1 2 3 4 5 6 systemctl enable haproxy systemctl start haproxy systemctl status haproxy systemctl enable keepalived systemctl start keepalived systemctl status keepalived
启动正常后,在 ha01 节点应该可以看到已经正常添加 vip 10.10.10.10
测试高可用 在 ha01 停止 haproxy,正常的话 vip 会漂移到 ha02 主机上
在 ha01 重新启动 haproxy 和 keepalived 后 vip 会漂移回来
配置 haproxy 建议开启haproxy的日志功能,便于后续的问题排查
1 2 mkdir /var/log/haproxychmod a+w /var/log/haproxy
在rsyslog文件下修改以下字段
1 2 3 4 5 6 7 8 9 10 11 12 13 14 15 $ vi /etc/rsyslog.conf19 $ModLoad imudp20 $UDPServerRun 514 24 $ModLoad imtcp25 $InputTCPServerRun 514 local0.=info -/var/log /haproxy/haproxy -info.log local0.=err -/var/log /haproxy/haproxy -err.log local0.notice;local0.!=err -/var/log /haproxy/haproxy -notice.log $ systemctl restart rsyslog
haproxy 配置中涉及服务较多,这里针对涉及到的 openstack 服务,一次性设置完成
全部 ha 节点都需配置,配置文件 /etc/haproxy/haproxy.cfg
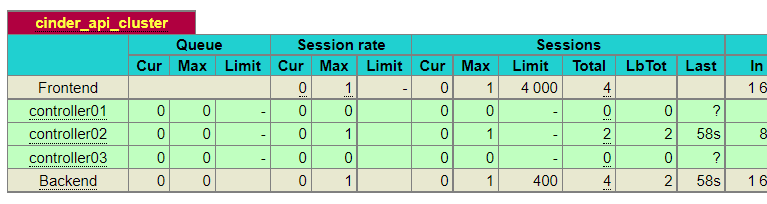
1 2 3 4 5 6 7 8 9 10 11 12 13 14 15 16 17 18 19 20 21 22 23 24 25 26 27 28 29 30 31 32 33 34 35 36 37 38 39 40 41 42 43 44 45 46 47 48 49 50 51 52 53 54 55 56 57 58 59 60 61 62 63 64 65 66 67 68 69 70 71 72 73 74 75 76 77 78 79 80 81 82 83 84 85 86 87 88 89 90 91 92 93 94 95 96 97 98 99 100 101 102 103 104 105 106 107 108 109 110 111 112 113 114 115 116 117 118 119 120 121 122 123 124 125 126 127 128 129 130 131 132 133 134 135 136 137 138 139 140 141 142 143 144 145 146 147 148 149 150 151 152 153 global log 127.0 .0 .1 local0 chroot /var/lib/haproxy daemon group haproxy user haproxy maxconn 4000 pidfile /var/run/haproxy.pid stats socket /var/lib/haproxy/stats defaults mode http log global maxconn 4000 option httplog option redispatch retries 3 timeout http-request 10s timeout queue 1m timeout connect 10s timeout client 1m timeout server 1m timeout check 10s listen stats bind 0.0 .0 .0 :1080 mode http stats enable stats uri / stats realm OpenStack\ Haproxy stats auth admin:123456 stats refresh 30s stats show-node stats show-legends stats hide-version listen dashboard_cluster bind 10.10 .10 .10 :80 balance source option tcpka option httpchk option tcplog server controller01 10.10 .10 .31 :80 check inter 2000 rise 2 fall 5 server controller02 10.10 .10 .32 :80 check inter 2000 rise 2 fall 5 server controller03 10.10 .10 .33 :80 check inter 2000 rise 2 fall 5 listen galera_cluster bind 10.10 .10 .10 :3306 balance source mode tcp server controller01 10.10 .10 .31 :3306 check inter 2000 rise 2 fall 5 server controller02 10.10 .10 .32 :3306 backup check inter 2000 rise 2 fall 5 server controller03 10.10 .10 .33 :3306 backup check inter 2000 rise 2 fall 5 listen rabbitmq_cluster bind 10.10 .10 .10 :5672 mode tcp option tcpka balance roundrobin timeout client 3h timeout server 3h option clitcpka server controller01 10.10 .10 .31 :5672 check inter 10s rise 2 fall 5 server controller02 10.10 .10 .32 :5672 check inter 10s rise 2 fall 5 server controller03 10.10 .10 .33 :5672 check inter 10s rise 2 fall 5 listen glance_api_cluster bind 10.10 .10 .10 :9292 balance source option tcpka option httpchk option tcplog timeout client 3h timeout server 3h server controller01 10.10 .10 .31 :9292 check inter 2000 rise 2 fall 5 server controller02 10.10 .10 .32 :9292 check inter 2000 rise 2 fall 5 server controller03 10.10 .10 .33 :9292 check inter 2000 rise 2 fall 5 listen keystone_public_cluster bind 10.10 .10 .10 :5000 balance source option tcpka option httpchk option tcplog server controller01 10.10 .10 .31 :5000 check inter 2000 rise 2 fall 5 server controller02 10.10 .10 .32 :5000 check inter 2000 rise 2 fall 5 server controller03 10.10 .10 .33 :5000 check inter 2000 rise 2 fall 5 listen nova_compute_api_cluster bind 10.10 .10 .10 :8774 balance source option tcpka option httpchk option tcplog server controller01 10.10 .10 .31 :8774 check inter 2000 rise 2 fall 5 server controller02 10.10 .10 .32 :8774 check inter 2000 rise 2 fall 5 server controller03 10.10 .10 .33 :8774 check inter 2000 rise 2 fall 5 listen nova_placement_cluster bind 10.10 .10 .10 :8778 balance source option tcpka option tcplog server controller01 10.10 .10 .31 :8778 check inter 2000 rise 2 fall 5 server controller02 10.10 .10 .32 :8778 check inter 2000 rise 2 fall 5 server controller03 10.10 .10 .33 :8778 check inter 2000 rise 2 fall 5 listen nova_metadata_api_cluster bind 10.10 .10 .10 :8775 balance source option tcpka option tcplog server controller01 10.10 .10 .31 :8775 check inter 2000 rise 2 fall 5 server controller02 10.10 .10 .32 :8775 check inter 2000 rise 2 fall 5 server controller03 10.10 .10 .33 :8775 check inter 2000 rise 2 fall 5 listen nova_vncproxy_cluster bind 10.10 .10 .10 :6080 balance source option tcpka option tcplog server controller01 10.10 .10 .31 :6080 check inter 2000 rise 2 fall 5 server controller02 10.10 .10 .32 :6080 check inter 2000 rise 2 fall 5 server controller03 10.10 .10 .33 :6080 check inter 2000 rise 2 fall 5 listen neutron_api_cluster bind 10.10 .10 .10 :9696 balance source option tcpka option httpchk option tcplog server controller01 10.10 .10 .31 :9696 check inter 2000 rise 2 fall 5 server controller02 10.10 .10 .32 :9696 check inter 2000 rise 2 fall 5 server controller03 10.10 .10 .33 :9696 check inter 2000 rise 2 fall 5 listen cinder_api_cluster bind 10.10 .10 .10 :8776 balance source option tcpka option httpchk option tcplog server controller01 10.10 .10 .31 :8776 check inter 2000 rise 2 fall 5 server controller02 10.10 .10 .32 :8776 check inter 2000 rise 2 fall 5 server controller03 10.10 .10 .33 :8776 check inter 2000 rise 2 fall 5
重启 haproxy
1 2 systemctl restart haproxy systemctl status haproxy
访问 haproxy 自带 web 管理页面:
http://10.10.10.10:1080/ or http://10.10.10.21:1080/ or http://10.10.10.22:1080/
admin 123456
每个项的状态可以清晰看到;可以看到很多为红色,正常,因为这些服务现在还未安装;
至此,openstack的基础依赖服务基本部署完成。
三、Keystone集群部署 Keystone 的主要功能:
管理用户及其权限;
维护 OpenStack 服务的 Endpoint;
Authentication(认证)和 Authorization(鉴权)。
创建keystone数据库 在任意控制节点创建数据库,数据库自动同步
1 2 3 4 5 6 mysql - uroot - p123456 create database keystone;GRANT ALL PRIVILEGES ON keystone.* TO 'keystone' @'%' IDENTIFIED BY '123456' ;GRANT ALL PRIVILEGES ON keystone.* TO 'keystone' @'localhost' IDENTIFIED BY '123456' ;flush privileges; exit;
安装keystone 在全部控制节点安装 keystone
1 2 3 4 5 6 7 8 9 10 wget ftp://ftp.pbone.net/mirror/archive.fedoraproject.org/epel/testing/6.2019-05-29/x86_64/Packages/p/python2-qpid-proton-0.28.0-1.el7.x86_64.rpm wget ftp://ftp.pbone.net/mirror/vault.centos.org/7.8.2003/messaging/x86_64/qpid-proton/Packages/q/qpid-proton-c-0.28.0-1.el7.x86_64.rpm rpm -ivh qpid-proton-c-0.28.0-1.el7.x86_64.rpm rpm -ivh python2-qpid-proton-0.28.0-1.el7.x86_64.rpm yum install openstack-keystone httpd mod_wsgi mod_ssl -y cp /etc/keystone/keystone.conf{,.bak}egrep -v '^$|^#' /etc/keystone/keystone.conf.bak > /etc/keystone/keystone.conf
如果要使用https访问,需要安装mod_ssl
自带的 python2-qpid-proton 为 0.26,不满足版本需求,需升级
配置Keystone 1 2 3 4 5 openstack-config --set /etc/keystone/keystone.conf cache backend oslo_cache.memcache_pool openstack-config --set /etc/keystone/keystone.conf cache enabled true openstack-config --set /etc/keystone/keystone.conf cache memcache_servers controller01:11211,controller02:11211,controller03:11211 openstack-config --set /etc/keystone/keystone.conf database connection mysql+pymysql://keystone:[email protected] /keystone openstack-config --set /etc/keystone/keystone.conf token provider fernet
初始化keystone数据库 在任意控制节点操作
1 2 3 4 5 6 7 8 9 10 11 12 13 14 15 16 17 18 19 20 21 22 23 24 25 26 27 28 29 30 31 32 33 34 35 36 37 38 39 40 41 42 43 44 45 46 47 48 49 50 51 52 53 54 55 56 57 # keystone用户初始化数据库 $ su -s /bin/sh -c keystone# 验证数据库 $ mysql -uroot -p123456 keystone -e ;+------------------------------------+ | Tables_in_keystone | +------------------------------------+ | access_rule | | access_token | | application_credential | | application_credential_access_rule | | application_credential_role | | assignment | | config_register | | consumer | | credential | | endpoint | | endpoint_group | | federated_user | | federation_protocol | | group | | id_mapping | | identity_provider | | idp_remote_ids | | implied_role | | limit | | local_user | | mapping | | migrate_version | | nonlocal_user | | password | | policy | | policy_association | | project | | project_endpoint | | project_endpoint_group | | project_option | | project_tag | | region | | registered_limit | | request_token | | revocation_event | | role | | role_option | | sensitive_config | | service | | service_provider | | system_assignment | | token | | trust | | trust_role | | user | | user_group_membership | | user_option | | whitelisted_config | +------------------------------------+
初始化Fernet密钥存储库,无报错即为成功
1 2 3 4 5 6 7 8 9 10 11 keystone-manage fernet_setup --keystone-user keystone --keystone-group keystone keystone-manage credential_setup --keystone-user keystone --keystone-group keystone scp -rp /etc/keystone/fernet-keys /etc/keystone/credential-keys controller02:/etc/keystone/ scp -rp /etc/keystone/fernet-keys /etc/keystone/credential-keys controller03:/etc/keystone/ chown -R keystone:keystone /etc/keystone/credential-keys/chown -R keystone:keystone /etc/keystone/fernet-keys/
认证引导
任意控制节点操作;初始化admin用户(管理用户)与密码,3种api端点,服务实体可用区等
注意:这里使用的是vip
1 2 3 4 5 keystone- manage bootstrap -- bootstrap- password 123456 \ -- bootstrap- admin- url http: -- bootstrap- internal - url http: -- bootstrap- public - url http: -- bootstrap- region- id RegionOne
配置Http Server 在全部控制节点设置,以controller01节点为例
配置 httpd.conf
1 2 3 4 5 6 7 8 9 10 11 12 13 cp /etc/httpd/conf/httpd.conf{,.bak}sed -i "s/#ServerName www.example.com:80/ServerName ${HOSTNAME} /" /etc/httpd/conf/httpd.conf sed -i "s/Listen\ 80/Listen\ 10.10.10.31:80/g" /etc/httpd/conf/httpd.conf sed -i "s/Listen\ 80/Listen\ 10.10.10.32:80/g" /etc/httpd/conf/httpd.conf sed -i "s/Listen\ 80/Listen\ 10.10.10.33:80/g" /etc/httpd/conf/httpd.conf
配置wsgi-keystone.conf
1 2 3 4 5 6 7 8 9 10 11 12 13 14 15 ln -s /usr/share/keystone/wsgi-keystone.conf /etc/httpd/conf.d/sed -i "s/Listen\ 5000/Listen\ 10.10.10.31:5000/g" /etc/httpd/conf.d/wsgi-keystone.conf sed -i "s#*:5000#10.10.10.31:5000#g" /etc/httpd/conf.d/wsgi-keystone.conf sed -i "s/Listen\ 5000/Listen\ 10.10.10.32:5000/g" /etc/httpd/conf.d/wsgi-keystone.conf sed -i "s#*:5000#10.10.10.32:5000#g" /etc/httpd/conf.d/wsgi-keystone.conf sed -i "s/Listen\ 5000/Listen\ 10.10.10.33:5000/g" /etc/httpd/conf.d/wsgi-keystone.conf sed -i "s#*:5000#10.10.10.33:5000#g" /etc/httpd/conf.d/wsgi-keystone.conf
启动服务
1 2 3 systemctl restart httpd.service systemctl enable httpd.service systemctl status httpd.service
配置admin用户变量脚本
1 2 3 openstack client环境脚本定义client调用openstack api环境变量,以方便api的调用(不必在命令行中携带环境变量); 官方文档将admin用户和demo租户的变量写入到了家目录下,根据不同的用户角色,需要定义不同的脚本; 一般将脚本创建在用户主目录
admin-openrc
1 2 3 4 5 6 7 8 9 10 11 12 13 14 15 16 17 18 19 20 21 22 23 24 25 26 27 28 $ cat >> ~/admin-openrc << EOF # admin-openrc export OS_USERNAME=admin export OS_PASSWORD=123456 export OS_PROJECT_NAME=admin export OS_USER_DOMAIN_NAME=Default export OS_PROJECT_DOMAIN_NAME=Default export OS_AUTH_URL=http://10.10.10.10:5000/v3 export OS_IDENTITY_API_VERSION=3 export OS_IMAGE_API_VERSION=2 EOF $ source ~/admin-openrc $ openstack domain list +---------+---------+---------+--------------------+ | ID | Name | Enabled | Description | +---------+---------+---------+--------------------+ | default | Default | True | The default domain | +---------+---------+---------+--------------------+ $ openstack token issue scp -rp ~/admin-openrc controller02:~/ scp -rp ~/admin-openrc controller03:~/
创建新域、项目、用户和角色 身份服务为每个OpenStack服务提供身份验证服务,其中包括服务使用域、项目、用户和角色的组合。
在任意控制节点操作
创建域 1 2 3 4 5 6 7 8 9 10 11 12 13 14 15 16 17 18 19 $ openstack domain create --description example+-------------+----------------------------------+ | Field | Value | +-------------+----------------------------------+ | description | An Example Domain | | enabled | True | | id | 4 a208138a0004bb1a05d6c61e14f47dc | | name | example | | options | {} | | tags | [] | +-------------+----------------------------------+ $ openstack domain list+----------------------------------+---------+---------+--------------------+ | ID | Name | Enabled | Description | +----------------------------------+---------+---------+--------------------+ | 4 a208138a0004bb1a05d6c61e14f47dc | example | True | An Example Domain | | default | Default | True | The default domain | +----------------------------------+---------+---------+--------------------+
创建demo项目 由于admin的项目角色用户都已经存在了;重新创建一个新的项目角色demo
以创建demo项目为例,demo项目属于”default”域
1 openstack project create --domain default --description "demo Project" demo
创建demo用户 需要输入新用户的密码
--password-prompt 为交互式; --password+密码 为非交互式
1 openstack user create --domain default --password 123456 demo
创建user角色 1 openstack role create user
查看角色
将user角色添加到demo项目和demo用户
1 openstack role add --project demo --user demo user
配置 demo 用户变量脚本
1 2 3 4 5 6 7 8 9 10 11 12 13 14 15 16 17 18 cat >> ~/demo-openrc << EOF #demo-openrc export OS_USERNAME=demo export OS_PASSWORD=123456 export OS_PROJECT_NAME= export OS_USER_DOMAIN_NAME=Default export OS_PROJECT_DOMAIN_NAME=Default export OS_AUTH_URL=http://10.10.10.10:5000/v3 export OS_IDENTITY_API_VERSION=3 export OS_IMAGE_API_VERSION=2 EOF source ~/demo-openrcopenstack token issue scp -rp ~/demo-openrc controller02:~/ scp -rp ~/demo-openrc controller03:~/
验证keystone 任意一台控制节点;以admin用户身份,请求身份验证令牌, 使用admin用户变量
1 2 3 4 $ source admin-openrc $ openstack --os-auth-url http: --os-project-domain-name Default --os-user-domain-name Default \ --os-project-name admin --os-username admin token issue
任意一台控制节点;以demo用户身份,请请求认证令牌, 使用demo用户变量
1 2 3 4 $ source demo-openrc $ openstack --os-auth-url http: --os-project-domain-name Default --os-user-domain-name Default \ --os-project-name demo --os-username demo token issue
四、Glance集群部署 Glance 具体功能如下:
提供 RESTful API 让用户能够查询和获取镜像的元数据和镜像本身;
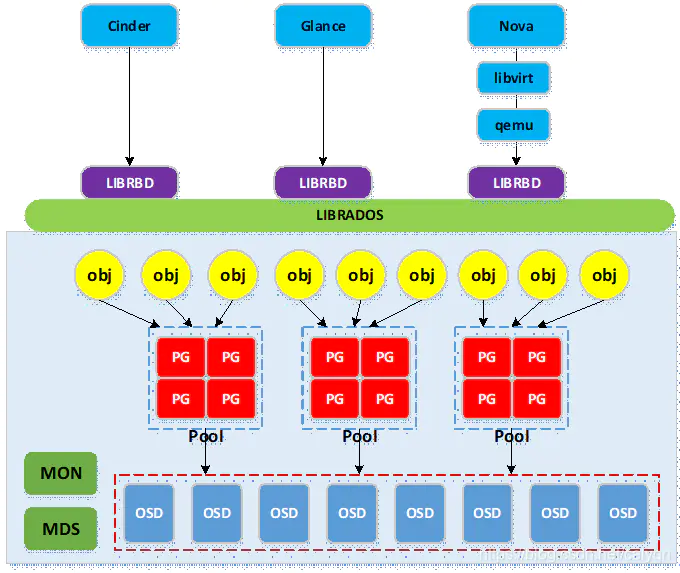
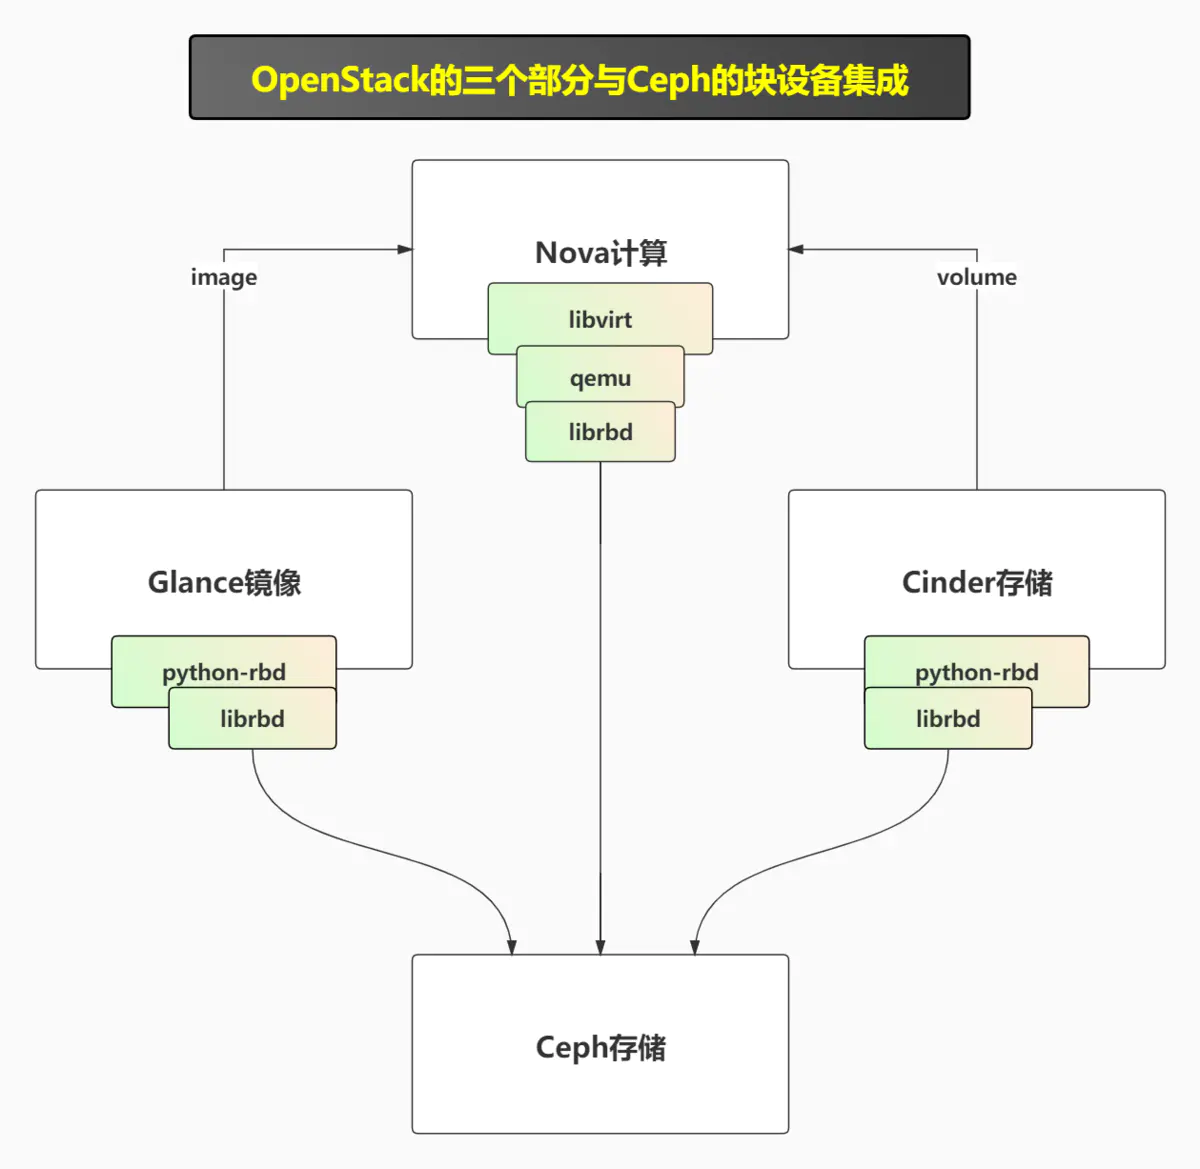
支持多种方式存储镜像,包括普通的文件系统、Swift、Ceph 等;
对实例执行快照创建新的镜像。
创建glance数据库 在任意控制节点创建数据库,数据库自动同步,以controller01节点为例
1 2 3 4 5 6 mysql - u root - p123456 CREATE DATABASE glance;GRANT ALL PRIVILEGES ON glance.* TO 'glance' @'localhost' IDENTIFIED BY '123456' ;GRANT ALL PRIVILEGES ON glance.* TO 'glance' @'%' IDENTIFIED BY '123456' ;flush privileges; exit;
创建glance-api相关服务凭证 在任意控制节点创建数据库,以controller01节点为例
1 2 3 4 5 6 7 8 9 10 11 12 13 14 15 16 17 18 19 20 source ~ / admin- openrc # 创建service项目 openstack project create # 创建glance用户 openstack user create # 将管理员admin用户添加到glance用户和项目中 openstack role add # 创建glance服务实体 openstack service create # 创建glance- api; openstack endpoint create openstack endpoint create openstack endpoint create # 查看创建之后的api; openstack endpoint list
部署与配置glance 安装glance 在全部控制节点安装glance,以controller01节点为例
1 2 3 4 5 yum install openstack-glance python-glance python-glanceclient -y cp /etc/glance/glance-api.conf{,.bak}egrep -v '^$|^#' /etc/glance/glance-api.conf.bak >/etc/glance/glance-api.conf
配置glance-api.conf 注意 bind_host 参数,根据不同节点修改;以controller01节点为例
1 2 3 4 5 6 7 8 9 10 11 12 13 14 15 openstack-config --set /etc/glance/glance-api.conf DEFAULT bind_host 10.10.10.31 openstack-config --set /etc/glance/glance-api.conf database connection mysql+pymysql://glance:[email protected] /glance openstack-config --set /etc/glance/glance-api.conf glance_store stores file,http openstack-config --set /etc/glance/glance-api.conf glance_store default_store file openstack-config --set /etc/glance/glance-api.conf glance_store filesystem_store_datadir /var/lib/glance/images/ openstack-config --set /etc/glance/glance-api.conf keystone_authtoken www_authenticate_uri http://10.10.10.10:5000 openstack-config --set /etc/glance/glance-api.conf keystone_authtoken auth_url http://10.10.10.10:5000 openstack-config --set /etc/glance/glance-api.conf keystone_authtoken memcached_servers controller01:11211,controller02:11211,controller03:11211 openstack-config --set /etc/glance/glance-api.conf keystone_authtoken auth_type password openstack-config --set /etc/glance/glance-api.conf keystone_authtoken project_domain_name Default openstack-config --set /etc/glance/glance-api.conf keystone_authtoken user_domain_name Default openstack-config --set /etc/glance/glance-api.conf keystone_authtoken project_name service openstack-config --set /etc/glance/glance-api.conf keystone_authtoken username glance openstack-config --set /etc/glance/glance-api.conf keystone_authtoken password 123456 openstack-config --set /etc/glance/glance-api.conf paste_deploy flavor keystone
创建镜像存储目录并赋权限 /var/lib/glance/images是默认的存储目录,在全部控制节点创建
1 2 mkdir /var/lib/glance/images/chown glance:nobody /var/lib/glance/images
初始化glance数据库 任意控制节点操作
1 su -s /bin/sh -c "glance-manage db_sync" glance
验证glance数据库是否正常写入
1 2 3 4 5 6 7 8 9 10 11 12 13 14 15 16 17 18 19 20 $ mysql -uglance -p123456 -e +----------------------------------+ | Tables_in_glance | +----------------------------------+ | alembic_version | | image_locations | | image_members | | image_properties | | image_tags | | images | | metadef_namespace_resource_types | | metadef_namespaces | | metadef_objects | | metadef_properties | | metadef_resource_types | | metadef_tags | | migrate_version | | task_info | | tasks | +----------------------------------+
启动服务 全部控制节点
1 2 3 4 5 systemctl enable openstack-glance-api.service systemctl restart openstack-glance-api.service systemctl status openstack-glance-api.service sleep 3slsof -i:9292
下载cirros镜像验证glance服务 在任意控制节点上;下载cirros镜像;格式指定为qcow2,bare;设置public权限;
镜像生成后,在指定的存储目录下生成以镜像id命名的镜像文件
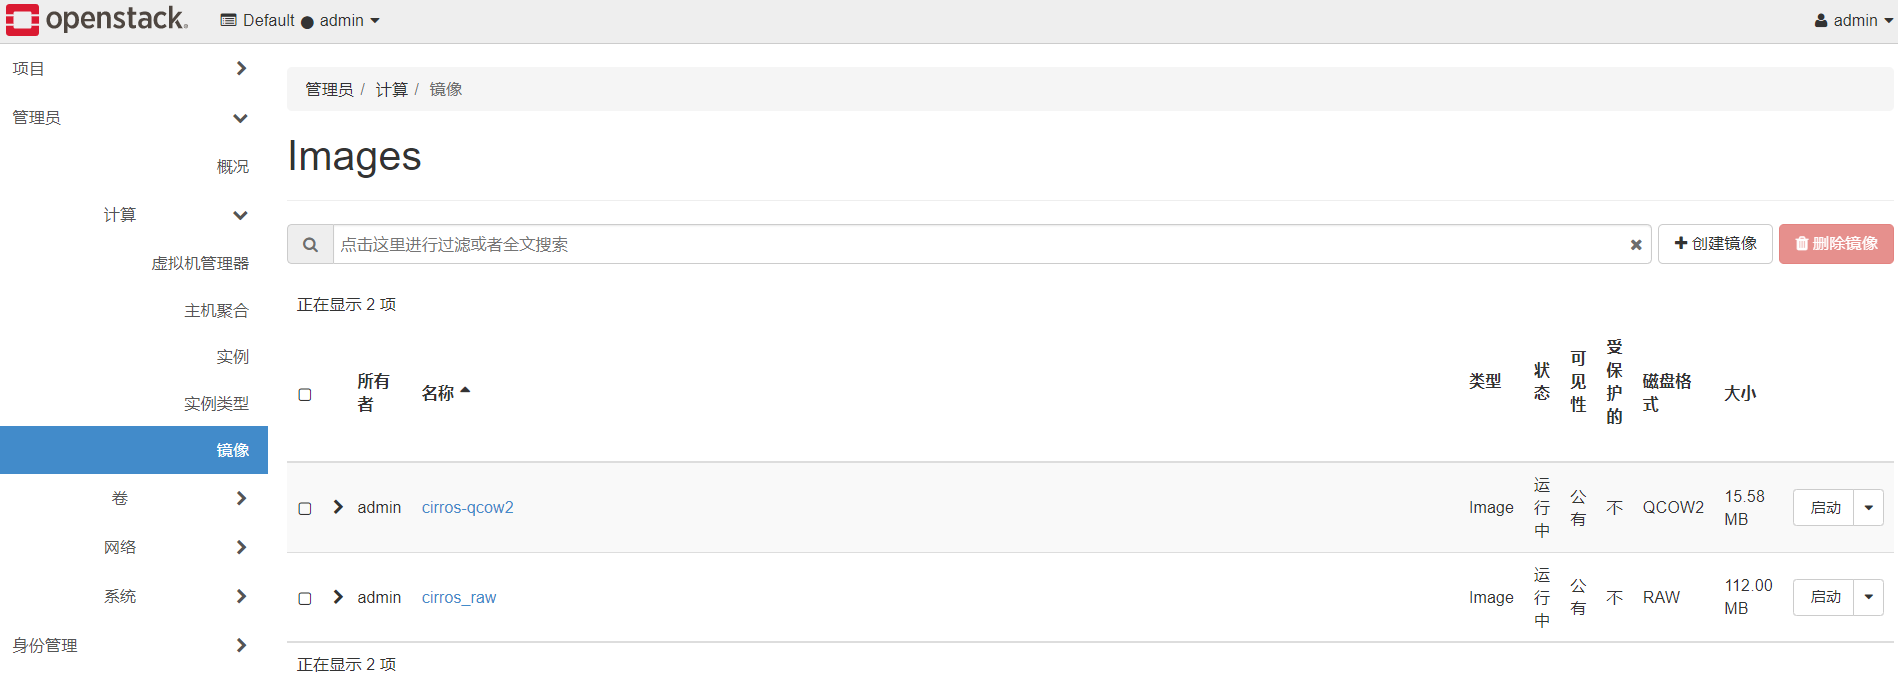
1 2 3 4 5 6 7 8 9 10 11 $ source ~/admin-openrc$ wget -c http://download.cirros-cloud.net/0.5.2/cirros-0.5.2-x86_64-disk.img $ openstack image create --file ~/cirros-0.5.2-x86_64-disk.img --disk-format qcow2 --container-format bare --public cirros-qcow2 $ openstack image list +--------------------------------------+--------------+--------+ | ID | Name | Status | +--------------------------------------+--------------+--------+ | 1c66cd7e-b6d9-4e70-a3d4-f73b27a84230 | cirros-qcow2 | active | +--------------------------------------+--------------+--------+
查看镜像
1 2 3 4 5 6 7 8 9 10 11 12 13 [root@controller01 ~] total 0 [root@controller02 ~] total 15956 -rw-r----- 1 glance glance 16338944 Nov 4 17:25 1c66cd7e-b6d9-4e70-a3d4-f73b27a84230 [root@controller03 ~] total 0 scp -pr /var/lib/glance/images/* controller01:/var/lib/glance/images/ scp -pr /var/lib/glance/images/* controller03:/var/lib/glance/images/ chown -R glance. /var/lib/glance/images/*
这时候发现只有1台glance节点上有相关镜像,如果请求发到没有的机器就会找不到镜像;所以实际生产中一般用共性存储 nfs,或者 swift、ceph,方法后面再说。
五、Placement服务部署 Placement具体功能:
通过HTTP请求来跟踪和过滤资源
数据保存在本地数据库中
具备丰富的资源管理和筛选策略
创建Placement数据库 在任意控制节点创建数据库
1 2 3 4 5 6 7 mysql - u root - p123456 CREATE DATABASE placement;GRANT ALL PRIVILEGES ON placement.* TO 'placement' @'localhost' IDENTIFIED BY '123456' ;GRANT ALL PRIVILEGES ON placement.* TO 'placement' @'%' IDENTIFIED BY '123456' ;flush privileges; exit;
创建placement-api 在任意控制节点操作
创建Placement服务用户
将Placement用户添加到服务项目并赋予admin权限
1 openstack role add --project service --user placement admin
创建placement API服务实体
1 openstack service create --name placement --description "Placement API" placement
创建placement API服务访问端点
1 2 3 openstack endpoint create openstack endpoint create openstack endpoint create
安装placement软件包 在全部控制节点操作
1 yum install openstack-placement-api -y
修改配置文件 在全部控制节点操作
1 2 3 cp /etc/placement/placement.conf /etc/placement/placement.conf.bakgrep -Ev '^$|#' /etc/placement/placement.conf.bak > /etc/placement/placement.conf
1 2 3 4 5 6 7 8 9 10 openstack-config --set /etc/placement/placement.conf placement_database connection mysql+pymysql://placement:[email protected] /placement openstack-config --set /etc/placement/placement.conf api auth_strategy keystone openstack-config --set /etc/placement/placement.conf keystone_authtoken auth_url http://10.10.10.10:5000/v3 openstack-config --set /etc/placement/placement.conf keystone_authtoken memcached_servers controller01:11211,controller02:11211,controller03:11211 openstack-config --set /etc/placement/placement.conf keystone_authtoken auth_type password openstack-config --set /etc/placement/placement.conf keystone_authtoken project_domain_name Default openstack-config --set /etc/placement/placement.conf keystone_authtoken user_domain_name Default openstack-config --set /etc/placement/placement.conf keystone_authtoken project_name service openstack-config --set /etc/placement/placement.conf keystone_authtoken username placement openstack-config --set /etc/placement/placement.conf keystone_authtoken password 123456
初始化placement数据库 任意控制节点操作
1 2 su -s /bin/sh -c "placement-manage db sync" placement mysql -uroot -p123456 placement -e " show tables;"
配置00-placement-api.conf 修改placement的apache配置文件 在全部控制节点操作,以controller01节点为例;注意根据不同节点修改监听地址;官方文档没有提到,如果不修改,计算服务检查时将会报错;
1 2 3 4 5 6 7 8 9 10 11 12 13 14 15 cp /etc/httpd/conf.d/00-placement-api.conf{,.bak}sed -i "s/Listen\ 8778/Listen\ 10.10.10.31:8778/g" /etc/httpd/conf.d/00-placement-api.conf sed -i "s/*:8778/10.10.10.31:8778/g" /etc/httpd/conf.d/00-placement-api.conf cp /etc/httpd/conf.d/00-placement-api.conf{,.bak}sed -i "s/Listen\ 8778/Listen\ 10.10.10.32:8778/g" /etc/httpd/conf.d/00-placement-api.conf sed -i "s/*:8778/10.10.10.32:8778/g" /etc/httpd/conf.d/00-placement-api.conf cp /etc/httpd/conf.d/00-placement-api.conf{,.bak}sed -i "s/Listen\ 8778/Listen\ 10.10.10.33:8778/g" /etc/httpd/conf.d/00-placement-api.conf sed -i "s/*:8778/10.10.10.33:8778/g" /etc/httpd/conf.d/00-placement-api.conf
启用placement API访问 在全部控制节点操作
1 2 3 4 5 6 7 8 9 10 11 12 13 14 $ vi /etc/httpd/conf.d/00-placement-api.conf (15gg) ... #SSLCertificateKeyFile #SSLCertificateKeyFile ... <Directory /usr /bin > <IfVersion > = 2.4>Require all granted </IfVersion > <IfVersion < 2.4 > Order allow,deny Allow from all </IfVersion > </Directory > ...
重启apache服务 在全部控制节点操作;启动placement-api监听端口
1 2 3 systemctl restart httpd.service ss -tnlp|grep 8778 lsof -i:8778
1 2 3 $ curl http://10.10 .10.10 :8778 {"versions" : [{"id" : "v1.0" , "max_version" : "1.36" , "min_version" : "1.0" , "status" : "CURRENT" , "links" : [{"rel" : "self" , "href" : "" }]}]}
验证检查Placement健康状态 1 2 3 4 5 6 7 8 9 10 11 12 $ placement- status upgrade check + | Upgrade Check Results | + | Check : Missing Root Provider IDs | | Result : Success | | Details: None | + | Check : Incomplete Consumers | | Result : Success | | Details: None | +
六、Nova控制节点集群部署 Nova具体功能如下:
实例生命周期管理
管理计算资源
网络和认证管理
REST风格的API
异步的一致性通信
Hypervisor透明:支持Xen,XenServer/XCP, KVM, UML, VMware vSphere and Hyper-V
创建nova相关数据库 在任意控制节点创建数据库
1 2 3 4 5 6 7 8 9 10 11 12 13 14 15 16 17 # 创建nova_api,nova和nova_cell0数据库并授权 mysql - uroot - p123456 CREATE DATABASE nova_api;CREATE DATABASE nova;CREATE DATABASE nova_cell0;GRANT ALL PRIVILEGES ON nova_api.* TO 'nova' @'localhost' IDENTIFIED BY '123456' ;GRANT ALL PRIVILEGES ON nova_api.* TO 'nova' @'%' IDENTIFIED BY '123456' ;GRANT ALL PRIVILEGES ON nova.* TO 'nova' @'localhost' IDENTIFIED BY '123456' ;GRANT ALL PRIVILEGES ON nova.* TO 'nova' @'%' IDENTIFIED BY '123456' ;GRANT ALL PRIVILEGES ON nova_cell0.* TO 'nova' @'localhost' IDENTIFIED BY '123456' ;GRANT ALL PRIVILEGES ON nova_cell0.* TO 'nova' @'%' IDENTIFIED BY '123456' ;flush privileges; exit;
创建nova相关服务凭证 在任意控制节点操作
创建nova用户
1 2 source ~ / admin- openrc openstack user create
向nova用户赋予admin权限
1 openstack role add --project service --user nova admin
创建nova服务实体
1 openstack service create --name nova --description "OpenStack Compute" compute
创建Compute API服务端点
api地址统一采用vip,如果 public/internal/admin 分别设计使用不同的vip,请注意区分;
--region 与初始化admin用户时生成的 region 一致;
1 2 3 openstack endpoint create openstack endpoint create openstack endpoint create
安装nova软件包 在全部控制节点安装nova相关服务,以controller01节点为例
nova-api(nova主服务)
nova-scheduler(nova调度服务)
nova-conductor(nova数据库服务,提供数据库访问)
nova-novncproxy(nova的vnc服务,提供实例的控制台)
1 yum install openstack-nova-api openstack-nova-conductor openstack-nova-novncproxy openstack-nova-scheduler -y
部署与配置 在全部控制节点配置nova相关服务,以controller01节点为例
注意 my_ip 参数,根据节点修改;注意 nova.conf 文件的权限: root:nova
1 2 3 cp -a /etc/nova/nova.conf{,.bak}grep -Ev '^$|#' /etc/nova/nova.conf.bak > /etc/nova/nova.conf
1 2 3 4 5 6 7 8 9 10 11 12 13 14 15 16 17 18 19 20 21 22 23 24 25 26 27 28 29 30 31 32 33 34 35 36 37 38 39 40 41 42 43 44 45 46 47 48 49 50 51 52 53 54 openstack-config --set /etc/nova/nova.conf DEFAULT enabled_apis osapi_compute,metadata openstack-config --set /etc/nova/nova.conf DEFAULT my_ip 10.10.10.31 openstack-config --set /etc/nova/nova.conf DEFAULT use_neutron true openstack-config --set /etc/nova/nova.conf DEFAULT firewall_driver nova.virt.firewall.NoopFirewallDriver openstack-config --set /etc/nova/nova.conf DEFAULT transport_url rabbit://openstack:123456@controller01:5672,openstack:123456@controller02:5672,openstack:123456@controller03:5672 openstack-config --set /etc/nova/nova.conf scheduler discover_hosts_in_cells_interval 600 openstack-config --set /etc/nova/nova.conf DEFAULT osapi_compute_listen_port 8774 openstack-config --set /etc/nova/nova.conf DEFAULT metadata_listen_port 8775 openstack-config --set /etc/nova/nova.conf DEFAULT metadata_listen '$my_ip' openstack-config --set /etc/nova/nova.conf DEFAULT osapi_compute_listen '$my_ip' openstack-config --set /etc/nova/nova.conf api auth_strategy keystone openstack-config --set /etc/nova/nova.conf api_database connection mysql+pymysql://nova:[email protected] /nova_api openstack-config --set /etc/nova/nova.conf cache backend oslo_cache.memcache_pool openstack-config --set /etc/nova/nova.conf cache enabled True openstack-config --set /etc/nova/nova.conf cache memcache_servers controller01:11211,controller02:11211,controller03:11211 openstack-config --set /etc/nova/nova.conf database connection mysql+pymysql://nova:[email protected] /nova openstack-config --set /etc/nova/nova.conf keystone_authtoken www_authenticate_uri http://10.10.10.10:5000/v3 openstack-config --set /etc/nova/nova.conf keystone_authtoken auth_url http://10.10.10.10:5000/v3 openstack-config --set /etc/nova/nova.conf keystone_authtoken memcached_servers controller01:11211,controller02:11211,controller03:11211 openstack-config --set /etc/nova/nova.conf keystone_authtoken auth_type password openstack-config --set /etc/nova/nova.conf keystone_authtoken project_domain_name Default openstack-config --set /etc/nova/nova.conf keystone_authtoken user_domain_name Default openstack-config --set /etc/nova/nova.conf keystone_authtoken project_name service openstack-config --set /etc/nova/nova.conf keystone_authtoken username nova openstack-config --set /etc/nova/nova.conf keystone_authtoken password 123456 openstack-config --set /etc/nova/nova.conf vnc enabled true openstack-config --set /etc/nova/nova.conf vnc server_listen '$my_ip' openstack-config --set /etc/nova/nova.conf vnc server_proxyclient_address '$my_ip' openstack-config --set /etc/nova/nova.conf vnc novncproxy_host '$my_ip' openstack-config --set /etc/nova/nova.conf vnc novncproxy_port 6080 openstack-config --set /etc/nova/nova.conf glance api_servers http://10.10.10.10:9292 openstack-config --set /etc/nova/nova.conf oslo_concurrency lock_path /var/lib/nova/tmp openstack-config --set /etc/nova/nova.conf placement region_name RegionOne openstack-config --set /etc/nova/nova.conf placement project_domain_name Default openstack-config --set /etc/nova/nova.conf placement project_name service openstack-config --set /etc/nova/nova.conf placement auth_type password openstack-config --set /etc/nova/nova.conf placement user_domain_name Default openstack-config --set /etc/nova/nova.conf placement auth_url http://10.10.10.10:5000/v3 openstack-config --set /etc/nova/nova.conf placement username placement openstack-config --set /etc/nova/nova.conf placement password 123456
注意:
前端采用haproxy时,服务连接rabbitmq会出现连接超时重连的情况,可通过各服务与rabbitmq的日志查看;
transport_url=rabbit://openstack:123456@10.10.10.10 :5672
rabbitmq本身具备集群机制,官方文档建议直接连接rabbitmq集群;但采用此方式时服务启动有时会报错,原因不明;如果没有此现象,建议连接rabbitmq直接对接集群而非通过前端haproxy的vip+端口
1 openstack-config --set /etc/nova/nova.conf DEFAULT transport_url rabbit:// openstack:123456 @controller01:5672 ,openstack:123456 @controller02:5672 ,openstack:123456 @controller03:5672
初始化nova相关数据库并验证 任意控制节点操作
1 2 3 4 5 6 7 8 su -s /bin/sh -c "nova-manage api_db sync" nova su -s /bin/sh -c "nova-manage cell_v2 map_cell0" nova su -s /bin/sh -c "nova-manage cell_v2 create_cell --name=cell1 --verbose" nova su -s /bin/sh -c "nova-manage db sync" nova
验证nova cell0和cell1是否正确注册
1 2 3 4 5 6 7 $ su - s / bin/ sh - c "nova-manage cell_v2 list_cells" nova + | Name | UUID | Transport URL | Database Connection | Disabled | + | cell0 | 00000000 -0000 -0000 -0000 -000000000000 | none :/ | mysql+ pymysql:/ / nova:* * * * @10 .10 .10 .10 / nova_cell0 | False | | cell1 | 3e74 f43a-74 db-4 eba-85 ee- c8330f906b1b | rabbit:/ / openstack:* * * * @controller03 :5672 | mysql+ pymysql:/ / nova:* * * * @10 .10 .10 .10 / nova | False | +
验证nova数据库是否正常写入
1 2 3 mysql -unova -p123456 -e "use nova_api;show tables;" mysql -unova -p123456 -e "use nova;show tables;" mysql -unova -p123456 -e "use nova_cell0;show tables;"
启动nova服务 在全部控制节点操作,以controller01节点为例
1 2 3 4 5 6 7 8 9 10 11 12 13 14 15 16 17 systemctl enable openstack-nova-api.service systemctl enable openstack-nova-scheduler.service systemctl enable openstack-nova-conductor.service systemctl enable openstack-nova-novncproxy.service systemctl restart openstack-nova-api.service systemctl restart openstack-nova-scheduler.service systemctl restart openstack-nova-conductor.service systemctl restart openstack-nova-novncproxy.service systemctl status openstack-nova-api.service systemctl status openstack-nova-scheduler.service systemctl status openstack-nova-conductor.service systemctl status openstack-nova-novncproxy.service ss -tlnp | egrep '8774|8775|8778|6080' curl http://10.10.10.10:8774
验证 列出各服务控制组件,查看状态
1 2 3 4 5 6 7 8 9 10 11 12 $ source ~/admin-openrc$ openstack compute service list+----+----------------+--------------+----------+---------+-------+----------------------------+ | ID | Binary | Host | Zone | Status | State | Updated At | +----+----------------+--------------+----------+---------+-------+----------------------------+ | 21 | nova-scheduler | controller01 | internal | enabled | up | 2021 -11 -04 T10:24 :01.000000 | | 24 | nova-conductor | controller01 | internal | enabled | up | 2021 -11 -04 T10:24 :05.000000 | | 27 | nova-scheduler | controller02 | internal | enabled | up | 2021 -11 -04 T10:24 :13.000000 | | 30 | nova-scheduler | controller03 | internal | enabled | up | 2021 -11 -04 T10:24 :05.000000 | | 33 | nova-conductor | controller02 | internal | enabled | up | 2021 -11 -04 T10:24 :07.000000 | | 36 | nova-conductor | controller03 | internal | enabled | up | 2021 -11 -04 T10:24 :10.000000 | +----+----------------+--------------+----------+---------+-------+----------------------------+
展示api端点
1 2 3 4 5 6 7 8 9 10 11 12 13 14 15 16 17 18 19 20 21 22 23 24 25 26 27 28 29 30 31 32 33 $ openstack catalog list +-----------+-----------+------------------------------------------+ | Name | Type | Endpoints | +-----------+-----------+------------------------------------------+ | placement | placement | RegionOne | | | | admin: http: | | | RegionOne | | | | internal : http: | | | RegionOne | | | | public : http: | | | | | glance | image | RegionOne | | | | public : http: | | | RegionOne | | | | internal : http: | | | RegionOne | | | | admin: http: | | | | | keystone | identity | RegionOne | | | | internal : http: | | | RegionOne | | | | admin: http: | | | RegionOne | | | | public : http: | | | | | nova | compute | RegionOne | | | | public : http: | | | RegionOne | | | | internal : http: | | | RegionOne | | | | admin: http: | | | | +-----------+-----------+------------------------------------------+
检查cell与placement api;都为success为正常
1 2 3 4 5 6 7 8 9 10 11 12 13 14 15 16 17 18 19 20 21 22 $ nova- status upgrade check + | Upgrade Check Results | + | Check : Cells v2 | | Result : Success | | Details: No host mappings or compute nodes were found. Remember to | | run command 'nova-manage cell_v2 discover_hosts' when new | | compute hosts are deployed. | + | Check : Placement API | | Result : Success | | Details: None | + | Check : Ironic Flavor Migration | | Result : Success | | Details: None | + | Check : Cinder API | | Result : Success | | Details: None | +
七、Nova计算节点集群部署 安装nova-compute 在全部计算节点安装nova-compute服务,以compute01节点为例
1 2 3 4 5 6 wget ftp://ftp.pbone.net/mirror/archive.fedoraproject.org/epel/testing/6.2019-05-29/x86_64/Packages/p/python2-qpid-proton-0.28.0-1.el7.x86_64.rpm wget ftp://ftp.pbone.net/mirror/vault.centos.org/7.8.2003/messaging/x86_64/qpid-proton/Packages/q/qpid-proton-c-0.28.0-1.el7.x86_64.rpm rpm -ivh qpid-proton-c-0.28.0-1.el7.x86_64.rpm rpm -ivh python2-qpid-proton-0.28.0-1.el7.x86_64.rpm yum install openstack-nova-compute -y
部署与配置 在全部计算节点安装nova-compute服务,以compute01节点为例
注意 my_ip 参数,根据节点修改;注意 nova.conf 文件的权限: root:nova
1 2 3 cp /etc/nova/nova.conf{,.bak}grep -Ev '^$|#' /etc/nova/nova.conf.bak > /etc/nova/nova.conf
确定计算节点是否支持虚拟机硬件加速
1 2 3 4 5 $ egrep -c '(vmx|svm)' /proc/cpuinfo 4 # 如果此命令返回值不是0,则计算节点支持硬件加速,不需要加入下面的配置。 # 如果此命令返回值是0,则计算节点不支持硬件加速,并且必须配置libvirt为使用QEMU而不是KVM # 需要编辑/etc/nova/nova.conf 配置中的[libvirt]部分, vmware按照下面设置可以开启硬件加速
编辑配置文件nova.conf
1 2 3 4 5 6 7 8 9 10 11 12 13 14 15 16 17 18 19 20 21 22 23 24 25 26 27 28 29 30 31 32 33 34 35 36 37 openstack-config --set /etc/nova/nova.conf DEFAULT enabled_apis osapi_compute,metadata openstack-config --set /etc/nova/nova.conf DEFAULT transport_url rabbit://openstack:[email protected] openstack-config --set /etc/nova/nova.conf DEFAULT my_ip 10.10.10.41 openstack-config --set /etc/nova/nova.conf DEFAULT use_neutron true openstack-config --set /etc/nova/nova.conf DEFAULT firewall_driver nova.virt.firewall.NoopFirewallDriver openstack-config --set /etc/nova/nova.conf api auth_strategy keystone openstack-config --set /etc/nova/nova.conf keystone_authtoken www_authenticate_uri http://10.10.10.10:5000 openstack-config --set /etc/nova/nova.conf keystone_authtoken auth_url http://10.10.10.10:5000 openstack-config --set /etc/nova/nova.conf keystone_authtoken memcached_servers controller01:11211,controller02:11211,controller03:11211 openstack-config --set /etc/nova/nova.conf keystone_authtoken auth_type password openstack-config --set /etc/nova/nova.conf keystone_authtoken project_domain_name Default openstack-config --set /etc/nova/nova.conf keystone_authtoken user_domain_name Default openstack-config --set /etc/nova/nova.conf keystone_authtoken project_name service openstack-config --set /etc/nova/nova.conf keystone_authtoken username nova openstack-config --set /etc/nova/nova.conf keystone_authtoken password 123456 openstack-config --set /etc/nova/nova.conf libvirt virt_type kvm openstack-config --set /etc/nova/nova.conf vnc enabled true openstack-config --set /etc/nova/nova.conf vnc server_listen 0.0.0.0 openstack-config --set /etc/nova/nova.conf vnc server_proxyclient_address '$my_ip' openstack-config --set /etc/nova/nova.conf vnc novncproxy_base_url http://10.10.10.10:6080/vnc_auto.html openstack-config --set /etc/nova/nova.conf glance api_servers http://10.10.10.10:9292 openstack-config --set /etc/nova/nova.conf oslo_concurrency lock_path /var/lib/nova/tmp openstack-config --set /etc/nova/nova.conf placement region_name RegionOne openstack-config --set /etc/nova/nova.conf placement project_domain_name Default openstack-config --set /etc/nova/nova.conf placement project_name service openstack-config --set /etc/nova/nova.conf placement auth_type password openstack-config --set /etc/nova/nova.conf placement user_domain_name Default openstack-config --set /etc/nova/nova.conf placement auth_url http://10.10.10.10:5000/v3 openstack-config --set /etc/nova/nova.conf placement username placement openstack-config --set /etc/nova/nova.conf placement password 123456
启动计算节点的nova服务 全部计算节点操作
1 2 3 systemctl restart libvirtd.service openstack-nova-compute.service systemctl enable libvirtd.service openstack-nova-compute.service systemctl status libvirtd.service openstack-nova-compute.service
向cell数据库添加计算节点 任意控制节点执行;查看计算节点列表
1 2 3 4 5 6 7 8 $ source ~/admin-openrc$ openstack compute service list --service nova-compute+----+--------------+-----------+------+---------+-------+----------------------------+ | ID | Binary | Host | Zone | Status | State | Updated At | +----+--------------+-----------+------+---------+-------+----------------------------+ | 39 | nova-compute | compute01 | nova | enabled | up | 2021 -11 -04 T10:45 :46.000000 | | 42 | nova-compute | compute02 | nova | enabled | up | 2021 -11 -04 T10:45 :48.000000 | +----+--------------+-----------+------+---------+-------+----------------------------+
控制节点上发现计算主机 添加每台新的计算节点时,都必须在控制器节点上运行
手动发现计算节点
1 2 3 4 5 6 7 8 9 $ su -s /bin/sh -c "nova-manage cell_v2 discover_hosts --verbose" nova Found 2 cell mappings. Skipping cell0 since it does not contain hosts. Getting computes from cell 'cell1 ': 3e74 f43a-74 db-4 eba-85 ee-c8330f906b1b Checking host mapping for compute host 'compute01 ': a476abf2-030 f-4943 -b8a7-167 d4a65a393 Creating host mapping for compute host 'compute01 ': a476abf2-030 f-4943 -b8a7-167 d4a65a393 Checking host mapping for compute host 'compute02 ': ed0a899f-d898-4 a73-9100 -a69a26edb932 Creating host mapping for compute host 'compute02 ': ed0a899f-d898-4 a73-9100 -a69a26edb932 Found 2 unmapped computes in cell: 3e74 f43a-74 db-4 eba-85 ee-c8330f906b1b
自动发现计算节点
为避免新加入计算节点时,手动执行注册操作 nova-manage cell_v2 discover_hosts,可设置控制节点定时自动发现主机;涉及控制节点 nova.conf 文件的 [scheduler] 字段;
在全部控制节点操作 ;设置自动发现时间为10min,可根据实际环境调节
1 2 openstack-config --set /etc/nova/nova.conf scheduler discover_hosts_in_cells_interval 600 systemctl restart openstack-nova-api.service
验证 列出服务组件以验证每个进程的成功启动和注册情况
1 2 3 4 5 6 7 8 9 10 11 12 13 14 $ source ~/admin-openrc$ openstack compute service list+----+----------------+--------------+----------+---------+-------+----------------------------+ | ID | Binary | Host | Zone | Status | State | Updated At | +----+----------------+--------------+----------+---------+-------+----------------------------+ | 21 | nova-scheduler | controller01 | internal | enabled | up | 2021 -11 -04 T10:49 :48.000000 | | 24 | nova-conductor | controller01 | internal | enabled | up | 2021 -11 -04 T10:49 :42.000000 | | 27 | nova-scheduler | controller02 | internal | enabled | up | 2021 -11 -04 T10:49 :43.000000 | | 30 | nova-scheduler | controller03 | internal | enabled | up | 2021 -11 -04 T10:49 :45.000000 | | 33 | nova-conductor | controller02 | internal | enabled | up | 2021 -11 -04 T10:49 :47.000000 | | 36 | nova-conductor | controller03 | internal | enabled | up | 2021 -11 -04 T10:49 :50.000000 | | 39 | nova-compute | compute01 | nova | enabled | up | 2021 -11 -04 T10:49 :46.000000 | | 42 | nova-compute | compute02 | nova | enabled | up | 2021 -11 -04 T10:49 :48.000000 | +----+----------------+--------------+----------+---------+-------+----------------------------+
列出身份服务中的API端点以验证与身份服务的连接
1 2 3 4 5 6 7 8 9 10 11 12 13 14 15 16 17 18 19 20 21 22 23 24 25 26 27 28 29 30 31 32 33 $ openstack catalog list +-----------+-----------+------------------------------------------+ | Name | Type | Endpoints | +-----------+-----------+------------------------------------------+ | placement | placement | RegionOne | | | | admin: http: | | | RegionOne | | | | internal : http: | | | RegionOne | | | | public : http: | | | | | glance | image | RegionOne | | | | public : http: | | | RegionOne | | | | internal : http: | | | RegionOne | | | | admin: http: | | | | | keystone | identity | RegionOne | | | | internal : http: | | | RegionOne | | | | admin: http: | | | RegionOne | | | | public : http: | | | | | nova | compute | RegionOne | | | | public : http: | | | RegionOne | | | | internal : http: | | | RegionOne | | | | admin: http: | | | | +-----------+-----------+------------------------------------------+
列出镜像服务中的镜像以及镜像的状态
1 2 3 4 5 6 $ openstack image list +--------------------------------------+--------------+--------+ | ID | Name | Status | +--------------------------------------+--------------+--------+ | 1c66cd7e-b6d9-4e70-a3d4-f73b27a84230 | cirros-qcow2 | active | +--------------------------------------+--------------+--------+
检查Cells和placement API是否正常运行
1 2 3 4 5 6 7 8 9 10 11 12 13 14 15 16 17 18 19 20 $ nova- status upgrade check + | Upgrade Check Results | + | Check : Cells v2 | | Result : Success | | Details: None | + | Check : Placement API | | Result : Success | | Details: None | + | Check : Ironic Flavor Migration | | Result : Success | | Details: None | + | Check : Cinder API | | Result : Success | | Details: None | +
扩展:openstack(nova)、kvm、qemu和libvirtd之间的联系 一:QEMU
QEMU是一个模拟器,通过动态二进制转换来模拟cpu以及其他一系列硬件,使guest os认为自己就是在和真正的硬件打交道,其实是和qemu模拟的硬件交互。这种模式下,guest os可以和主机上的硬件进行交互,但是所有的指令都需要qemu来进行翻译,性能会比较差。
二:KVM
KVM是Linux内核提供的虚拟化架构,它需要硬件硬件CPU支持,比如采用硬件辅助虚拟化的Intel-VT,AMD-V。
KVM通过一个内核模块kvm.ko来实现核心虚拟化功能,以及一个和处理器相关的模块,如kvm-intel.ko或者kvm-amd.ko。kvm本身不实现模拟,仅暴露一个接口/dev/kvm,用户态程序可以通过访问这个接口的ioctl函数来实现vcpu的创建,和虚拟内存的地址空间分配。
有了kvm之后,guest-os的CPU指令不用再经过qemu翻译就可以运行,大大提升了运行速度。
但是kvm只能模拟cpu和内存,不能模拟其他设备,于是就有了下面这个两者合一的技术qemu-kvm。
三:QEMU-KVM
qemu-kvm,是qemu一个特定于kvm加速模块的分支。
qemu将kvm整合进来,通过ioctl调用/dev/kvm,将cpu相关的指令交给内核模块来做,kvm只实现了cpu和内存虚拟化,但不能模拟其它设备,因此qemu还需要模拟其它设备(如:硬盘、网卡等),qemu加上kvm就是完整意义上的服务器虚拟化
综上所述,QEMU-KVM具有两大作用:
提供对cpu,内存(KVM负责),IO设备(QEMU负责)的虚拟
对各种虚拟设备的创建,调用进行管理(QEMU负责)
qemu-kvm架构如下:
四:libvirtd
Libvirtd是目前使用最广泛的对kvm虚拟机进行管理的工具和api。Libvirtd是一个Domain进程可以被本地virsh调用,也可以被远端的virsh调用,libvirtd调用kvm-qemu控制虚拟机。
libvirtd由几个不同的部分组成,其中包括应用程序编程接口(API)库,一个守护进程(libvirtd)和一个默认的命令行工具(virsh),libvirtd守护进程负责对虚拟机的管理,因此要确保这个进程的运行。
五:openstack(nova)、kvm、qemu-kvm和libvirtd之间的关系。
kvm是最底层的VMM,它可以模拟cpu和内存,但是缺少对网络、I/O及周边设备的支持,因此不能直接使用。
qemu-kvm是构建与kvm之上的,它提供了完整的虚拟化方案
openstack(nova)的核心功能就是管理一大堆虚拟机,虚拟机可以是各种各样(kvm, qemu, xen, vmware…),而且管理的方法也可以是各种各样(libvirt, xenapi, vmwareapi…)。而nova中默认使用的管理虚拟机的API就是libvirtd。
简单说就是,openstack不会去直接控制qemu-kvm,而是通过libvirtd库去间接控制qemu-kvm。
另外,libvirt还提供了跨VM平台的功能,它可以控制除了QEMU之外的模拟器,包括vmware, virtualbox, xen等等。所以为了openstack的跨VM性,所以openstack只会用libvirt而不直接用qemu-kvm
八、Neutron控制+网络节点集群部署(openvswitch方式) Nova具体功能如下:
Neutron 为整个 OpenStack 环境提供网络支持,包括二层交换,三层路由,负载均衡,防火墙和 VPN 等。
Neutron 提供了一个灵活的框架,通过配置,无论是开源还是商业软件都可以被用来实现这些功能。
创建nova相关数据库(控制节点) 在任意控制节点创建数据库;
1 2 3 4 5 6 $ mysql - uroot - p123456 CREATE DATABASE neutron;GRANT ALL PRIVILEGES ON neutron.* TO 'neutron' @'localhost' IDENTIFIED BY '123456' ;GRANT ALL PRIVILEGES ON neutron.* TO 'neutron' @'%' IDENTIFIED BY '123456' ;flush privileges; exit;
创建neutron相关服务凭证 在任意控制节点操作;
创建neutron用户
1 2 source ~ / admin- openrc openstack user create
向neutron用户赋予admin权限
1 openstack role add --project service --user neutron admin
创建neutron服务实体
1 openstack service create --name neutron --description "OpenStack Networking" network
创建neutron API服务端点
api地址统一采用vip,如果 public/internal/admin 分别设计使用不同的vip,请注意区分;
--region 与初始化admin用户时生成的 region 一致;neutron-api 服务类型为network;
1 2 3 openstack endpoint create openstack endpoint create openstack endpoint create
安装配置
openstack-neutron:neutron-server的包
openstack-neutron-ml2:ML2 plugin的包
openstack-neutron-openvswitch:openvswitch相关的包
ebtables:防火墙相关的包
conntrack-tools: 该模块可以对iptables进行状态数据包检查
安装软件包 在全部控制节点安装neutron相关服务
1 yum install openstack-neutron openstack-neutron-ml2 ebtables conntrack-tools openstack-neutron-openvswitch libibverbs net -tools -y
在全部控制节点配置neutron相关服务 ,以controller01节点为例;
内核配置 在全部控制节点执行
1 2 3 4 5 echo ' net.ipv4.conf.all.rp_filter=0 net.ipv4.conf.default.rp_filter=0 ' >> /etc/sysctl.confsysctl -p
配置neutron.conf 注意 my_ip 参数,根据节点修改;注意 neutron.conf 文件的权限: root:neutron
注意 bind_host 参数,根据节点修改;
1 2 3 cp -a /etc/neutron/neutron.conf{,.bak}grep -Ev '^$|#' /etc/neutron/neutron.conf.bak > /etc/neutron/neutron.conf
1 2 3 4 5 6 7 8 9 10 11 12 13 14 15 16 17 18 19 20 21 22 23 24 25 26 27 28 29 30 31 32 33 34 35 36 37 38 39 40 41 42 43 44 openstack-config --set /etc/neutron/neutron.conf DEFAULT bind_host 10.10.10.31 openstack-config --set /etc/neutron/neutron.conf DEFAULT core_plugin ml2 openstack-config --set /etc/neutron/neutron.conf DEFAULT service_plugins router openstack-config --set /etc/neutron/neutron.conf DEFAULT allow_overlapping_ips true openstack-config --set /etc/neutron/neutron.conf DEFAULT transport_url rabbit://openstack:123456@controller01:5672,openstack:123456@controller02:5672,openstack:123456@controller03:5672 openstack-config --set /etc/neutron/neutron.conf DEFAULT auth_strategy keystone openstack-config --set /etc/neutron/neutron.conf DEFAULT notify_nova_on_port_status_changes true openstack-config --set /etc/neutron/neutron.conf DEFAULT notify_nova_on_port_data_changes true openstack-config --set /etc/neutron/neutron.conf DEFAULT l3_ha True openstack-config --set /etc/neutron/neutron.conf DEFAULT max_l3_agents_per_router 3 openstack-config --set /etc/neutron/neutron.conf DEFAULT min_l3_agents_per_router 2 openstack-config --set /etc/neutron/neutron.conf DEFAULT dhcp_agents_per_network 3 openstack-config --set /etc/neutron/neutron.conf DEFAULT router_distributed true openstack-config --set /etc/neutron/neutron.conf DEFAULT rpc_response_timeout 180 openstack-config --set /etc/neutron/neutron.conf database connection mysql+pymysql://neutron:[email protected] /neutron openstack-config --set /etc/neutron/neutron.conf keystone_authtoken www_authenticate_uri http://10.10.10.10:5000 openstack-config --set /etc/neutron/neutron.conf keystone_authtoken auth_url http://10.10.10.10:5000 openstack-config --set /etc/neutron/neutron.conf keystone_authtoken memcached_servers controller01:11211,controller02:11211,controller03:11211 openstack-config --set /etc/neutron/neutron.conf keystone_authtoken auth_type password openstack-config --set /etc/neutron/neutron.conf keystone_authtoken project_domain_name default openstack-config --set /etc/neutron/neutron.conf keystone_authtoken user_domain_name default openstack-config --set /etc/neutron/neutron.conf keystone_authtoken project_name service openstack-config --set /etc/neutron/neutron.conf keystone_authtoken username neutron openstack-config --set /etc/neutron/neutron.conf keystone_authtoken password 123456 openstack-config --set /etc/neutron/neutron.conf nova auth_url http://10.10.10.10:5000 openstack-config --set /etc/neutron/neutron.conf nova auth_type password openstack-config --set /etc/neutron/neutron.conf nova project_domain_name default openstack-config --set /etc/neutron/neutron.conf nova user_domain_name default openstack-config --set /etc/neutron/neutron.conf nova region_name RegionOne openstack-config --set /etc/neutron/neutron.conf nova project_name service openstack-config --set /etc/neutron/neutron.conf nova username nova openstack-config --set /etc/neutron/neutron.conf nova password 123456 openstack-config --set /etc/neutron/neutron.conf oslo_concurrency lock_path /var/lib/neutron/tmp
配置ml2_conf.ini 在全部控制节点操作,以controller01节点为例;
1 2 3 cp -a /etc/neutron/plugins/ml2/ml2_conf.ini{,.bak}grep -Ev '^$|#' /etc/neutron/plugins/ml2/ml2_conf.ini.bak > /etc/neutron/plugins/ml2/ml2_conf.ini
1 2 3 4 5 6 7 8 9 10 11 12 13 14 15 16 17 18 19 20 openstack-config --set /etc/neutron/plugins/ml2/ml2_conf.ini ml2 type_drivers flat,vlan,vxlan openstack-config --set /etc/neutron/plugins/ml2/ml2_conf.ini ml2 tenant_network_types vxlan,vlan,flat openstack-config --set /etc/neutron/plugins/ml2/ml2_conf.ini ml2 mechanism_drivers openvswitch,l2population openstack-config --set /etc/neutron/plugins/ml2/ml2_conf.ini ml2 extension_drivers port_security openstack-config --set /etc/neutron/plugins/ml2/ml2_conf.ini ml2_type_flat flat_networks external openstack-config --set /etc/neutron/plugins/ml2/ml2_conf.ini ml2_type_vlan network_vlan_ranges vlan:3001:3500 openstack-config --set /etc/neutron/plugins/ml2/ml2_conf.ini ml2_type_vxlan vni_ranges 10001:20000 openstack-config --set /etc/neutron/plugins/ml2/ml2_conf.ini securitygroup enable_ipset true openstack-config --set /etc/neutron/plugins/ml2/ml2_conf.ini agent enable_distributed_routing true openstack-config --set /etc/neutron/plugins/ml2/ml2_conf.ini agent tunnel_types vxlan openstack-config --set /etc/neutron/plugins/ml2/ml2_conf.ini agent l2_population true
创建ml2的软连接 文件指向ML2插件配置的软链接
1 ln -s /etc/neutron/plugins/ml2/ml2_conf.ini /etc/neutron/plugin.ini
配置nova.conf 在全部控制节点操作,以controller01节点为例;
1 2 3 4 5 6 7 8 9 10 11 12 13 14 15 openstack-config --set /etc/nova/nova.conf neutron url http://10.10.10.10:9696 openstack-config --set /etc/nova/nova.conf neutron auth_url http://10.10.10.10:5000 openstack-config --set /etc/nova/nova.conf neutron auth_type password openstack-config --set /etc/nova/nova.conf neutron project_domain_name default openstack-config --set /etc/nova/nova.conf neutron user_domain_name default openstack-config --set /etc/nova/nova.conf neutron region_name RegionOne openstack-config --set /etc/nova/nova.conf neutron project_name service openstack-config --set /etc/nova/nova.conf neutron username neutron openstack-config --set /etc/nova/nova.conf neutron password 123456 openstack-config --set /etc/nova/nova.conf neutron service_metadata_proxy true openstack-config --set /etc/nova/nova.conf neutron metadata_proxy_shared_secret 123456 openstack-config --set /etc/nova/nova.conf DEFAULT linuxnet_interface_driver nova.network.linux_net.LinuxOVSInterfaceDriver
初始化neutron数据库 任意控制节点操作
1 su -s /bin/sh -c "neutron-db-manage --config-file /etc/neutron/neutron.conf --config-file /etc/neutron/plugins/ml2/ml2_conf.ini upgrade head" neutron
验证neutron数据库是否正常写入
1 mysql -u neutron -p123456 -e "use neutron;show tables;"
注意:如果控制节点只跑neutron-server,则修改以上配置即可,然后使用:systemctl restart openstack-nova-api.service && systemctl enable neutron-server.service && systemctl restart neutron-server.service 启动服务即可
配置l3_agent.ini(self-networking)
在全部控制节点操作,以controller01节点为例;
1 2 3 cp -a /etc/neutron/l3_agent.ini{,.bak}grep -Ev '^$|#' /etc/neutron/l3_agent.ini.bak > /etc/neutron/l3_agent.ini
1 2 3 4 openstack-config --set /etc/neutron/l3_agent.ini DEFAULT interface_driver neutron.agent.linux.interface .OVSInterfaceDriver #openstack-config --set /etc/neutron/l3_agent.ini DEFAULT external_network_bridge br-ex openstack-config --set /etc/neutron/l3_agent.ini DEFAULT external_network_bridge openstack-config --set /etc/neutron/l3_agent.ini DEFAULT agent_mode dvr_snat
注意 agent_mode 为 dvr_snat
官方教程里面设置 external_network_bridge 为空,测试使用 br-ex 好像也没问题,不知其原由
配置dhcp_agent.ini
DHCP代理,DHCP代理为虚拟网络提供DHCP服务;
使用dnsmasp提供dhcp服务;
在全部控制节点操作,以controller01节点为例;
1 2 3 cp -a /etc/neutron/dhcp_agent.ini{,.bak}grep -Ev '^$|#' /etc/neutron/dhcp_agent.ini.bak > /etc/neutron/dhcp_agent.ini
1 2 3 openstack-config --set /etc/neutron/dhcp_agent.ini DEFAULT interface_driver neutron.agent.linux.interface .OVSInterfaceDriver openstack-config --set /etc/neutron/dhcp_agent.ini DEFAULT dhcp_driver neutron.agent.linux.dhcp.Dnsmasq openstack-config --set /etc/neutron/dhcp_agent.ini DEFAULT enable_isolated_metadata true
元数据代理提供配置信息,例如实例的凭据
metadata_proxy_shared_secret 的密码与控制节点上 /etc/nova/nova.conf 文件中密码一致;
在全部控制节点操作,以controller01节点为例;
1 2 3 cp -a /etc/neutron/metadata_agent.ini{,.bak}grep -Ev '^$|#' /etc/neutron/metadata_agent.ini.bak > /etc/neutron/metadata_agent.ini
1 2 3 openstack-config --set /etc/neutron/metadata_agent.ini DEFAULT nova_metadata_host 10.10.10.10 openstack-config --set /etc/neutron/metadata_agent.ini DEFAULT metadata_proxy_shared_secret 123456 openstack-config --set /etc/neutron/metadata_agent.ini cache memcache_servers controller01:11211,controller02:11211,controller03:11211
配置openvswitch_agent.ini 在全部控制节点操作,以controller01节点为例;
1 2 3 cp -a /etc/neutron/plugins/ml2/openvswitch_agent.ini{,.bak}grep -Ev '^$|#' /etc/neutron/plugins/ml2/openvswitch_agent.ini.bak > /etc/neutron/plugins/ml2/openvswitch_agent.ini
local_ip 修改为当前节点的主机ip
1 2 3 4 5 6 7 8 9 10 11 12 13 14 15 16 17 18 openstack-config --set /etc/neutron/plugins/ml2/openvswitch_agent.ini ovs integration_bridge br-int openstack-config --set /etc/neutron/plugins/ml2/openvswitch_agent.ini ovs tunnel_bridge br-tun openstack-config --set /etc/neutron/plugins/ml2/openvswitch_agent.ini ovs local_ip 10.10.30.31 openstack-config --set /etc/neutron/plugins/ml2/openvswitch_agent.ini ovs bridge_mappings external:br-ex openstack-config --set /etc/neutron/plugins/ml2/openvswitch_agent.ini agent tunnel_types vxlan openstack-config --set /etc/neutron/plugins/ml2/openvswitch_agent.ini agent l2_population true openstack-config --set /etc/neutron/plugins/ml2/openvswitch_agent.ini agent arp_responder true openstack-config --set /etc/neutron/plugins/ml2/openvswitch_agent.ini agent enable_distributed_routing true openstack-config --set /etc/neutron/plugins/ml2/openvswitch_agent.ini securitygroup enable_security_group true openstack-config --set /etc/neutron/plugins/ml2/openvswitch_agent.ini securitygroup firewall_driver neutron.agent.linux.openvswitch_firewall.OVSFirewallDriver
启动openvswitch服务 在全部控制节点操作,以controller01节点为例;
1 2 3 systemctl enable openvswitch.service systemctl restart openvswitch.service systemctl status openvswitch.service
创建网桥br-ex 在全部控制节点操作,以controller01节点为例;
将外部网络ip转移到网桥,添加到开机启动
ip地址修改为当前节点ens34地址;以controller01为例;
1 2 3 4 5 6 7 8 echo '# ovs-vsctl add-br br-ex ovs-vsctl add-port br-ex ens34 ovs-vsctl show ifconfig ens34 0.0.0.0 ifconfig br-ex 10.10.20.31/24 #route add default gw 10.10.20.2 # 可选,添加默认路由 #' >> /etc/rc.d/rc.local
创建并验证
1 2 3 4 5 6 7 8 9 10 11 12 13 14 15 16 17 18 19 20 21 22 23 24 25 26 27 28 29 [root@controller01 ~] ad5867f 6-9 ddd-4746 -9 de7-bc3c2b2e98f8 Bridge br-ex br-ex br-ex type: internalPort "ens34" Interface "ens34" ovs_version: "2.12.0" [root@controller01 ~]# [root@controller01 ~] br-ex: flags=4163 <UP,BROADCAST,RUNNING,MULTICAST> mtu 1500 inet 10 .10 .20 .31 netmask 255 .255 .255 .0 broadcast 10 .10 .20 .255 inet6 fe80::20 c:29 ff:fedd:69 e5 prefixlen 64 scopeid 0x20 <link> ether 00 :0 c:29 :dd:69 :e5 txqueuelen 1000 (Ethernet) RX packets 0 bytes 0 (0 .0 B) 0 dropped 0 overruns 0 frame 0 TX packets 7 bytes 586 (586 .0 B) 0 dropped 0 overruns 0 carrier 0 collisions 0 [root@controller01 ~]# [root@controller01 ~] ens34: flags=4163 <UP,BROADCAST,RUNNING,MULTICAST> mtu 1500 inet6 fe80::5 f52:19 c8:6 c65:c9f 3 prefixlen 64 scopeid 0x20 <link> ether 00 :0 c:29 :dd:69 :e5 txqueuelen 1000 (Ethernet) RX packets 1860 bytes 249541 (243 .6 KiB) RX errors 0 dropped 0 overruns 0 frame 0 TX packets 7014 bytes 511816 (499 .8 KiB) TX errors 0 dropped 0 overruns 0 carrier 0 collisions 0
关闭网卡的开机自启
全部控制节点执行;关闭的目的是以保证OVS创建的网卡可以安全使用
1 sed -i 's#ONBOOT=yes#ONBOOT=no#g' /etc/sysconfig/network-scripts/ifcfg-ens34
启动服务 全部控制节点操作;
1 2 3 4 5 6 7 8 9 10 11 12 13 14 15 16 17 18 19 20 21 22 23 systemctl restart openstack-nova-api.service && systemctl status openstack-nova-api.service systemctl enable neutron-server.service \ neutron-openvswitch-agent.service \ neutron-l3-agent.service \ neutron-dhcp-agent.service \ neutron-metadata-agent.service systemctl restart neutron-server.service \ neutron-openvswitch-agent.service \ neutron-l3-agent.service \ neutron-dhcp-agent.service \ neutron-metadata-agent.service systemctl status neutron-server.service \ neutron-openvswitch-agent.service \ neutron-l3-agent.service \ neutron-dhcp-agent.service \ neutron-metadata-agent.service
验证 1 2 3 4 5 6 7 . ~/admin-openrc openstack extension list --network openstack network agent list
1 2 3 4 5 6 7 8 9 10 11 12 13 14 15 16 17 18 19 20 21 22 23 24 25 26 27 28 29 30 31 32 33 34 35 36 37 38 39 40 41 42 43 44 45 46 47 [root@controller01 ~ ] 2b64473f-6320-411b-b8ce-d9d802c08cd0 Manager "ptcp:6640:127.0.0.1" is_connected: true Bridge br-ex Controller "tcp:127.0.0.1:6633" is_connected: true fail_mode: secure datapath_type: system Port phy-br-ex Interface phy-br-ex type: patch options: {peer=int-br-ex } Port "ens34" Interface "ens34" Port br-ex Interface br-ex type: internal Bridge br-tun Controller "tcp:127.0.0.1:6633" is_connected: true fail_mode: secure datapath_type: system Port br-tun Interface br-tun type: internal Port patch-int Interface patch-int type: patch options: {peer=patch-tun } Bridge br-int Controller "tcp:127.0.0.1:6633" is_connected: true fail_mode: secure datapath_type: system Port int-br-ex Interface int-br-ex type: patch options: {peer=phy-br-ex } Port br-int Interface br-int type: internal Port patch-tun Interface patch-tun type: patch options: {peer=patch-int } ovs_version: "2.12.0"
br-ex 连接外部网络以及不同网络vm通信用,br-int 同计算节点同网络vm通信用,br-tun 不同计算节点同网络vm通信用
其中 br-ex 需要手动创建,br-int 与 br-tun 由 neutron-openvswitch-agent 自动创建
九、Neutron计算节点(openvswitch方式) 安装neutron-openvswitch 在全部计算节点安装,以compute01节点为例
1 yum install openstack-neutron openstack-neutron-ml2 ebtables conntrack-tools openstack-neutron-openvswitch libibverbs net -tools -y
内核配置 在全部计算节点执行
1 2 3 4 5 echo ' net.ipv4.conf.all.rp_filter=0 net.ipv4.conf.default.rp_filter=0 ' >> /etc/sysctl.confsysctl -p
元数据代理提供配置信息,例如实例的凭据
metadata_proxy_shared_secret 的密码与控制节点上 /etc/nova/nova.conf 文件中密码一致;
在全部计算节点操作;
1 2 3 cp -a /etc/neutron/metadata_agent.ini{,.bak}grep -Ev '^$|#' /etc/neutron/metadata_agent.ini.bak > /etc/neutron/metadata_agent.ini
1 2 3 openstack-config --set /etc/neutron/metadata_agent.ini DEFAULT nova_metadata_host 10.10.10.10 openstack-config --set /etc/neutron/metadata_agent.ini DEFAULT metadata_proxy_shared_secret 123456 openstack-config --set /etc/neutron/metadata_agent.ini cache memcache_servers controller01:11211,controller02:11211,controller03:11211
配置l3_agent.ini(self-networking)
在全部计算节点操作;
1 2 3 cp -a /etc/neutron/l3_agent.ini{,.bak}grep -Ev '^$|#' /etc/neutron/l3_agent.ini.bak > /etc/neutron/l3_agent.ini
1 2 3 4 openstack-config --set /etc/neutron/l3_agent.ini DEFAULT interface_driver neutron.agent.linux.interface .OVSInterfaceDriver #openstack-config --set /etc/neutron/l3_agent.ini DEFAULT external_network_bridge br-ex openstack-config --set /etc/neutron/l3_agent.ini DEFAULT external_network_bridge openstack-config --set /etc/neutron/l3_agent.ini DEFAULT agent_mode dvr
注意 agent_mode 为 dvr
官方教程里面设置 external_network_bridge 为空,测试使用 br-ex 好像也没问题,不知其原由
配置openvswitch_agent.ini 所有计算节点操作
1 2 3 cp -a /etc/neutron/plugins/ml2/openvswitch_agent.ini{,.bak}grep -Ev '^$|#' /etc/neutron/plugins/ml2/openvswitch_agent.ini.bak > /etc/neutron/plugins/ml2/openvswitch_agent.ini
1 2 3 4 5 6 7 8 9 10 11 12 13 14 15 16 17 18 openstack-config --set /etc/neutron/plugins/ml2/openvswitch_agent.ini ovs integration_bridge br-int openstack-config --set /etc/neutron/plugins/ml2/openvswitch_agent.ini ovs tunnel_bridge br-tun openstack-config --set /etc/neutron/plugins/ml2/openvswitch_agent.ini ovs local_ip 10.10.30.41 openstack-config --set /etc/neutron/plugins/ml2/openvswitch_agent.ini ovs bridge_mappings external:br-ex openstack-config --set /etc/neutron/plugins/ml2/openvswitch_agent.ini agent tunnel_types vxlan openstack-config --set /etc/neutron/plugins/ml2/openvswitch_agent.ini agent l2_population true openstack-config --set /etc/neutron/plugins/ml2/openvswitch_agent.ini agent arp_responder true openstack-config --set /etc/neutron/plugins/ml2/openvswitch_agent.ini agent enable_distributed_routing true openstack-config --set /etc/neutron/plugins/ml2/openvswitch_agent.ini securitygroup enable_security_group true openstack-config --set /etc/neutron/plugins/ml2/openvswitch_agent.ini securitygroup firewall_driver neutron.agent.linux.openvswitch_firewall.OVSFirewallDriver
配置neutron.conf 所有计算节点操作,注意修改 bind_host
1 2 3 cp -a /etc/neutron/neutron.conf{,.bak}grep -Ev '^$|#' /etc/neutron/neutron.conf.bak > /etc/neutron/neutron.conf
1 2 3 4 5 6 7 8 9 10 11 12 13 14 15 16 17 openstack-config --set /etc/neutron/neutron.conf DEFAULT bind_host 10.10.10.41 openstack-config --set /etc/neutron/neutron.conf DEFAULT transport_url rabbit://openstack:123456@controller01:5672,openstack:123456@controller02:5672,openstack:123456@controller03:5672 openstack-config --set /etc/neutron/neutron.conf DEFAULT auth_strategy keystone openstack-config --set /etc/neutron/neutron.conf DEFAULT rpc_response_timeout 180 openstack-config --set /etc/neutron/neutron.conf keystone_authtoken www_authenticate_uri http://10.10.10.10:5000 openstack-config --set /etc/neutron/neutron.conf keystone_authtoken auth_url http://10.10.10.10:5000 openstack-config --set /etc/neutron/neutron.conf keystone_authtoken memcached_servers controller01:11211,controller02:11211,controller03:11211 openstack-config --set /etc/neutron/neutron.conf keystone_authtoken auth_type password openstack-config --set /etc/neutron/neutron.conf keystone_authtoken project_domain_name default openstack-config --set /etc/neutron/neutron.conf keystone_authtoken user_domain_name default openstack-config --set /etc/neutron/neutron.conf keystone_authtoken project_name service openstack-config --set /etc/neutron/neutron.conf keystone_authtoken username neutron openstack-config --set /etc/neutron/neutron.conf keystone_authtoken password 123456 openstack-config --set /etc/neutron/neutron.conf oslo_concurrency lock_path /var/lib/neutron/tmp
配置nova.conf 在全部计算节点操作;
1 2 3 4 5 6 7 8 9 10 11 openstack-config --set /etc/nova/nova.conf neutron url http://10.10.10.10:9696 openstack-config --set /etc/nova/nova.conf neutron auth_url http://10.10.10.10:5000 openstack-config --set /etc/nova/nova.conf neutron auth_type password openstack-config --set /etc/nova/nova.conf neutron project_domain_name default openstack-config --set /etc/nova/nova.conf neutron user_domain_name default openstack-config --set /etc/nova/nova.conf neutron region_name RegionOne openstack-config --set /etc/nova/nova.conf neutron project_name service openstack-config --set /etc/nova/nova.conf neutron username neutron openstack-config --set /etc/nova/nova.conf neutron password 123456 openstack-config --set /etc/nova/nova.conf DEFAULT linuxnet_interface_driver nova.network.linux_net.LinuxOVSInterfaceDriver
启动openvswitch服务 在全部计算节点操作;
1 2 3 systemctl enable openvswitch.service systemctl restart openvswitch.service systemctl status openvswitch.service
创建网桥br-ex 在全部计算节点操作;
将外部网络ip转移到网桥,添加到开机启动
ip地址修改为当前节点ens34地址;
1 2 3 4 5 6 7 8 echo '# ovs-vsctl add-br br-ex ovs-vsctl add-port br-ex ens34 ovs-vsctl show ifconfig ens34 0.0.0.0 ifconfig br-ex 10.10.20.41/24 #route add default gw 10.10.20.2 # 可选,添加默认路由 #' >> /etc/rc.d/rc.local
创建并验证
1 2 3 4 5 6 7 8 9 10 11 12 13 14 15 16 17 18 19 20 21 22 23 24 25 26 27 28 29 [root@compute01 ~] ad5867f 6-9 ddd-4746 -9 de7-bc3c2b2e98f8 Bridge br-ex br-ex br-ex type: internalPort "ens34" Interface "ens34" ovs_version: "2.12.0" [root@compute01 ~]# [root@compute01 ~] br-ex: flags=4163 <UP,BROADCAST,RUNNING,MULTICAST> mtu 1500 inet 10 .10 .20 .31 netmask 255 .255 .255 .0 broadcast 10 .10 .20 .255 inet6 fe80::20 c:29 ff:fedd:69 e5 prefixlen 64 scopeid 0x20 <link> ether 00 :0 c:29 :dd:69 :e5 txqueuelen 1000 (Ethernet) RX packets 0 bytes 0 (0 .0 B) 0 dropped 0 overruns 0 frame 0 TX packets 7 bytes 586 (586 .0 B) 0 dropped 0 overruns 0 carrier 0 collisions 0 [root@compute01 ~]# [root@compute01 ~] ens34: flags=4163 <UP,BROADCAST,RUNNING,MULTICAST> mtu 1500 inet6 fe80::5 f52:19 c8:6 c65:c9f 3 prefixlen 64 scopeid 0x20 <link> ether 00 :0 c:29 :dd:69 :e5 txqueuelen 1000 (Ethernet) RX packets 1860 bytes 249541 (243 .6 KiB) RX errors 0 dropped 0 overruns 0 frame 0 TX packets 7014 bytes 511816 (499 .8 KiB) TX errors 0 dropped 0 overruns 0 carrier 0 collisions 0
关闭网卡的开机自启
全部计算节点执行;关闭的目的是以保证OVS创建的网卡可以安全使用
1 sed -i 's#ONBOOT=yes#ONBOOT=no#g' /etc/sysconfig/network-scripts/ifcfg-ens34
启动服务 在全部计算节点操作;
1 2 3 4 5 6 systemctl restart openstack-nova-compute.service && systemctl status openstack-nova-compute.service systemctl enable neutron-openvswitch-agent.service neutron-metadata-agent.service neutron-l3-agent.service systemctl restart neutron-openvswitch-agent.service neutron-metadata-agent.service neutron-l3-agent.service systemctl status neutron-openvswitch-agent.service neutron-metadata-agent.service neutron-l3-agent.service
验证 在任意控制节点操作;
1 2 3 4 5 6 $ . ~/admin-openrc # 查看neutron相关的agent; # 或:openstack network agent list --agent-type open-vswitch # type 类型 'bgp' , 'dhcp' , 'open-vswitch' , 'linux-bridge' , 'ofa' , 'l3' , 'loadbalancer' , 'metering' , 'metadata' , 'macvtap' , 'nic' $ openstack network agent list
1 2 3 4 5 6 7 8 [root@controller01 ~]# openstack network agent list|grep compute | 03995744 -16 b1-4 c48-bde1-2 ac9978ec16e | Open vSwitch agent | compute01 | None | :-) | UP | neutron-openvswitch-agent | | 1 b80a75e-f579-41 d6-ac8a-5 bab32ddd575 | L3 agent | compute02 | nova | :-) | UP | neutron-l3-agent | | 3528 f80a-43 fa-4 c3b-8 c41-9 ad0c7fcc587 | Open vSwitch agent | compute02 | None | :-) | UP | neutron-openvswitch-agent | | 48317 ab2-e4fd-4 de7-b544-ddf3ff3dc706 | Metadata agent | compute01 | None | :-) | UP | neutron-metadata-agent | | db15406c-a2f2-49e0 -ae21-cb4f6ce1b7c5 | Metadata agent | compute02 | None | :-) | UP | neutron-metadata-agent | | e84b48f1-b830-4 af6-a00f-2 d1b698256da | L3 agent | compute01 | nova | :-) | UP | neutron-l3-agent | [root@controller01 ~]#
1 2 3 4 5 6 7 8 9 10 11 12 13 14 15 16 17 18 19 20 21 22 23 24 25 26 27 28 29 30 31 32 33 34 35 36 37 38 39 40 41 42 43 44 45 46 47 [root@compute01 ~ ] 9b2ebb43-8831-4aef-ad3a-f7a91160cd6c Manager "ptcp:6640:127.0.0.1" is_connected: true Bridge br-tun Controller "tcp:127.0.0.1:6633" is_connected: true fail_mode: secure datapath_type: system Port patch-int Interface patch-int type: patch options: {peer=patch-tun } Port br-tun Interface br-tun type: internal Bridge br-ex Controller "tcp:127.0.0.1:6633" is_connected: true fail_mode: secure datapath_type: system Port "ens34" Interface "ens34" Port phy-br-ex Interface phy-br-ex type: patch options: {peer=int-br-ex } Port br-ex Interface br-ex type: internal Bridge br-int Controller "tcp:127.0.0.1:6633" is_connected: true fail_mode: secure datapath_type: system Port patch-tun Interface patch-tun type: patch options: {peer=patch-int } Port br-int Interface br-int type: internal Port int-br-ex Interface int-br-ex type: patch options: {peer=phy-br-ex } ovs_version: "2.12.0"
十、Horazion仪表盘集群部署
OpenStack仪表板Dashboard服务的项目名称是Horizon,它所需的唯一服务是身份服务keystone,开发语言是python的web框架Django。
仪表盘使得通过OpenStack API与OpenStack计算云控制器进行基于web的交互成为可能。
Horizon 允许自定义仪表板的商标;并提供了一套内核类和可重复使用的模板及工具。
安装Train版本的Horizon有以下要求
Python 2.7、3.6或3.7
Django 1.11、2.0和2.2
Django 2.0和2.2支持在Train版本中处于试验阶段
Ussuri发行版(Train发行版之后的下一个发行版)将使用Django 2.2作为主要的Django版本。Django 2.0支持将被删除。
安装dashboard 在全部控制节点安装dashboard服务,以controller01节点为例
1 yum install openstack-dashboard memcached python-memcached -y
配置local_settings OpenStack Horizon 参数设置说明
在全部控制节点操作;
1 2 3 cp -a /etc/openstack-dashboard/local_settings{,.bak}grep -Ev '^$|#' /etc/openstack-dashboard/local_settings.bak > /etc/openstack-dashboard/local_settings
添加或者修改以下配置:
1 2 3 4 5 6 7 8 9 10 11 12 13 14 15 16 17 18 19 20 21 22 23 24 25 26 27 28 29 30 31 32 33 34 35 36 37 38 39 40 41 42 43 44 45 46 47 48 49 50 51 52 53 54 55 56 57 58 59 60 61 62 63 64 65 66 67 68 69 70 71 72 73 74 75 WEBROOT = '/dashboard/' OPENSTACK_HOST = "10.10.10.10" ALLOWED_HOSTS = ['*' , 'localhost' ] SESSION_ENGINE = 'django.contrib.sessions.backends.cache' CACHES = { 'default' : { 'BACKEND' : 'django.core.cache.backends.memcached.MemcachedCache' , 'LOCATION' : 'controller01:11211,controller02:11211,controller03:11211' , } } OPENSTACK_KEYSTONE_URL = "http://%s:5000/v3" % OPENSTACK_HOST OPENSTACK_KEYSTONE_MULTIDOMAIN_SUPPORT = True OPENSTACK_API_VERSIONS = { "identity" : 3 ,"image" : 2 ,"volume" : 3 ,} OPENSTACK_KEYSTONE_DEFAULT_DOMAIN = "Default" OPENSTACK_KEYSTONE_DEFAULT_ROLE = "user" OPENSTACK_NEUTRON_NETWORK = { 'enable_auto_allocated_network' : False ,'enable_distributed_router' : True ,'enable_fip_topology_check' : False ,'enable_ha_router' : True ,'enable_lb' : False ,'enable_firewall' : False ,'enable_vpn' : False ,'enable_ipv6' : True ,'enable_quotas' : True ,'enable_rbac_policy' : True ,'enable_router' : True ,'default_dns_nameservers' : [],'supported_provider_types' : ['*' ],'segmentation_id_range' : {},'extra_provider_types' : {},'supported_vnic_types' : ['*' ],'physical_networks' : [],} TIME_ZONE = "Asia/Shanghai"
修改好的 /etc/openstack-dashboard/local_settings 参考:
1 2 3 4 5 6 7 8 9 10 11 12 13 14 15 16 17 18 19 20 21 22 23 24 25 26 27 28 29 30 31 32 33 34 35 36 37 38 39 40 41 42 43 44 45 46 47 48 49 50 51 52 53 54 55 56 57 58 59 60 61 62 63 64 65 66 67 68 69 70 71 72 73 74 75 76 77 78 79 80 81 82 83 84 85 86 87 88 89 90 91 92 93 94 95 96 97 98 99 100 101 102 103 104 105 106 107 108 109 110 111 112 113 114 115 116 117 118 119 120 121 122 123 124 125 126 127 128 129 130 131 132 133 134 135 136 137 138 139 140 141 142 143 144 145 146 147 148 149 150 151 152 153 154 155 156 157 158 159 160 161 162 163 164 165 166 167 168 169 170 171 172 173 174 175 176 177 178 179 180 181 182 183 184 185 186 187 188 189 190 191 192 193 194 195 196 197 198 199 200 201 202 203 204 205 206 207 208 209 210 211 212 213 214 215 216 217 218 219 220 221 222 223 224 225 226 227 228 229 230 231 232 233 234 235 236 237 238 239 240 241 242 243 244 245 246 247 248 249 250 251 252 253 254 255 256 257 258 259 260 261 262 263 264 265 266 import osfrom django.utils.translation import ugettext_lazy as _from openstack_dashboard.settings import HORIZON_CONFIGDEBUG = False ALLOWED_HOSTS = ['*' , 'localhost' ] LOCAL_PATH = '/tmp' WEBROOT = '/dashboard/' SECRET_KEY='00be7c741571a0ea5a64' EMAIL_BACKEND = 'django.core.mail.backends.console.EmailBackend' OPENSTACK_HOST = "10.10.10.10" OPENSTACK_KEYSTONE_URL = "http://%s:5000/v3" % OPENSTACK_HOST OPENSTACK_KEYSTONE_MULTIDOMAIN_SUPPORT = True OPENSTACK_NEUTRON_NETWORK = { 'enable_auto_allocated_network' : False ,'enable_distributed_router' : True ,'enable_fip_topology_check' : False ,'enable_ha_router' : True ,'enable_ipv6' : True ,'enable_quotas' : True ,'enable_rbac_policy' : True ,'enable_router' : True ,'default_dns_nameservers' : [],'supported_provider_types' : ['*' ],'segmentation_id_range' : {},'extra_provider_types' : {},'supported_vnic_types' : ['*' ],'physical_networks' : [],} TIME_ZONE = "Asia/Shanghai" LOGGING = { 'version' : 1 ,'disable_existing_loggers' : False ,'formatters' : {'console' : { 'format' : '%(levelname)s %(name)s %(message)s' }, 'operation' : { 'format' : '%(message)s' }, }, 'handlers' : {'null' : { 'level' : 'DEBUG' , 'class' : 'logging.NullHandler' , }, 'console' : { 'level' : 'DEBUG' if DEBUG else 'INFO' , 'class' : 'logging.StreamHandler' , 'formatter' : 'console' , }, 'operation' : { 'level' : 'INFO' , 'class' : 'logging.StreamHandler' , 'formatter' : 'operation' , }, }, 'loggers' : {'horizon' : { 'handlers' : ['console' ], 'level' : 'DEBUG' , 'propagate' : False , }, 'horizon.operation_log' : { 'handlers' : ['operation' ], 'level' : 'INFO' , 'propagate' : False , }, 'openstack_dashboard' : { 'handlers' : ['console' ], 'level' : 'DEBUG' , 'propagate' : False , }, 'novaclient' : { 'handlers' : ['console' ], 'level' : 'DEBUG' , 'propagate' : False , }, 'cinderclient' : { 'handlers' : ['console' ], 'level' : 'DEBUG' , 'propagate' : False , }, 'keystoneauth' : { 'handlers' : ['console' ], 'level' : 'DEBUG' , 'propagate' : False , }, 'keystoneclient' : { 'handlers' : ['console' ], 'level' : 'DEBUG' , 'propagate' : False , }, 'glanceclient' : { 'handlers' : ['console' ], 'level' : 'DEBUG' , 'propagate' : False , }, 'neutronclient' : { 'handlers' : ['console' ], 'level' : 'DEBUG' , 'propagate' : False , }, 'swiftclient' : { 'handlers' : ['console' ], 'level' : 'DEBUG' , 'propagate' : False , }, 'oslo_policy' : { 'handlers' : ['console' ], 'level' : 'DEBUG' , 'propagate' : False , }, 'openstack_auth' : { 'handlers' : ['console' ], 'level' : 'DEBUG' , 'propagate' : False , }, 'django' : { 'handlers' : ['console' ], 'level' : 'DEBUG' , 'propagate' : False , }, 'django.db.backends' : { 'handlers' : ['null' ], 'propagate' : False , }, 'requests' : { 'handlers' : ['null' ], 'propagate' : False , }, 'urllib3' : { 'handlers' : ['null' ], 'propagate' : False , }, 'chardet.charsetprober' : { 'handlers' : ['null' ], 'propagate' : False , }, 'iso8601' : { 'handlers' : ['null' ], 'propagate' : False , }, 'scss' : { 'handlers' : ['null' ], 'propagate' : False , }, }, } SECURITY_GROUP_RULES = { 'all_tcp' : {'name' : _('All TCP' ),'ip_protocol' : 'tcp' ,'from_port' : '1' ,'to_port' : '65535' ,}, 'all_udp' : {'name' : _('All UDP' ),'ip_protocol' : 'udp' ,'from_port' : '1' ,'to_port' : '65535' ,}, 'all_icmp' : {'name' : _('All ICMP' ),'ip_protocol' : 'icmp' ,'from_port' : '-1' ,'to_port' : '-1' ,}, 'ssh' : {'name' : 'SSH' ,'ip_protocol' : 'tcp' ,'from_port' : '22' ,'to_port' : '22' ,}, 'smtp' : {'name' : 'SMTP' ,'ip_protocol' : 'tcp' ,'from_port' : '25' ,'to_port' : '25' ,}, 'dns' : {'name' : 'DNS' ,'ip_protocol' : 'tcp' ,'from_port' : '53' ,'to_port' : '53' ,}, 'http' : {'name' : 'HTTP' ,'ip_protocol' : 'tcp' ,'from_port' : '80' ,'to_port' : '80' ,}, 'pop3' : {'name' : 'POP3' ,'ip_protocol' : 'tcp' ,'from_port' : '110' ,'to_port' : '110' ,}, 'imap' : {'name' : 'IMAP' ,'ip_protocol' : 'tcp' ,'from_port' : '143' ,'to_port' : '143' ,}, 'ldap' : {'name' : 'LDAP' ,'ip_protocol' : 'tcp' ,'from_port' : '389' ,'to_port' : '389' ,}, 'https' : {'name' : 'HTTPS' ,'ip_protocol' : 'tcp' ,'from_port' : '443' ,'to_port' : '443' ,}, 'smtps' : {'name' : 'SMTPS' ,'ip_protocol' : 'tcp' ,'from_port' : '465' ,'to_port' : '465' ,}, 'imaps' : {'name' : 'IMAPS' ,'ip_protocol' : 'tcp' ,'from_port' : '993' ,'to_port' : '993' ,}, 'pop3s' : {'name' : 'POP3S' ,'ip_protocol' : 'tcp' ,'from_port' : '995' ,'to_port' : '995' ,}, 'ms_sql' : {'name' : 'MS SQL' ,'ip_protocol' : 'tcp' ,'from_port' : '1433' ,'to_port' : '1433' ,}, 'mysql' : {'name' : 'MYSQL' ,'ip_protocol' : 'tcp' ,'from_port' : '3306' ,'to_port' : '3306' ,}, 'rdp' : {'name' : 'RDP' ,'ip_protocol' : 'tcp' ,'from_port' : '3389' ,'to_port' : '3389' ,}, } SESSION_ENGINE = 'django.contrib.sessions.backends.cache' CACHES = { 'default' : { 'BACKEND' : 'django.core.cache.backends.memcached.MemcachedCache' , 'LOCATION' : 'controller01:11211,controller02:11211,controller03:11211' , } } OPENSTACK_API_VERSIONS = { "identity" : 3 ,"image" : 2 ,"volume" : 3 ,} OPENSTACK_KEYSTONE_DEFAULT_DOMAIN = "Default" OPENSTACK_KEYSTONE_DEFAULT_ROLE = "user"
配置openstack-dashboard.conf 在全部控制节点操作;
1 2 3 4 5 6 7 cp /etc/httpd/conf.d/openstack-dashboard.conf{,.bak}ln -s /etc/openstack-dashboard /usr/share/openstack-dashboard/openstack_dashboard/confsed -i '3a WSGIApplicationGroup\ %{GLOBAL}' /etc/httpd/conf.d/openstack-dashboard.conf
最终:/etc/httpd/conf.d/openstack-dashboard.conf
1 2 3 4 5 6 7 8 9 10 11 12 13 14 15 16 17 18 19 20 21 22 23 24 25 26 27 <VirtualHost *:80> ServerAdmin [email protected] ServerName openstack_dashboard DocumentRoot /usr/share/openstack-dashboard/ LogLevel warn ErrorLog /var/log/httpd/openstack_dashboard-error.log CustomLog /var/log/httpd/openstack_dashboard-access.log combined WSGIScriptReloading On WSGIDaemonProcess openstack_dashboard_website processes=3 WSGIProcessGroup openstack_dashboard_website WSGIApplicationGroup %{GLOBAL} WSGIPassAuthorization On WSGIScriptAlias /dashboard /usr/share/openstack-dashboard/openstack_dashboard/wsgi/django.wsgi <Location "/" > Require all granted </Location> Alias /dashboard/static /usr/share/openstack-dashboard/static <Location "/static" > SetHandler None </Location> </Virtualhost>
重启apache和memcache 在全部控制节点操作;
1 2 3 systemctl restart httpd.service memcached.service systemctl enable httpd.service memcached.service systemctl status httpd.service memcached.service
验证访问 地址: http://10.10.10.10/dashboard
域/账号/密码:default/admin/123456,或:default/demo/123456
十一、创建虚拟网络并启动实例操作 创建external外部网络 只能admin管理员操作,可添加多个外部网络;
为了验证访问外部网络的功能,需要先在 vmware 中把VMnet2设置为NAT模式,前面已提到过
管理员—网络—创建网络
物理网络对应前面配置:openstack-config –set /etc/neutron/plugins/ml2/ml2_conf.ini ml2_type_flat flat_networks external
需要勾选外部网络
因为前面配置:openstack-config –set /etc/neutron/plugins/ml2/linuxbridge_agent.ini linux_bridge physical_interface_mappings external:ens34,vlan:ens36,external 对应物理网卡 ens34,所以这里的真实网络地址为:10.10.20.0/24
创建路由
可以不选择外部网络(这样的路由器只用于不同vpc之间的连通)
路由已连接的外部网络
创建安全组
放行所有出口流量
放行所有同安全组的入口流量
放行外部22、icmp的入口流量
创建实例类型
注意Swap磁盘会占用计算节点本地磁盘,即使后面对接了分布式存储ceph,所以你会发现大多数公有云厂商swap默认就是关闭的
对接ceph后根磁盘大小就由创建实例指定的卷大小决定了
创建vpc网络
把 vpc 网络连接到路由器,以便访问外部网络
创建实例
选择 vpc,这里其实可以直接选择 EXT 外部网络,让每个实例分配外部网络IP,直接访问外部网络,但是因为我们外部网络只在3个控制节点存在,如果这里使用 EXT 网络,会报错:ERROR nova.compute.manager [instance: a8847440-8fb9-48ca-a530-4258bd623dce] PortBindingFailed: Binding failed for port f0687181-4539-4096-b09e-0cfdeab000af, please check neutron logs for more information.(计算节点日志 /var/log/nova/nova-compute.log)
当某个vpc的子网中有两个(或以上)个网段时,创建虚拟机时,quantum会从默认的子网段(一般为最新创建的子网段)中获取IP地址,绑定新创建的虚拟机port。但是有的时候想让新创建的虚拟机获得指定的子网段IP地址,不使用默认的IP地址段时,则需要设置一下,具体方法自行百度
其他选项卡可以不填
默认情况下实例会出错:ImageUnacceptable: Image 1c66cd7e-b6 d9-4e70-a3d4-f73b27a84230 is unacceptable: Image has no associated data。原因是当前glance服务使用的是本地存储镜像,这就会导致三个glance节点只有一个节点上存在镜像,临时解决方法是把 /var/lib/glance/images/ 下所有镜像拷贝到所有glance节点,拷贝完后注意目录授权,最终解决方案是glance使用共享存储(nfs等)、分布式存储(swift、ceph等)
网络拓扑如下:
不同vpc内主机之间通信 不同vpc之间的主机如果需要通信的话只需要把两个 vpc 都连接到相同路由器上面即可
浮动IP 把 vpc 通过路由器和ext外部网络连接后,虽然实例可以访问外网了,但是外面无法访问进来,这时候需要使用浮动IP功能了。
先申请浮动IP
绑定浮动ip到具体实例
验证
十二、Ceph集群部署 基础安装见: ceph-deploy 安装 ceph - leffss - 博客园 (cnblogs.com)
十三、Cinder部署 Cinder的核心功能是对卷的管理,允许对卷、卷的类型、卷的快照、卷备份进行处理。它为后端不同的存储设备提供给了统一的接口,不同的块设备服务厂商在Cinder中实现其驱动,可以被Openstack整合管理,nova与cinder的工作原理类似。支持多种 back-end(后端)存储方式,包括 LVM,NFS,Ceph 和其他诸如 EMC、IBM 等商业存储产品和方案。
Cinder各组件功能
Cinder-api 是 cinder 服务的 endpoint,提供 rest 接口,负责处理 client 请求,并将 RPC 请求发送至 cinder-scheduler 组件。Cinder-scheduler 负责 cinder 请求调度,其核心部分就是 scheduler_driver, 作为 scheduler manager 的 driver,负责 cinder-volume 具体的调度处理,发送 cinder RPC 请求到选择的 cinder-volume。Cinder-volume 负责具体的 volume 请求处理,由不同后端存储提供 volume 存储空间。目前各大存储厂商已经积极地将存储产品的 driver 贡献到 cinder 社区
其中Cinder-api与Cinder-scheduler构成控制节点,Cinder-volume 构成存储节点;
在采用ceph或其他商业/非商业后端存储时,建议将Cinder-api、Cinder-scheduler与Cinder-volume服务部署在控制节点;
这里由于只有计算节点上能访问 ceph 从 client 网络(Cinder-volume需要访问ceph集群,nova计算节点也需要),所以将Cinder-api、Cinder-scheduler部署在3台控制节点,Cinder-volume部署在2台计算节点;
Cinder控制节点集群部署 创建cinder数据库 在任意控制节点创建数据库;
1 2 3 4 5 6 mysql - u root - p123456 create database cinder;grant all privileges on cinder.* to 'cinder' @'%' identified by '123456' ;grant all privileges on cinder.* to 'cinder' @'localhost' identified by '123456' ;flush privileges;
创建cinder相关服务凭证 在任意控制节点操作,以controller01节点为例;
创建cinder服务用户
1 2 source admin-openrc openstack user create --domain default --password 123456 cinder
向cinder用户赋予admin权限
1 openstack role add --project service --user cinder admin
创建cinderv2和cinderv3服务实体
1 2 3 4 # cinder服务实体类型 "volume" openstack service create --name cinderv2 --description "OpenStack Block Storage" volumev2 openstack service create --name cinderv3 --description "OpenStack Block Storage" volumev3
创建块存储服务API端点
块存储服务需要每个服务实体的端点
cinder-api后缀为用户project-id,可通过 openstack project list 查看
1 2 3 4 5 6 7 8 # v2 openstack endpoint create --region RegionOne volumev2 public http: openstack endpoint create --region RegionOne volumev2 internal http: openstack endpoint create --region RegionOne volumev2 admin http: # v3 openstack endpoint create --region RegionOne volumev3 public http: openstack endpoint create --region RegionOne volumev3 internal http: openstack endpoint create --region RegionOne volumev3 admin http:
部署与配置cinder 安装cinder
在全部控制节点安装cinder服务,以controller01节点为例
1 yum install openstack-cinder -y
配置cinder.conf
在全部控制节点操作,以controller01节点为例;注意 my_ip 参数,根据节点修改;
1 2 3 cp -a /etc/cinder/cinder.conf{,.bak}grep -Ev '^$|#' /etc/cinder/cinder.conf.bak > /etc/cinder/cinder.conf
1 2 3 4 5 6 7 8 9 10 11 12 13 14 15 16 17 18 19 20 21 22 openstack-config --set /etc/cinder/cinder.conf DEFAULT my_ip 10.10.10.31 openstack-config --set /etc/cinder/cinder.conf DEFAULT auth_strategy keystone openstack-config --set /etc/cinder/cinder.conf DEFAULT glance_api_servers http://10.10.10.10:9292 openstack-config --set /etc/cinder/cinder.conf DEFAULT osapi_volume_listen '$my_ip' openstack-config --set /etc/cinder/cinder.conf DEFAULT osapi_volume_listen_port 8776 openstack-config --set /etc/cinder/cinder.conf DEFAULT log_dir /var/log/cinder openstack-config --set /etc/cinder/cinder.conf DEFAULT transport_url rabbit://openstack:123456@controller01:5672,openstack:123456@controller02:5672,openstack:123456@controller03:5672 openstack-config --set /etc/cinder/cinder.conf database connection mysql+pymysql://cinder:[email protected] /cinder openstack-config --set /etc/cinder/cinder.conf keystone_authtoken www_authenticate_uri http://10.10.10.10:5000 openstack-config --set /etc/cinder/cinder.conf keystone_authtoken auth_url http://10.10.10.10:5000 openstack-config --set /etc/cinder/cinder.conf keystone_authtoken memcached_servers controller01:11211,controller02:11211,controller03:11211 openstack-config --set /etc/cinder/cinder.conf keystone_authtoken auth_type password openstack-config --set /etc/cinder/cinder.conf keystone_authtoken project_domain_name default openstack-config --set /etc/cinder/cinder.conf keystone_authtoken user_domain_name default openstack-config --set /etc/cinder/cinder.conf keystone_authtoken project_name service openstack-config --set /etc/cinder/cinder.conf keystone_authtoken username cinder openstack-config --set /etc/cinder/cinder.conf keystone_authtoken password 123456 openstack-config --set /etc/cinder/cinder.conf oslo_concurrency lock_path /var/lib/cinder/tmp
配置nova.conf使用块存储
在全部控制节点操作,以controller01节点为例;
配置只涉及nova.conf的 [cinder] 字段;
1 openstack-config --set /etc/nova/nova.conf cinder os_region_name RegionOne
初始化cinder数据库 任意控制节点操作;
1 2 3 4 su -s /bin/sh -c "cinder-manage db sync" cinder mysql -ucinder -p123456 -e "use cinder;show tables;"
启动服务 全部控制节点操作;修改了nova配置文件,首先需要重启nova服务
1 2 3 4 5 systemctl restart openstack-nova-api.service && systemctl status openstack-nova-api.service systemctl enable openstack-cinder-api.service openstack-cinder-scheduler.service scheduler.service scheduler.service
控制节点验证 1 2 3 4 5 6 7 8 9 $ source admin-openrc$ openstack volume service list+------------------+--------------+------+---------+-------+----------------------------+ | Binary | Host | Zone | Status | State | Updated At | +------------------+--------------+------+---------+-------+----------------------------+ | cinder-scheduler | controller01 | nova | enabled | up | 2021 -11 -10 T04:47 :23.000000 | | cinder-scheduler | controller02 | nova | enabled | up | 2021 -11 -10 T04:47 :27.000000 | | cinder-scheduler | controller03 | nova | enabled | up | 2021 -11 -10 T04:47 :29.000000 | +------------------+--------------+------+---------+-------+----------------------------+
Cinder存储节点集群部署 Openstack的存储面临的问题 https://docs.openstack.org/arch-design/
企业上线openstack,必须要思考和解决三方面的难题:
控制集群的高可用和负载均衡,保障集群没有单点故障,持续可用,
网络的规划和neutron L3的高可用和负载均衡,
存储的高可用性和性能问题。
存储openstack中的痛点与难点之一
在上线和运维中,值得考虑和规划的重要点,openstack支持各种存储,包括分布式的文件系统,常见的有: ceph,glusterfs和sheepdog,同时也支持商业的FC存储,如 IBM,EMC,NetApp和huawei 的专业存储设备,一方面能够满足企业的利旧和资源的统一管理。
Ceph概述
ceph作为近年来呼声最高的统一存储,在云环境下适应而生,ceph成就了openstack和cloudstack这类的开源的平台方案,同时openstack的快速发展,也吸引了越来越多的人参与到ceph的研究中来。ceph在整个社区的活跃度越来越高,越来越多的企业,使用ceph做为openstack的 glance,nova,cinder 的存储。
ceph是一种统一的分布式文件系统;能够支持三种常用的接口:
对象存储接口,兼容于S3,用于存储结构化的数据,如图片,视频,音频等文件,其他对象存储有: S3,Swift,FastDFS 等;
文件系统接口,通过 cephfs 来完成,能够实现类似于nfs的挂载文件系统,需要由MDS来完成,类似的文件系存储有: nfs,samba,glusterfs 等;
块存储,通过rbd实现,专门用于存储云环境下块设备,如openstack的cinder卷存储,这也是目前ceph应用最广泛的地方。
安装cinder 在全部计算点安装;
1 yum install openstack-cinder targetcli python2-keystone -y
配置cinder.conf 在全部计算点配置;注意 my_ip 参数,根据节点修改;
1 2 3 cp -a /etc/cinder/cinder.conf{,.bak}grep -Ev '#|^$' /etc/cinder/cinder.conf.bak>/etc/cinder/cinder.conf
1 2 3 4 5 6 7 8 9 10 11 12 13 14 15 16 17 18 19 20 openstack-config --set /etc/cinder/cinder.conf DEFAULT transport_url rabbit://openstack:123456@controller01:5672,openstack:123456@controller02:5672,openstack:123456@controller03:5672 openstack-config --set /etc/cinder/cinder.conf DEFAULT auth_strategy keystone openstack-config --set /etc/cinder/cinder.conf DEFAULT my_ip 10.10.10.41 openstack-config --set /etc/cinder/cinder.conf DEFAULT glance_api_servers http://10.10.10.10:9292 openstack-config --set /etc/cinder/cinder.conf DEFAULT enabled_backends ceph openstack-config --set /etc/cinder/cinder.conf database connection mysql+pymysql://cinder:[email protected] /cinder openstack-config --set /etc/cinder/cinder.conf keystone_authtoken www_authenticate_uri http://10.10.10.10:5000 openstack-config --set /etc/cinder/cinder.conf keystone_authtoken auth_url http://10.10.10.10:5000 openstack-config --set /etc/cinder/cinder.conf keystone_authtoken memcached_servers controller01:11211,controller02:11211,controller03:11211 openstack-config --set /etc/cinder/cinder.conf keystone_authtoken auth_type password openstack-config --set /etc/cinder/cinder.conf keystone_authtoken project_domain_name default openstack-config --set /etc/cinder/cinder.conf keystone_authtoken user_domain_name default openstack-config --set /etc/cinder/cinder.conf keystone_authtoken project_name service openstack-config --set /etc/cinder/cinder.conf keystone_authtoken username cinder openstack-config --set /etc/cinder/cinder.conf keystone_authtoken password 123456 openstack-config --set /etc/cinder/cinder.conf oslo_concurrency lock_path /var/lib/cinder/tmp
启动服务 全部计算节点操作;
1 2 3 systemctl restart openstack-cinder-volume.service target .service systemctl enable openstack-cinder-volume.service target .service systemctl status openstack-cinder-volume.service target .service
在控制节点进行验证 1 2 3 4 5 6 7 8 9 10 11 $ source admin-openrc$ openstack volume service list+------------------+----------------+------+---------+-------+----------------------------+ | Binary | Host | Zone | Status | State | Updated At | +------------------+----------------+------+---------+-------+----------------------------+ | cinder-scheduler | controller01 | nova | enabled | up | 2021 -11 -10 T05:04 :24.000000 | | cinder-scheduler | controller02 | nova | enabled | up | 2021 -11 -10 T05:04 :27.000000 | | cinder-scheduler | controller03 | nova | enabled | up | 2021 -11 -10 T05:04 :20.000000 | | cinder-volume | compute01@ceph | nova | enabled | down | 2021 -11 -10 T05:01 :08.000000 | | cinder-volume | compute02@ceph | nova | enabled | down | 2021 -11 -10 T05:01 :10.000000 | +------------------+----------------+------+---------+-------+----------------------------+
默认情况下 2 个cinder-volume的state状态是down的,原因是此时后端存储服务为ceph,但ceph相关服务尚未启用并集成到cinder-volume
十四、对接Ceph存储 OpenStack 使用 Ceph 作为后端存储可以带来以下好处:
不需要购买昂贵的商业存储设备,降低 OpenStack 的部署成本
Ceph 同时提供了块存储、文件系统和对象存储,能够完全满足 OpenStack 的存储类型需求
RBD COW 特性支持快速的并发启动多个 OpenStack 实例
为 OpenStack 实例默认的提供持久化卷
为 OpenStack 卷提供快照、备份以及复制功能
为 Swift 和 S3 对象存储接口提供了兼容的 API 支持
在生产环境中,我们经常能够看见将 Nova、Cinder、Glance 与 Ceph RBD 进行对接。除此之外,还可以将 Swift、Manila 分别对接到 Ceph RGW 与 CephFS。Ceph 作为统一存储解决方案,有效降低了 OpenStack 云环境的复杂性与运维成本。
Openstack环境中,数据存储可分为临时性存储与永久性存储。
临时性存储:主要由本地文件系统提供,并主要用于nova虚拟机的本地系统与临时数据盘,以及存储glance上传的系统镜像;
永久性存储:主要由cinder提供的块存储与swift提供的对象存储构成,以cinder提供的块存储应用最为广泛,块存储通常以云盘的形式挂载到虚拟机中使用。
Openstack中需要进行数据存储的三大项目主要是nova项目(虚拟机镜像文件),glance项目(共用模版镜像)与cinder项目(块存储)。
下图为cinder,glance与nova访问ceph集群的逻辑图:
ceph与openstack集成主要用到ceph的rbd服务,ceph底层为rados存储集群,ceph通过librados库实现对底层rados的访问;
openstack各项目客户端调用librbd,再由librbd调用librados访问底层rados;
实际使用中,nova需要使用libvirtdriver驱动以通过libvirt与qemu调用librbd;cinder与glance可直接调用librbd;
写入ceph集群的数据被条带切分成多个object,object通过hash函数映射到pg(构成pg容器池pool),然后pg通过几圈crush算法近似均匀地映射到物理存储设备osd(osd是基于文件系统的物理存储设备,如xfs,ext4等)。
CEPH PG数量设置与详细介绍
在创建池之前要设置一下每个OSD的最大PG 数量
PG PGP官方计算公式计算器
参数解释:
Target PGs per OSD :预估每个OSD的PG数,一般取100计算。当预估以后集群OSD数不会增加时,取100计算;当预估以后集群OSD数会增加一倍时,取200计算。**OSD #**:集群OSD数量。
%Data :预估该pool占该OSD集群总容量的近似百分比。Size :该pool的副本数。
依据参数使用公式计算新的 PG 的数目:
PG 总数= ((OSD总数*100)/最大副本数)/池数
3x100/3/3=33.33 ;舍入到2的N次幕为32
我们会将三个重要的OpenStack服务:Cinder(块存储)、Glance(镜像)和Nova(虚拟机虚拟磁盘)与Ceph集成。
openstack 集群准备 openstack集群作为ceph的客户端;下面需要再openstack集群上进行ceph客户端的环境配置
全部节点上添加ceph的yum源 1 2 rpm -ivh http://download.ceph.com/rpm-luminous/el7/noarch/ceph-release-1-1.el7.noarch.rpm sed -i 's#download.ceph.com#mirrors.aliyun.com/ceph#g' /etc/yum.repos.d/ceph.repo
安装Ceph客户端 openstack全部节点安装ceph;已配置yum源,直接安装即可;目的是可以在openstack集群使用ceph的命令
glance服务所在节点安装python2-rbd
glance-api 服务运行在3个控制节点, 因此3台控制节点都必须安装
1 yum install python-rbd -y
cinder-volume与nova-compute服务所在节点安装ceph-common
cinder-volume 与 nova-compute 服务运行在2个计算(存储)节点; 因此2台计算节点都必须安装
1 yum install ceph-common -y
需要有ceph的配置文件(ceph集群上操作) 将配置文件和密钥复制到openstack集群各节点
配置文件就是生成的ceph.conf;而密钥是 ceph.client.admin.keyring,当使用ceph客户端连接至ceph集群时需要使用的密默认密钥,这里我们所有节点都要复制,命令如下:
1 ceph-deploy admin controller01 controller02 controller03 compute01 compute02
ceph 集群准备 需求说明 ※Glance 作为openstack中镜像服务,支持多种适配器,支持将镜像存放到本地文件系统,http服务器,ceph分布式文件系统,glusterfs和sleepdog等开源的分布式文件系统上。目前glance采用的是本地filesystem的方式存储,存放在默认的路径 /var/lib/glance/images 下,当把本地的文件系统修改为分布式的文件系统ceph之后,原本在系统中镜像将无法使用,所以建议当前的镜像删除,部署好ceph之后,再统一上传至ceph中存储。
※Nova 负责虚拟机的生命周期管理,包括创建,删除,重建,开机,关机,重启,快照等,作为openstack的核心,nova负责IaaS中计算重要的职责,其中nova的存储格外重要,默认情况下,nova将instance的数据存放在/var/lib/nova/instances/%UUID目录下,使用本地的存储空间。使用这种方式带来的好处是:简单,易实现,速度快,故障域在一个可控制的范围内。然而,缺点也非常明显:compute出故障,上面的虚拟机down机时间长,没法快速恢复,此外,一些特性如热迁移live-migration,虚拟机容灾nova evacuate等高级特性,将无法使用,对于后期的云平台建设,有明显的缺陷。对接 Ceph 主要是希望将实例的系统磁盘文件储存到 Ceph 集群中。与其说是对接 Nova,更准确来说是对接 QEMU-KVM/libvirt,因为 librbd 早已原生集成到其中。
※Cinder 为 OpenStack 提供卷服务,支持非常广泛的后端存储类型。对接 Ceph 后,Cinder 创建的 Volume 本质就是 Ceph RBD 的块设备,当 Volume 被虚拟机挂载后,Libvirt 会以 rbd 协议的方式使用这些 Disk 设备。除了 cinder-volume 之后,Cinder 的 Backup 服务也可以对接 Ceph,将备份的 Image 以对象或块设备的形式上传到 Ceph 集群。
原理解析 使用ceph的rbd接口,需要通过libvirt,所以需要在客户端机器上安装libvirt和qemu,关于ceph和openstack结合的结构如下,同时,在openstack中,需要用到存储的地方有三个:
glance的镜像,默认的本地存储,路径在 /var/lib/glance/images 目录下,
nova虚拟机存储,默认本地,路径位于 /var/lib/nova/instances 目录下,
cinder存储,默认采用LVM的存储方式。
创建pool池 为 Glance、Nova、Cinder 创建专用的RBD Pools池
需要配置hosts解析文件,这里最开始已经配置完成,如未添加hosts解析需要进行配置
在ceph01管理节点上操作 ;命名为:volumes,vms,images,分布给Glance,Nova,Cinder 使用
依据参数使用公式计算新的 PG 的数目,集群中15个 osd,2个副本(默认3个,生产也建议3个),3个池:
PG 总数= ((OSD总数*100)/最大副本数)/池数
15x100/2/3=250 ;舍入到2的N次幕为128
1 2 3 4 5 6 7 8 9 10 11 12 13 14 15 16 17 18 19 20 21 22 23 24 25 26 27 28 29 30 31 32 33 34 35 36 37 38 # ceph默认创建了一个pool池为rbd [root@ceph01 ~ ]# ceph osd lspools 1 .rgw.root,2 default .rgw.control,3 default .rgw.meta,4 default .rgw.log,----------------------------------- # 为 Glance、Nova、Cinder 创建专用的 RBD Pools,并格式化 ceph osd pool create images 128 128 ceph osd pool create volumes 128 128 ceph osd pool create vms 128 128 rbd pool init images rbd pool init volumes rbd pool init vms ----------------------------------- # 查看pool的pg_num和pgp_num大小 [root@ceph01 ~ ]# ceph osd pool get vms pg_num pg_num: 128 [root@ceph01 ~ ]# ceph osd pool get vms pgp_num pgp_num: 128 ----------------------------------- # 查看ceph中的pools;忽略之前创建的pool [root@ceph01 ~ ]# ceph osd lspools 1 .rgw.root,2 default .rgw.control,3 default .rgw.meta,4 default .rgw.log,5 images,6 volumes,7 vms,[root@ceph01 ~ ]# ceph osd pool stats ... pool images id 5 nothing is going on pool volumes id 6 nothing is going on pool vms id 7 nothing is going on
ceph授权认证 在ceph01管理节点上操作 ;
通过ceph管理节点为Glance、cinder创建用户
针对pool设置权限,pool名对应创建的pool
1 2 3 4 5 6 7 [root@ceph01 ~] [client.glance] key = AQCyX4thKE90ERAAw7mrCSGzDip60gZQpoth7g==[root@ceph01 ~] [client.cinder] key = AQC9X4thS8JUKxAApugrXmAkkgHt3NvW/v4lJg==
配置openstack节点与ceph的ssh免密连接
前面已配置,省略
推送client.glance和client.cinder秘钥
1 2 3 4 5 6 7 8 9 10 11 12 13 ceph auth get-or-create client.glance | tee /etc/ceph/ceph.client.glance.keyring [client.glance] key = AQCyX4thKE90ERAAw7mrCSGzDip60gZQpoth7g== ceph auth get-or-create client.glance | ssh root@controller01 tee /etc/ceph/ceph.client.glance.keyring ceph auth get-or-create client.glance | ssh root@controller02 tee /etc/ceph/ceph.client.glance.keyring ceph auth get-or-create client.glance | ssh root@controller03 tee /etc/ceph/ceph.client.glance.keyring ssh root@controller01 chown glance:glance /etc/ceph/ceph.client.glance.keyring ssh root@controller02 chown glance:glance /etc/ceph/ceph.client.glance.keyring ssh root@controller03 chown glance:glance /etc/ceph/ceph.client.glance.keyring
nova-compute与cinder-volume都部署在计算节点 ,不必重复操作,如果nova计算节点与cinder存储节点分离则需要分别推送;
1 2 3 4 5 6 7 8 9 10 11 ceph auth get-or-create client.cinder | tee /etc/ceph/ceph.client.cinder.keyring [client.cinder] key = AQC9X4thS8JUKxAApugrXmAkkgHt3NvW/v4lJg== ceph auth get-or-create client.cinder | ssh root@compute01 tee /etc/ceph/ceph.client.cinder.keyring ceph auth get-or-create client.cinder | ssh root@compute02 tee /etc/ceph/ceph.client.cinder.keyring ssh root@compute01 chown cinder:cinder /etc/ceph/ceph.client.cinder.keyring ssh root@compute02 chown cinder:cinder /etc/ceph/ceph.client.cinder.keyring
授权添加到Libvirt守护进程 在ceph管理节点上为nova节点创建keyring文件
nova-compute所在节点需要将client.cinder用户的秘钥文件存储到libvirt中;当基于ceph后端的cinder卷被attach到虚拟机实例时,libvirt需要用到该秘钥以访问ceph集群;
在ceph管理节点向计算(存储)节点推送client.cinder秘钥文件,生成的文件是临时性的,将秘钥添加到libvirt后可删除
1 2 ceph auth get -key client.cinder | ssh root@compute01 tee /etc/ceph/client.cinder.key ceph auth get -key client.cinder | ssh root@compute02 tee /etc/ceph/client.cinder.key
在计算节点将秘钥加入libvirt
全部计算节点配置;以compute01节点为例;
生成随机 UUID,作为Libvirt秘钥的唯一标识,全部计算节点可共用此uuid;
只需要生成一次,所有的cinder-volume、nova-compute都是用同一个UUID,请保持一致;
1 2 3 4 5 6 7 8 9 10 11 12 13 14 15 16 17 18 19 20 21 22 23 24 25 26 27 28 29 30 31 32 33 34 35 36 37 38 39 [root@compute01 ~ ]# uuidgen bae8efd1-e319-48 cc-8f d0-9213 dd0e3497 [root@compute01 ~ ]# # 创建Libvirt秘钥文件,修改为生成的uuid [root@compute01 ~ ]# cat >> /etc/ceph/secret.xml <<EOF <secret ephemeral='no' private ='no' > <uuid>bae8efd1-e319-48 cc-8f d0-9213 dd0e3497</uuid> <usage type='ceph' > <name>client.cinder secret</name> </usage> </secret> EOF scp -rp /etc/ceph/secret.xml compute02:/etc/ceph/ # 定义Libvirt秘钥;全部计算节点执行 [root@compute01 ~ ]# virsh secret-define --file /etc/ceph/secret.xml Secret bae8efd1-e319-48 cc-8f d0-9213 dd0e3497 created [root@compute02 ~ ]# virsh secret-define --file /etc/ceph/secret.xml Secret bae8efd1-e319-48 cc-8f d0-9213 dd0e3497 created # 设置秘钥的值为client.cinder用户的key,Libvirt;凭此key就能以Cinder的用户访问Ceph集群 [root@compute01 ~ ]# virsh secret-set-value --secret bae8efd1-e319-48cc-8fd0-9213dd0e3497 --base64 $(cat /etc/ceph/client.cinder.key) Secret value set [root@compute02 ~ ]# virsh secret-set-value --secret bae8efd1-e319-48cc-8fd0-9213dd0e3497 --base64 $(cat /etc/ceph/client.cinder.key) Secret value set # 查看每台计算节点上的秘钥清单 [root@compute01 ~ ]# virsh secret-list UUID Usage -------------------------------------------------------------------------------- bae8efd1-e319-48 cc-8f d0-9213 dd0e3497 ceph client.cinder secret [root@compute02 ~ ]# virsh secret-list UUID Usage -------------------------------------------------------------------------------- bae8efd1-e319-48 cc-8f d0-9213 dd0e3497 ceph client.cinder secret
配置glance集成ceph Glance 为 OpenStack 提供镜像及其元数据注册服务,Glance 支持对接多种后端存储。与 Ceph 完成对接后,Glance 上传的 Image 会作为块设备储存在 Ceph 集群中。新版本的 Glance 也开始支持 enabled_backends 了,可以同时对接多个存储提供商。
**写时复制技术(copy-on-write)**:内核只为新生成的子进程创建虚拟空间结构,它们复制于父进程的虚拟空间结构,但是不为这些段分配物理内存,它们共享父进程的物理空间,当父子进程中有更改相应的段的行为发生时,再为子进程相应的段分配物理空间。写时复制技术大大降低了进程对资源的浪费。
配置glance-api.conf 全部控制节点进行配置;以controller01节点为例;
只修改涉及glance集成ceph的相关配置
1 2 3 4 5 6 7 8 cp /etc/glance/glance-api.conf{,.bak2}[glance_store] stores = file,http default_store = file filesystem_store_datadir = /var/lib/glance/images/
1 2 3 4 5 6 7 8 9 openstack-config --set /etc/glance/glance-api.conf DEFAULT show_image_direct_url True openstack-config --set /etc/glance/glance-api.conf glance_store stores rbd openstack-config --set /etc/glance/glance-api.conf glance_store default_store rbd openstack-config --set /etc/glance/glance-api.conf glance_store rbd_store_pool images openstack-config --set /etc/glance/glance-api.conf glance_store rbd_store_user glance openstack-config --set /etc/glance/glance-api.conf glance_store rbd_store_ceph_conf /etc/ceph/ceph.conf openstack-config --set /etc/glance/glance-api.conf glance_store rbd_store_chunk_size 8
变更配置文件,重启服务
1 2 systemctl restart openstack-glance-api.service lsof -i :9292
上传镜像测试 对接 Ceph 之后,通常会以 RAW 格式创建 Glance Image,而不再使用 QCOW2 格式,否则创建虚拟机时需要进行镜像复制,没有利用 Ceph RBD COW 的优秀特性。
1 2 3 4 5 6 7 8 9 10 11 12 13 14 15 16 17 18 19 20 21 22 23 24 25 26 27 28 29 30 31 32 33 34 35 36 37 38 39 40 41 42 43 44 45 46 47 48 49 50 51 52 53 54 55 56 57 58 59 60 61 62 63 64 65 66 [root@controller01 ~ ]# ll total 16448 - rw- r- rw- r- rw- r- rw- r- rw- r[root@controller01 ~ ]# [root@controller01 ~ ]# qemu- img info cirros-0.5 .1 - x86_64- disk.img image: cirros-0.5 .1 - x86_64- disk.img file format: qcow2 virtual size: 112 M (117440512 bytes) disk size: 16 M cluster_size: 65536 Format specific information: compat: 1.1 lazy refcounts: false refcount bits: 16 corrupt: false [root@controller01 ~ ]# # 将镜像从qcow2格式转换为raw格式 [root@controller01 ~ ]# qemu- img convert - f qcow2 - O raw cirros-0.5 .1 - x86_64- disk.img cirros-0.5 .1 - x86_64- disk.raw [root@controller01 ~ ]# ls - l total 33504 - rw- r- rw- r- rw- r- rw- r- rw- r- rw- r[root@controller01 ~ ]# [root@controller01 ~ ]# qemu- img info cirros-0.5 .1 - x86_64- disk.raw image: cirros-0.5 .1 - x86_64- disk.raw file format: raw virtual size: 112 M (117440512 bytes) disk size: 17 M [root@controller01 ~ ]# [root@controller01 ~ ]# # 上传镜像;查看glance和ceph联动情况 [root@controller01 ~ ]# openstack image create + | Field | Value | + | checksum | 01e7 d1515ee776be3228673441d449e6 | | container_format | bare | | created_at | 2021 -11 -10 T11:13 :57 Z | | disk_format | raw | | file | / v2/ images/ 1 c72f484- f828-4 a9d-9 a4c-5 d542acbd203/ file | | id | 1 c72f484- f828-4 a9d-9 a4c-5 d542acbd203 | | min_disk | 0 | | min_ram | 0 | | name | cirros_raw | | owner | 60 f490ceabcb493db09bdd4c1990655f | | properties | direct_url= 'rbd://18bdcd50-2ea5-4130-b27b-d1b61d1460c7/images/1c72f484-f828-4a9d-9a4c-5d542acbd203/snap' , os_hash_algo= 'sha512' , os_hash_value= 'd663dc8d739adc772acee23be3931075ea82a14ba49748553ab05f0e191286a8fe937d00d9f685ac69fd817d867b50be965e82e46d8cf3e57df6f86a57fa3c36' , os_hidden= 'False' | | protected | False | | schema | / v2/ schemas/ image | | size | 117440512 | | status | active | | tags | | | updated_at | 2021 -11 -10 T11:14 :01 Z | | virtual_size | None | | visibility | public | + [root@controller01 ~ ]#
查看镜像和glance池数据
1 2 3 4 5 6 7 8 [root@controller01 ~ ]# openstack image list + | ID | Name | Status | + | 1 c66cd7e- b6d9-4e70 - a3d4- f73b27a84230 | cirros- qcow2 | active | | 1 c72f484- f828-4 a9d-9 a4c-5 d542acbd203 | cirros_raw | active | + [root@controller01 ~ ]#
1 2 3 [root@controller01 ~ ]# rbd ls images 1 c72f484-f828-4 a9d-9 a4c-5 d542acbd203[root@controller01 ~ ]#
1 2 3 4 5 6 7 8 9 10 11 12 13 14 [root@controller01 ~ ] rbd image '1c72f484-f828-4a9d-9a4c-5d542acbd203': size 112 MiB in 14 objects order 23 (8 MiB objects) snapshot_count: 1 id: 5e9ee3899042 block_name_prefix: rbd_data.5e9ee3899042 format: 2 features: layering, exclusive-lock, object-map, fast-diff, deep-flatten op_features: flags: create_timestamp: Wed Nov 10 19 :14:01 2021 [root@controller01 ~ ] [root@controller01 ~ ]
1 2 3 4 [root@controller01 ~ ]# rbd snap ls images/1c72f484-f828-4a9d-9a4c-5d542acbd203 SNAPID NAME SIZE PROTECTED TIMESTAMP 4 snap 112 MiB yes Wed Nov 10 19 :14 :04 2021 [root@controller01 ~ ]#
1 2 3 4 5 6 7 8 9 10 11 12 13 14 15 16 17 18 19 20 21 22 [root@controller01 ~ ]# rados ls -p images rbd_directory rbd_data.5e9 ee3899042.0000000000000008 rbd_info rbd_data.5e9 ee3899042.0000000000000002 rbd_data.5e9 ee3899042.0000000000000006 rbd_object_map.5e9 ee3899042.0000000000000004 rbd_data.5e9 ee3899042.0000000000000003 rbd_data.5e9 ee3899042.0000000000000005 rbd_data.5e9 ee3899042.000000000000000b rbd_data.5e9 ee3899042.000000000000000 d rbd_data.5e9 ee3899042.0000000000000007 rbd_data.5e9 ee3899042.0000000000000000 rbd_data.5e9 ee3899042.0000000000000009 rbd_data.5e9 ee3899042.000000000000000 a rbd_data.5e9 ee3899042.0000000000000004 rbd_object_map.5e9 ee3899042 rbd_id.1 c72f484-f828-4 a9d-9 a4c-5 d542acbd203 rbd_data.5e9 ee3899042.000000000000000 c rbd_header.5e9 ee3899042 rbd_data.5e9 ee3899042.0000000000000001 [root@controller01 ~ ]#
Ceph执行image镜像的步骤过程详解 创建raw格式的Image时;Ceph中执行了以下步骤:
在 Pool images 中新建了一个 {glance_image_uuid} 块设备,块设备的 Object Size 为 8M,对应的 Objects 有 2 个,足以放下 cirros.raw 13M 的数据。
对新建块设备执行快照。
对该快照执行保护。
1 2 3 rbd -p ${ GLANCE_POOL } create --size ${ SIZE } ${ IMAGE_ID } rbd -p ${ GLANCE_POOL } snap create ${ IMAGE_ID }@snap rbd -p ${ GLANCE_POOL } snap protect ${ IMAGE_ID }@snap
删除raw格式的Image时;Ceph中执行了以下步骤:
1 2 3 rbd -p ${GLANCE_POOL} snap unprotect ${IMAGE_ID} @snap rbd -p ${GLANCE_POOL} snap rm ${IMAGE_ID} @snap rbd -p ${GLANCE_POOL} rm ${IMAGE_ID}
总结
将openstack集群中的glance镜像的数据存储到ceph中是一种非常好的解决方案,既能够保障镜像数据的安全性,同时glance和nova在同个存储池中,能够基于copy-on-write(写时复制)的方式快速创建虚拟机,能够在秒级为单位实现vm的创建。
使用Ceph作为Cinder的后端存储 配置cinder.conf
全部计算节点进行配置; 以compute01节点为例;只修改glance集成ceph的相关配置
1 2 # 备份cinder.conf的配置文件;以便于恢复 cp /etc/cinder/cinder.conf{,.bak2}
1 2 3 4 5 6 7 8 9 10 11 12 13 14 15 openstack-config --set /etc/cinder/cinder.conf DEFAULT enabled_backends ceph openstack-config --set /etc/cinder/cinder.conf DEFAULT glance_api_version 2 openstack-config --set /etc/cinder/cinder.conf ceph volume_driver cinder.volume.drivers.rbd.RBDDriver openstack-config --set /etc/cinder/cinder.conf ceph rbd_pool volumes openstack-config --set /etc/cinder/cinder.conf ceph rbd_ceph_conf /etc/ceph/ceph.conf openstack-config --set /etc/cinder/cinder.conf ceph rbd_flatten_volume_from_snapshot false openstack-config --set /etc/cinder/cinder.conf ceph rbd_max_clone_depth 5 openstack-config --set /etc/cinder/cinder.conf ceph rbd_store_chunk_size 4 openstack-config --set /etc/cinder/cinder.conf ceph rados_connect_timeout -1 openstack-config --set /etc/cinder/cinder.conf ceph rbd_user cinder openstack-config --set /etc/cinder/cinder.conf ceph rbd_secret_uuid bae8efd1-e319-48cc-8fd0-9213dd0e3497 openstack-config --set /etc/cinder/cinder.conf ceph volume_backend_name ceph
重启cinder-volume服务 全部计算节点重启cinder-volume服务;
1 2 systemctl restart openstack-cinder-volume.service systemctl status openstack-cinder-volume.service
验证服务状态 任意控制节点上查看;
1 2 3 4 5 6 7 8 9 10 [root@controller01 ~]# openstack volume service list +------------------+----------------+------+---------+-------+----------------------------+ | Binary | Host | Zone | Status | State | Updated At | +------------------+----------------+------+---------+-------+----------------------------+ | cinder-scheduler | controller01 | nova | enabled | up | 2021 -11 -10 T11:45 :19.000000 | | cinder-scheduler | controller02 | nova | enabled | up | 2021 -11 -10 T11:45 :11.000000 | | cinder-scheduler | controller03 | nova | enabled | up | 2021 -11 -10 T11:45 :14.000000 | | cinder-volume | compute01@ceph | nova | enabled | up | 2021 -11 -10 T11:45 :17.000000 | | cinder-volume | compute02@ceph | nova | enabled | up | 2021 -11 -10 T11:45 :21.000000 | +------------------+----------------+------+---------+-------+----------------------------+
创建空白卷Volume测试 设置卷类型
在任意控制节点为cinder的ceph后端存储创建对应的type,在配置多存储后端时可区分类型;
1 2 3 4 5 6 7 8 [root@controller01 ~]# cinder type -create ceph + | ID | Name | Description | Is_Public | + | 98718 aae-b0e8-4 a4e-8 b94-de0ace67b392 | ceph | - | True | + [root@controller01 ~]# # 可通过 cinder type -list 或 openstack volume type list 查看
为ceph type设置扩展规格,键值 volume_backend_name,value值 ceph
1 2 3 4 5 6 7 8 9 10 [root@controller01 ~] [root@controller01 ~] [root@controller01 ~] +--------------------------------------+-------------+---------------------------------+ | ID | Name | extra_specs | +--------------------------------------+-------------+---------------------------------+ | 1 eae6f86-f6ae-4685 -8 f2b-0064 dcb9d917 | __DEFAULT__ | {} | | 98718 aae-b0e8-4 a4e-8 b94-de0ace67b392 | ceph | {'volume_backend_name' : 'ceph' } | +--------------------------------------+-------------+---------------------------------+ [root@controller01 ~]
创建一个volume卷
任意控制节点上创建一个1GB的卷 ;最后的数字1代表容量为1G
1 2 3 4 5 6 7 8 9 10 11 12 13 14 15 16 17 18 19 20 21 22 23 24 25 26 [root@controller01 ~ ]# openstack volume create + | Field | Value | + | attachments | [] | | availability_zone | nova | | bootable | false | | consistencygroup_id | None | | created_at | 2021 -11 -10 T11:56 :02.000000 | | description | None | | encrypted | False | | id | 77 d1dc9c-2826 -45 f2- b738- f3571f90ef87 | | migration_status | None | | multiattach | False | | name | ceph- volume | | properties | | | replication_status | None | | size | 1 | | snapshot_id | None | | source_volid | None | | status | creating | | type | ceph | | updated_at | None | | user_id | 05 a3ad27698e41b0a3e10a6daffbf64e | + [root@controller01 ~ ]#
验证
查看创建好的卷
1 2 3 4 5 6 7 8 9 10 11 12 13 14 15 16 17 18 19 20 21 22 23 24 25 26 27 28 29 30 31 32 33 34 35 36 37 38 39 40 41 42 43 44 45 46 47 48 49 50 51 52 53 54 55 56 57 58 59 60 61 62 63 64 65 66 67 68 69 70 71 72 73 74 75 76 77 78 79 80 81 82 83 84 85 86 87 88 89 90 91 92 93 94 95 96 97 98 99 100 101 102 103 104 105 106 107 108 109 110 111 112 113 114 115 116 117 118 119 120 121 122 123 124 125 126 127 128 129 130 131 132 133 134 135 136 137 138 139 140 141 142 143 144 145 146 147 148 149 150 151 152 153 154 155 156 157 158 159 160 161 162 163 164 165 166 167 168 169 170 171 172 173 174 175 [root@controller01 ~ ]# openstack volume list +--------------------------------------+-------------+-----------+------+-----------------------------+ | ID | Name | Status | Size | Attached to | +--------------------------------------+-------------+-----------+------+-----------------------------+ | 77 d1dc9c-2826 -45f 2-b738-f3571f90ef87 | ceph-volume | available | 1 | | | 0092b 891-a249-4 c62-b06d-71f 9a5e66e37 | | in -use | 1 | Attached to s6 on /dev/vda | +--------------------------------------+-------------+-----------+------+-----------------------------+ [root@controller01 ~ ]# # 检查ceph集群的volumes池 [root@controller01 ~ ]# rbd ls volumes volume-0092b 891-a249-4 c62-b06d-71f 9a5e66e37 volume-77 d1dc9c-2826 -45f 2-b738-f3571f90ef87 [root@controller01 ~ ]# [root@controller01 ~ ]# [root@controller01 ~ ]# rbd info volumes/volume-77d1dc9c-2826-45f2-b738-f3571f90ef87 rbd image 'volume-77d1dc9c-2826-45f2-b738-f3571f90ef87' : size 1 GiB in 256 objects order 22 (4 MiB objects) snapshot_count: 0 id: 60754 c5853d9 block_name_prefix: rbd_data.60754 c5853d9 format: 2 features: layering, exclusive-lock , object -map, fast-diff, deep-flatten op_features: flags: create_timestamp: Wed Nov 10 19 :56 :05 2021 [root@controller01 ~ ]# [root@controller01 ~ ]# rados ls -p volumes rbd_data.5f 93fbe03211.00000000000000 c8 rbd_data.5f 93fbe03211.0000000000000056 rbd_data.5f 93fbe03211.00000000000000b 8 rbd_data.5f 93fbe03211.0000000000000011 rbd_data.5f 93fbe03211.0000000000000026 rbd_data.5f 93fbe03211.000000000000000 e rbd_data.5f 93fbe03211.0000000000000080 rbd_data.5f 93fbe03211.00000000000000 ae rbd_data.5f 93fbe03211.00000000000000 ac rbd_data.5f 93fbe03211.0000000000000003 rbd_data.5f 93fbe03211.00000000000000 ce rbd_data.5f 93fbe03211.0000000000000060 rbd_data.5f 93fbe03211.0000000000000012 rbd_data.5f 93fbe03211.00000000000000e4 rbd_data.5f 93fbe03211.000000000000008 c rbd_data.5f 93fbe03211.0000000000000042 rbd_data.5f 93fbe03211.000000000000001 c rbd_data.5f 93fbe03211.000000000000002 c rbd_data.5f 93fbe03211.00000000000000 cc rbd_data.5f 93fbe03211.0000000000000086 rbd_data.5f 93fbe03211.0000000000000082 rbd_data.5f 93fbe03211.000000000000006 e rbd_data.5f 93fbe03211.00000000000000f 4 rbd_data.5f 93fbe03211.0000000000000094 rbd_data.5f 93fbe03211.0000000000000008 rbd_data.5f 93fbe03211.00000000000000 d4 rbd_data.5f 93fbe03211.0000000000000015 rbd_data.5f 93fbe03211.00000000000000 ca rbd_header.60754 c5853d9 rbd_data.5f 93fbe03211.00000000000000 da rbd_data.5f 93fbe03211.0000000000000084 rbd_data.5f 93fbe03211.0000000000000009 rbd_directory rbd_data.5f 93fbe03211.00000000000000f a rbd_data.5f 93fbe03211.000000000000003 a rbd_data.5f 93fbe03211.000000000000004 c rbd_object_map.60754 c5853d9 rbd_data.5f 93fbe03211.00000000000000e8 rbd_data.5f 93fbe03211.000000000000003 c rbd_data.5f 93fbe03211.00000000000000e6 rbd_data.5f 93fbe03211.0000000000000054 rbd_data.5f 93fbe03211.0000000000000006 rbd_data.5f 93fbe03211.0000000000000032 rbd_data.5f 93fbe03211.0000000000000046 rbd_data.5f 93fbe03211.00000000000000f 2 rbd_data.5f 93fbe03211.0000000000000038 rbd_data.5f 93fbe03211.0000000000000096 rbd_data.5f 93fbe03211.0000000000000016 rbd_data.5f 93fbe03211.000000000000004 e rbd_children rbd_data.5f 93fbe03211.00000000000000 d6 rbd_data.5f 93fbe03211.00000000000000 aa rbd_data.5f 93fbe03211.000000000000006 c rbd_data.5f 93fbe03211.0000000000000068 rbd_data.5f 93fbe03211.0000000000000036 rbd_data.5f 93fbe03211.0000000000000000 rbd_data.5f 93fbe03211.0000000000000078 rbd_data.5f 93fbe03211.00000000000000b a rbd_data.5f 93fbe03211.0000000000000004 rbd_data.5f 93fbe03211.0000000000000014 rbd_data.5f 93fbe03211.00000000000000 c0 rbd_data.5f 93fbe03211.000000000000009 a rbd_info rbd_data.5f 93fbe03211.000000000000007 e rbd_data.5f 93fbe03211.000000000000000b rbd_header.5f 93fbe03211 rbd_data.5f 93fbe03211.000000000000000 c rbd_data.5f 93fbe03211.00000000000000b 0 rbd_id.volume-0092b 891-a249-4 c62-b06d-71f 9a5e66e37 rbd_data.5f 93fbe03211.00000000000000b 4 rbd_data.5f 93fbe03211.000000000000005 c rbd_data.5f 93fbe03211.0000000000000058 rbd_data.5f 93fbe03211.0000000000000024 rbd_data.5f 93fbe03211.00000000000000b 6 rbd_data.5f 93fbe03211.00000000000000 a8 rbd_data.5f 93fbe03211.0000000000000062 rbd_data.5f 93fbe03211.0000000000000066 rbd_data.5f 93fbe03211.00000000000000 a0 rbd_id.volume-77 d1dc9c-2826 -45f 2-b738-f3571f90ef87 rbd_data.5f 93fbe03211.00000000000000 d8 rbd_data.5f 93fbe03211.0000000000000022 rbd_data.5f 93fbe03211.000000000000007 a rbd_data.5f 93fbe03211.000000000000003 e rbd_data.5f 93fbe03211.00000000000000b 2 rbd_data.5f 93fbe03211.000000000000000 d rbd_data.5f 93fbe03211.000000000000009 c rbd_data.5f 93fbe03211.000000000000001 e rbd_data.5f 93fbe03211.0000000000000020 rbd_data.5f 93fbe03211.0000000000000076 rbd_data.5f 93fbe03211.00000000000000 a4 rbd_data.5f 93fbe03211.00000000000000 a6 rbd_data.5f 93fbe03211.000000000000004 a rbd_data.5f 93fbe03211.0000000000000010 rbd_data.5f 93fbe03211.0000000000000030 rbd_data.5f 93fbe03211.00000000000000 d0 rbd_data.5f 93fbe03211.0000000000000064 rbd_data.5f 93fbe03211.000000000000000 a rbd_data.5f 93fbe03211.000000000000001 a rbd_data.5f 93fbe03211.000000000000007 c rbd_data.5f 93fbe03211.00000000000000 c4 rbd_data.5f 93fbe03211.0000000000000005 rbd_data.5f 93fbe03211.000000000000008 a rbd_data.5f 93fbe03211.000000000000008 e rbd_data.5f 93fbe03211.00000000000000f f rbd_data.5f 93fbe03211.0000000000000002 rbd_data.5f 93fbe03211.00000000000000 a2 rbd_data.5f 93fbe03211.00000000000000e0 rbd_data.5f 93fbe03211.0000000000000070 rbd_data.5f 93fbe03211.00000000000000b c rbd_data.5f 93fbe03211.00000000000000f c rbd_data.5f 93fbe03211.0000000000000050 rbd_data.5f 93fbe03211.00000000000000f 0 rbd_data.5f 93fbe03211.00000000000000 dc rbd_data.5f 93fbe03211.0000000000000034 rbd_data.5f 93fbe03211.000000000000002 a rbd_data.5f 93fbe03211.00000000000000 ec rbd_data.5f 93fbe03211.0000000000000052 rbd_data.5f 93fbe03211.0000000000000074 rbd_data.5f 93fbe03211.00000000000000 d2 rbd_data.5f 93fbe03211.000000000000006 a rbd_data.5f 93fbe03211.00000000000000 ee rbd_data.5f 93fbe03211.00000000000000 c6 rbd_data.5f 93fbe03211.00000000000000 de rbd_data.5f 93fbe03211.00000000000000f e rbd_data.5f 93fbe03211.0000000000000088 rbd_data.5f 93fbe03211.00000000000000e2 rbd_data.5f 93fbe03211.0000000000000098 rbd_data.5f 93fbe03211.00000000000000f 6 rbd_data.5f 93fbe03211.00000000000000 c2 rbd_data.5f 93fbe03211.0000000000000044 rbd_data.5f 93fbe03211.000000000000002 e rbd_data.5f 93fbe03211.000000000000005 a rbd_data.5f 93fbe03211.0000000000000048 rbd_data.5f 93fbe03211.000000000000009 e rbd_data.5f 93fbe03211.0000000000000018 rbd_data.5f 93fbe03211.0000000000000072 rbd_data.5f 93fbe03211.0000000000000090 rbd_data.5f 93fbe03211.00000000000000b e rbd_data.5f 93fbe03211.00000000000000 ea rbd_data.5f 93fbe03211.0000000000000028 rbd_data.5f 93fbe03211.00000000000000f 8 rbd_data.5f 93fbe03211.0000000000000040 rbd_data.5f 93fbe03211.000000000000005 e rbd_data.5f 93fbe03211.0000000000000092 rbd_object_map.5f 93fbe03211 [root@controller01 ~ ]#
openstack创建一个空白 Volume,Ceph相当于执行了以下指令
1 rbd -p ${CINDER_POOL} create --new-format --size ${SIZE} volume-${VOLUME_ID}
卷可以连接到实例
从镜像创建Volume测试 从镜像创建 Volume 的时候应用了 Ceph RBD COW Clone 功能,这是通过 glance-api.conf [DEFAULT] show_image_direct_url = True 来开启。这个配置项的作用是持久化 Image 的 location,此时 Glance RBD Driver 才可以通过 Image location 执行 Clone 操作。并且还会根据指定的 Volume Size 来调整 RBD Image 的 Size。
删除僵尸镜像的方法
1 2 3 4 5 6 7 [root@controller01 ~]# openstack image list +--------------------------------------+--------------+--------+ | ID | Name | Status | +--------------------------------------+--------------+--------+ | 1 c66cd7e-b6d9-4e70 -a3d4-f73b27a84230 | cirros-qcow2 | active | | 1 c72f484-f828-4 a9d-9 a4c-5 d542acbd203 | cirros_raw | active | +--------------------------------------+--------------+--------+
一直存在的cirros_qcow2镜像为对接ceph之前的镜像,现在已无法使用,所以将之删除
1 2 3 4 5 6 7 8 9 10 11 12 13 14 15 16 17 18 19 20 21 22 # 把镜像属性变为非可用状态,必须保证无实例正在使用,否则会报 HTTP 500 错误 $ openstack image set $ openstack image list + | ID | Name | Status | + | 1 c66cd7e- b6d9-4e70 - a3d4- f73b27a84230 | cirros- qcow2 | deactivated | | 1 c72f484- f828-4 a9d-9 a4c-5 d542acbd203 | cirros_raw | active | + # 进入数据库 mysql - uroot - p123456 use glance; select id, status, name from images where id= '1c66cd7e-b6d9-4e70-a3d4-f73b27a84230' ;update images set deleted= 1 where id= '1c66cd7e-b6d9-4e70-a3d4-f73b27a84230' ;$ openstack image list + | ID | Name | Status | + | 1 c72f484- f828-4 a9d-9 a4c-5 d542acbd203 | cirros_raw | active | +
为cirros_raw镜像创建一个1G的卷
1 2 3 4 5 6 7 8 9 10 11 12 13 14 15 16 17 18 19 20 21 22 23 24 25 $ openstack volume create + | Field | Value | + | attachments | [] | | availability_zone | nova | | bootable | false | | consistencygroup_id | None | | created_at | 2021 -11 -10 T12:14 :29.000000 | | description | None | | encrypted | False | | id | f79c3af2-101e-4 a76-9e88 -37 ceb51f622c | | migration_status | None | | multiattach | False | | name | cirros_raw_image | | properties | | | replication_status | None | | size | 1 | | snapshot_id | None | | source_volid | None | | status | creating | | type | ceph | | updated_at | None | | user_id | 05 a3ad27698e41b0a3e10a6daffbf64e | +
或者web界面
从镜像创建的卷就可以在创建实例时使用了
查看images池的Objects信息
1 2 3 4 5 6 7 8 9 10 11 12 13 14 15 16 17 18 19 20 21 22 23 24 25 [root@controller01 ~ ] volume-0092b891-a249-4c62-b06d-71f9a5e66e37 volume-77d1dc9c-2826-45f2-b738-f3571f90ef87 volume-f79c3af2-101e-4a76-9e88-37ceb51f622c [root@controller01 ~ ] [root@controller01 ~ ] rbd image 'volume-f79c3af2-101e-4a76-9e88-37ceb51f622c': size 1 GiB in 256 objects order 22 (4 MiB objects) snapshot_count: 0 id: 62606c5008db block_name_prefix: rbd_data.62606c5008db format: 2 features: layering, exclusive-lock, object-map, fast-diff, deep-flatten op_features: flags: create_timestamp: Wed Nov 10 20 :14:29 2021 parent: images/1c72f484-f828-4a9d-9a4c-5d542acbd203@snap overlap: 112 MiB [root@controller01 ~ ] [root@controller01 ~ ] rbd_id.volume-0092b891-a249-4c62-b06d-71f9a5e66e37 rbd_id.volume-77d1dc9c-2826-45f2-b738-f3571f90ef87 rbd_id.volume-f79c3af2-101e-4a76-9e88-37ceb51f622c [root@controller01 ~ ]
在openstack上从镜像创建一个Volume,Ceph相当于执行了以下指令
1 2 3 4 5 rbd clone ${GLANCE_POOL} /${IMAGE_ID} @snap ${CINDER_POOL} /volume-${VOLUME_ID} if [[ -n "${SIZE} " ]]; then rbd resize --size ${SIZE} ${CINDER_POOL} /volume-${VOLUME_ID} fi
为镜像创建的卷生成快照测试 任意控制节点操作;
创建cirros_raw_image卷的快照
1 2 3 4 5 6 7 8 9 10 11 12 13 14 15 [root@controller01 ~ ]# openstack volume snapshot create + | Field | Value | + | created_at | 2021 -11 -10 T12:26 :02.607424 | | description | None | | id | 6658 c988-8 dcd-411e-9882 - a1ac357fbe93 | | name | cirros_raw_image_snap01 | | properties | | | size | 1 | | status | creating | | updated_at | None | | volume_id | f79c3af2-101e-4 a76-9e88 -37 ceb51f622c | + [root@controller01 ~ ]#
查看快照列表
1 2 3 4 5 6 7 [root@controller01 ~ ]# openstack volume snapshot list + | ID | Name | Description | Status | Size | + | 6658 c988-8 dcd-411e-9882 - a1ac357fbe93 | cirros_raw_image_snap01 | None | available | 1 | + [root@controller01 ~ ]#
或者 web 查看
在ceph上查镜像看创建的快照
1 2 3 4 5 6 7 8 9 10 11 12 13 14 15 16 17 18 19 20 21 [root@controller01 ~] +--------------------------------------+-------------------------+-------------+-----------+------+ | ID | Name | Description | Status | Size | +--------------------------------------+-------------------------+-------------+-----------+------+ | 6658 c988-8 dcd-411 e-9882 -a1ac357fbe93 | cirros_raw_image_snap01 | None | available | 1 | +--------------------------------------+-------------------------+-------------+-----------+------+ [root@controller01 ~] [root@controller01 ~] +--------------------------------------+------------------+-----------+------+-----------------------------+ | ID | Name | Status | Size | Attached to | +--------------------------------------+------------------+-----------+------+-----------------------------+ | f79c3af2-101 e-4 a76-9 e88-37 ceb51f622c | cirros_raw_image | available | 1 | | | 77 d1dc9c-2826 -45 f2-b738-f3571f90ef87 | ceph-volume | available | 1 | | | 00 92b891-a249-4 c62-b06d-71 f9a5e66e37 | | in-use | 1 | Attached to s6 on /dev/vda | +--------------------------------------+------------------+-----------+------+-----------------------------+ [root@controller01 ~] [root@controller01 ~] [root@controller01 ~] SNAPID NAME SIZE PROTECTED TIMESTAMP 4 snapshot-6658 c988-8 dcd-411 e-9882 -a1ac357fbe93 1 GiB yes Wed Nov 10 20 :26 :02 2021 [root@controller01 ~]
查看快照详细信息
1 2 3 4 5 6 7 8 9 10 11 12 13 14 15 [root@controller01 ~ ] rbd image 'volume-f79c3af2-101e-4a76-9e88-37ceb51f622c': size 1 GiB in 256 objects order 22 (4 MiB objects) snapshot_count: 1 id: 62606c5008db block_name_prefix: rbd_data.62606c5008db format: 2 features: layering, exclusive-lock, object-map, fast-diff, deep-flatten op_features: flags: create_timestamp: Wed Nov 10 20 :14:29 2021 parent: images/1c72f484-f828-4a9d-9a4c-5d542acbd203@snap overlap: 112 MiB [root@controller01 ~ ]
在openstack上对镜像的卷创建快照,Ceph相当于执行了以下指令
1 2 rbd -p ${ CINDER_POOL } snap create volume-${ VOLUME_ID }@snapshot -${ SNAPSHOT_ID } rbd -p ${ CINDER_POOL } snap protect volume-${ VOLUME_ID }@snapshot -${ SNAPSHOT_ID }
完成后就可以从快照创建实例了
创建 Volume卷备份测试 如果说快照时一个时间机器,那么备份就是一个异地的时间机器,它具有容灾的含义。所以一般来说 Ceph Pool backup 应该与 Pool images、volumes 以及 vms 处于不同的灾备隔离域。
https://www.cnblogs.com/luohaixian/p/9344803.html
https://docs.openstack.org/zh_CN/user-guide/backup-db-incremental.html
一般的,备份具有以下类型:
使用Ceph作为Nova的虚拟机存储 Nova是OpenStack中的计算服务。 Nova存储与默认的运行虚拟机相关联的虚拟磁盘镜像,在 /var/lib/nova/instances/%UUID 目录下。Ceph是可以直接与Nova集成的存储后端之一。
在虚拟磁盘映像的计算节点上使用本地存储有一些缺点:
镜像存储在根文件系统下。大镜像可能导致文件系统被填满,从而导致计算节点崩溃。
计算节点上的磁盘崩溃可能导致虚拟磁盘丢失,因此无法进行虚拟机恢复。
Nova 为 OpenStack 提供计算服务,对接 Ceph 主要是希望将实例的系统磁盘文件储存到 Ceph 集群中。与其说是对接 Nova,更准确来说是对接 QEMU-KVM/libvirt,因为 librbd 早已原生集成到其中。
如果需要从ceph rbd中启动虚拟机,必须将ceph配置为nova的临时后端;
推荐在计算节点的配置文件中启用rbd cache功能;
为了便于故障排查,配置admin socket参数,这样每个使用ceph rbd的虚拟机都有1个socket将有利于虚拟机性能分析与故障解决;
相关配置只涉及全部计算节点ceph.conf文件的[client]与[client.cinder]字段,以compute01节点为例;
配置ceph.conf
如果需要从ceph rbd中启动虚拟机,必须将ceph配置为nova的临时后端;
推荐在计算节点的配置文件中启用rbd cache功能;
为了便于故障排查,配置admin socket参数,这样每个使用ceph rbd的虚拟机都有1个socket将有利于虚拟机性能分析与故障解决;
全部计算节点配置 ceph.conf文件相关的 [client] 与 [client.cinder] 字段,以compute01节点为例;
1 2 3 4 5 6 7 8 9 10 11 12 13 14 15 mkdir -p /var/run/ceph/guests/ /var/log/qemu/chown qemu:libvirt /var/run/ceph/guests/ /var/log/qemu/[root@compute01 ~] [client] rbd_cache = true rbd_cache_writethrough_until_flush = true admin_socket = /var/run/ceph/guests/$cluster -$type .$id .$pid .$cctid .asok log_file = /var/log/qemu/qemu-guest-$pid .log rbd_concurrent_management_ops = 20 [client.cinder] keyring = /etc/ceph/ceph.client.cinder.keyring
配置nova.conf 在全部计算节点配置nova后端使用ceph集群的vms池,以compute01节点为例;
1 2 cp /etc/nova/nova.conf{,.bak2}
1 2 3 4 5 6 7 8 9 10 11 12 13 14 15 16 17 18 19 20 21 22 openstack-config --set /etc/nova/nova.conf DEFAULT vif_plugging_timeout 0 openstack-config --set /etc/nova/nova.conf DEFAULT vif_plugging_is_fatal False openstack-config --set /etc/nova/nova.conf libvirt images_type rbd openstack-config --set /etc/nova/nova.conf libvirt images_rbd_pool vms openstack-config --set /etc/nova/nova.conf libvirt images_rbd_ceph_conf /etc/ceph/ceph.conf openstack-config --set /etc/nova/nova.conf libvirt rbd_user cinder openstack-config --set /etc/nova/nova.conf libvirt rbd_secret_uuid bae8efd1-e319-48cc-8fd0-9213dd0e3497 openstack-config --set /etc/nova/nova.conf libvirt disk_cachemodes \"network=writeback\" openstack-config --set /etc/nova/nova.conf libvirt live_migration_flag \"VIR_MIGRATE_UNDEFINE_SOURCE,VIR_MIGRATE_PEER2PEER,VIR_MIGRATE_LIVE,VIR_MIGRATE_PERSIST_DEST,VIR_MIGRATE_TUNNELLED\" openstack-config --set /etc/nova/nova.conf libvirt inject_password false openstack-config --set /etc/nova/nova.conf libvirt inject_key false openstack-config --set /etc/nova/nova.conf libvirt inject_partition -2 openstack-config --set /etc/nova/nova.conf libvirt hw_disk_discard unmap
重启计算服务 在全部计算节点操作;
1 2 systemctl restart libvirtd.service openstack-nova-compute.service systemctl status libvirtd.service openstack-nova-compute.service
配置live-migration热迁移 修改/etc/libvirt/libvirtd.conf
在全部计算节点操作,以compute01节点为例;
以下给出libvirtd.conf文件的修改处所在的行num
1 2 3 4 5 6 7 8 9 10 11 12 13 14 15 16 17 18 [root@compute01 ~] 20 :listen_tls = 0 34 :listen_tcp = 1 52 :tcp_port = "16509" 65 :listen_addr = "10.10.10.41" 167 :auth_tcp = "none" [root@compute02 ~] 20 :listen_tls = 0 34 :listen_tcp = 1 52 :tcp_port = "16509" 65 :listen_addr = "10.10.10.42" 167 :auth_tcp = "none"
修改/etc/sysconfig/libvirtd
在全部计算节点操作,以compute01节点为例;设置libvirtd 服务监听
1 2 3 4 5 [root@compute01 ~] 12 :LIBVIRTD_ARGS="--listen" [root@compute02 ~] 12 :LIBVIRTD_ARGS="--listen"
计算节点设置免密访问 所有计算节点都必须相互设置nova用户免密,迁移必须,不做迁移会失败;
1 2 3 4 5 6 7 8 9 10 11 12 13 14 15 16 17 18 19 20 21 22 23 usermod -s /bin/bash nova passwd nova su - nova ssh-keygen -t rsa -P '' ssh-copy-id -i .ssh/id_rsa.pub nova@localhost scp -rp .ssh/ nova@compute02 :/var/lib/nova ssh nova@compute02 ssh nova@compute0 1
设置iptables 测试环境已经关闭了iptables,因此暂时不需要设置;正式环境需要配置
live-migration时,源计算节点主动连接目的计算节点 tcp 16509 端口,可以使用 virsh -c qemu+tcp://{node_ip or node_name}/system 连接目的计算节点测试;
迁移前后,在源目地计算节点上的被迁移instance使用 tcp 49152~49161 端口做临时通信;
因虚拟机已经启用iptables相关规则,此时切忌随意重启iptables服务,尽量使用插入的方式添加规则;
同时以修改配置文件的方式写入相关规则,切忌使用 iptables saved 命令;
在全部计算节点操作;
1 2 iptables -I INPUT -p tcp -m state --state NEW -m tcp --dport 16509 -j ACCEPT iptables -I INPUT -p tcp -m state --state NEW -m tcp --dport 49152 :49161 -j ACCEPT
需重启服务 全部计算节点操作;
1 2 3 4 5 systemctl mask libvirtd.socket libvirtd-ro.socket libvirtd-admin.socket libvirtd-tls.socket libvirtd-tcp.socket systemctl restart libvirtd.service systemctl restart openstack-nova-compute.service systemctl status libvirtd.service openstack-nova-compute.service ss -ntlp|grep libvirtd
验证热迁移 首先创建一个存储在 ceph 中是实例
卷大小就是实例 / 目录的大小
创建新卷选项选择不的话,实例还是存储在计算节点本机目录:/var/lib/nova/instances/,不能实现热迁移
其他选项和创建普通实例没区别,就不列出了
查看 s1 在哪个计算节点
1 2 3 4 5 6 7 8 9 10 11 12 13 14 15 16 17 18 19 20 21 22 23 24 25 26 27 28 29 30 31 32 33 34 35 36 37 38 39 40 41 42 43 44 45 46 47 48 49 50 51 52 53 54 55 56 57 58 59 60 61 62 63 64 65 66 67 68 69 70 71 72 73 74 75 76 77 78 79 80 81 82 83 84 85 86 87 88 89 90 91 92 93 94 95 96 97 98 99 100 101 102 103 104 105 106 107 108 109 110 111 112 113 114 115 116 117 118 119 120 121 122 123 124 125 126 127 128 129 130 131 132 133 134 135 136 137 138 139 140 141 142 143 144 145 146 147 148 149 150 151 152 153 154 155 156 157 158 159 160 161 162 163 164 165 166 167 168 169 170 171 172 173 174 175 176 177 178 179 180 181 182 183 184 185 186 187 188 189 190 191 192 193 194 195 196 197 198 199 200 201 202 203 204 205 206 207 208 209 210 211 212 213 214 215 216 217 218 219 220 221 222 223 224 225 226 227 228 229 230 231 232 233 234 235 236 237 238 239 240 241 242 243 244 245 246 247 248 249 250 251 252 253 254 255 256 257 258 259 260 261 262 263 264 265 266 267 268 269 270 271 272 273 274 275 276 277 278 [root@controller01 ~]# source admin-openrc [root@controller01 ~]# [root@controller01 ~]# nova list +--------------------------------------+------+--------+------------+-------------+---------------------+ | ID | Name | Status | Task State | Power State | Networks | +--------------------------------------+------+--------+------------+-------------+---------------------+ | d5a0812e-59ba-4508-ac35-636717e20f04 | s1 | ACTIVE | - | Running | vpc03=172.20.10.168 | +--------------------------------------+------+--------+------------+-------------+---------------------+ [root@controller01 ~]# [root@controller01 ~]# nova show s1 +--------------------------------------+----------------------------------------------------------------------------------+ | Property | Value | +--------------------------------------+----------------------------------------------------------------------------------+ | OS-DCF:diskConfig | AUTO | | OS-EXT-AZ:availability_zone | nova | | OS-EXT-SRV-ATTR:host | compute02 | | OS-EXT-SRV-ATTR:hostname | s1 | | OS-EXT-SRV-ATTR:hypervisor_hostname | compute02 | | OS-EXT-SRV-ATTR:instance_name | instance-00000061 | | OS-EXT-SRV-ATTR:kernel_id | | | OS-EXT-SRV-ATTR:launch_index | 0 | | OS-EXT-SRV-ATTR:ramdisk_id | | | OS-EXT-SRV-ATTR:reservation_id | r-rny3edjk | | OS-EXT-SRV-ATTR:root_device_name | /dev/vda | | OS-EXT-SRV-ATTR:user_data | - | | OS-EXT-STS:power_state | 1 | | OS-EXT-STS:task_state | - | | OS-EXT-STS:vm_state | active | | OS-SRV-USG:launched_at | 2021-11-11T02:35:56.000000 | | OS-SRV-USG:terminated_at | - | | accessIPv4 | | | accessIPv6 | | | config_drive | | | created | 2021-11-11T02:35:48Z | | description | - | | flavor:disk | 10 | | flavor:ephemeral | 0 | | flavor:extra_specs | {} | | flavor:original_name | instance1 | | flavor:ram | 256 | | flavor:swap | 128 | | flavor:vcpus | 1 | | hostId | 5822a85b8dd4e33ef68488497628775f8a77b492223e44535c31858d | | host_status | UP | | id | d5a0812e-59ba-4508-ac35-636717e20f04 | | image | Attempt to boot from volume - no image supplied | | key_name | - | | locked | False | | locked_reason | - | | metadata | {} | | name | s1 | | os-extended-volumes:volumes_attached | [{"id": "03a348c2-f5cb-4258-ae7c-f4b4462c9856", "delete_on_termination": false}] | | progress | 0 | | security_groups | default | | server_groups | [] | | status | ACTIVE | | tags | [] | | tenant_id | 60f490ceabcb493db09bdd4c1990655f | | trusted_image_certificates | - | | updated | 2021-11-11T02:35:57Z | | user_id | 05a3ad27698e41b0a3e10a6daffbf64e | | vpc03 network | 172.20.10.168 | +--------------------------------------+----------------------------------------------------------------------------------+ [root@controller01 ~]# # 当前在 compute02 上,迁移到 compute01 [root@controller01 ~]# nova live-migration s1 compute01 [root@controller01 ~]# [root@controller01 ~]# nova list +--------------------------------------+------+-----------+------------+-------------+---------------------+ | ID | Name | Status | Task State | Power State | Networks | +--------------------------------------+------+-----------+------------+-------------+---------------------+ | d5a0812e-59ba-4508-ac35-636717e20f04 | s1 | MIGRATING | migrating | Running | vpc03=172.20.10.168 | +--------------------------------------+------+-----------+------------+-------------+---------------------+ [root@controller01 ~]# [root@controller01 ~]# [root@controller01 ~]# nova list +--------------------------------------+------+--------+------------+-------------+---------------------+ | ID | Name | Status | Task State | Power State | Networks | +--------------------------------------+------+--------+------------+-------------+---------------------+ | d5a0812e-59ba-4508-ac35-636717e20f04 | s1 | ACTIVE | - | Running | vpc03=172.20.10.168 | +--------------------------------------+------+--------+------------+-------------+---------------------+ [root@controller01 ~]# +--------------------------------------+----------------------------------------------------------------------------------+ | Property | Value | +--------------------------------------+----------------------------------------------------------------------------------+ | OS-DCF:diskConfig | AUTO | | OS-EXT-AZ:availability_zone | nova | | OS-EXT-SRV-ATTR:host | compute01 | | OS-EXT-SRV-ATTR:hostname | s1 | | OS-EXT-SRV-ATTR:hypervisor_hostname | compute01 | | OS-EXT-SRV-ATTR:instance_name | instance-00000061 | | OS-EXT-SRV-ATTR:kernel_id | | | OS-EXT-SRV-ATTR:launch_index | 0 | | OS-EXT-SRV-ATTR:ramdisk_id | | | OS-EXT-SRV-ATTR:reservation_id | r-rny3edjk | | OS-EXT-SRV-ATTR:root_device_name | /dev/vda | | OS-EXT-SRV-ATTR:user_data | - | | OS-EXT-STS:power_state | 1 | | OS-EXT-STS:task_state | - | | OS-EXT-STS:vm_state | active | | OS-SRV-USG:launched_at | 2021-11-11T02:35:56.000000 | | OS-SRV-USG:terminated_at | - | | accessIPv4 | | | accessIPv6 | | | config_drive | | | created | 2021-11-11T02:35:48Z | | description | - | | flavor:disk | 10 | | flavor:ephemeral | 0 | | flavor:extra_specs | {} | | flavor:original_name | instance1 | | flavor:ram | 256 | | flavor:swap | 128 | | flavor:vcpus | 1 | | hostId | bcb1cd1c0027f77a3e41d871686633a7e9dc272b27252fadf846e887 | | host_status | UP | | id | d5a0812e-59ba-4508-ac35-636717e20f04 | | image | Attempt to boot from volume - no image supplied | | key_name | - | | locked | False | | locked_reason | - | | metadata | {} | | name | s1 | | os-extended-volumes:volumes_attached | [{"id": "03a348c2-f5cb-4258-ae7c-f4b4462c9856", "delete_on_termination": false}] | | progress | 0 | | security_groups | default | | server_groups | [] | | status | ACTIVE | | tags | [] | | tenant_id | 60f490ceabcb493db09bdd4c1990655f | | trusted_image_certificates | - | | updated | 2021-11-11T02:39:41Z | | user_id | 05a3ad27698e41b0a3e10a6daffbf64e | | vpc03 network | 172.20.10.168 | +--------------------------------------+----------------------------------------------------------------------------------+ [root@controller01 ~]# # 查看实例所在节点 [root@controller01 ~]# nova hypervisor-servers compute01 +--------------------------------------+-------------------+--------------------------------------+---------------------+ | ID | Name | Hypervisor ID | Hypervisor Hostname | +--------------------------------------+-------------------+--------------------------------------+---------------------+ | d5a0812e-59ba-4508-ac35-636717e20f04 | instance-0000006d | ed0a899f-d898-4a73-9100-a69a26edb932 | compute01 | +--------------------------------------+-------------------+--------------------------------------+---------------------+ # 计算节点上 qemu 的对应的实例配置文件记录着挂载的磁盘,<disk type ='network' device ='disk' > 配置段 [root@compute01 ~]# cat /etc/libvirt/qemu/instance-0000006d.xml <domain type ='qemu' > <name > instance-0000006d</name > <uuid > e4bbad3e-499b-442b-9789-5fb386edfb3f</uuid > <metadata > <nova:instance xmlns:nova ="http://openstack.org/xmlns/libvirt/nova/1.0" > <nova:package version ="20.6.0-1.el7" /> <nova:name > s1</nova:name > <nova:creationTime > 2021-11-11 05:34:19</nova:creationTime > <nova:flavor name ="instance2" > <nova:memory > 2048</nova:memory > <nova:disk > 20</nova:disk > <nova:swap > 0</nova:swap > <nova:ephemeral > 0</nova:ephemeral > <nova:vcpus > 2</nova:vcpus > </nova:flavor > <nova:owner > <nova:user uuid ="05a3ad27698e41b0a3e10a6daffbf64e" > admin</nova:user > <nova:project uuid ="60f490ceabcb493db09bdd4c1990655f" > admin</nova:project > </nova:owner > </nova:instance > </metadata > <memory unit ='KiB' > 2097152</memory > <currentMemory unit ='KiB' > 2097152</currentMemory > <vcpu placement ='static' > 2</vcpu > <cputune > <shares > 2048</shares > </cputune > <sysinfo type ='smbios' > <system > <entry name ='manufacturer' > RDO</entry > <entry name ='product' > OpenStack Compute</entry > <entry name ='version' > 20.6.0-1.el7</entry > <entry name ='serial' > e4bbad3e-499b-442b-9789-5fb386edfb3f</entry > <entry name ='uuid' > e4bbad3e-499b-442b-9789-5fb386edfb3f</entry > <entry name ='family' > Virtual Machine</entry > </system > </sysinfo > <os > <type arch ='x86_64' machine ='pc-i440fx-rhel7.6.0' > hvm</type > <boot dev ='hd' /> <smbios mode ='sysinfo' /> </os > <features > <acpi /> <apic /> </features > <cpu mode ='host-model' check ='partial' > <model fallback ='allow' /> <topology sockets ='2' cores ='1' threads ='1' /> </cpu > <clock offset ='utc' /> <on_poweroff > destroy</on_poweroff > <on_reboot > restart</on_reboot > <on_crash > destroy</on_crash > <devices > <emulator > /usr/libexec/qemu-kvm</emulator > <disk type ='network' device ='disk' > <driver name ='qemu' type ='raw' cache ='writeback' discard ='unmap' /> <auth username ='cinder' > <secret type ='ceph' uuid ='bae8efd1-e319-48cc-8fd0-9213dd0e3497' /> </auth > <source protocol ='rbd' name ='volumes/volume-4106914a-7f5c-4723-b3f8-410cb955d6d3' > <host name ='10.10.50.51' port ='6789' /> <host name ='10.10.50.52' port ='6789' /> <host name ='10.10.50.53' port ='6789' /> </source > <target dev ='vda' bus ='virtio' /> <serial > 4106914a-7f5c-4723-b3f8-410cb955d6d3</serial > <address type ='pci' domain ='0x0000' bus ='0x00' slot ='0x04' function ='0x0' /> </disk > <disk type ='network' device ='disk' > <driver name ='qemu' type ='raw' cache ='writeback' discard ='unmap' /> <auth username ='cinder' > <secret type ='ceph' uuid ='bae8efd1-e319-48cc-8fd0-9213dd0e3497' /> </auth > <source protocol ='rbd' name ='volumes/volume-6c5c6991-ca91-455d-835b-c3e0e9651ef6' > <host name ='10.10.50.51' port ='6789' /> <host name ='10.10.50.52' port ='6789' /> <host name ='10.10.50.53' port ='6789' /> </source > <target dev ='vdb' bus ='virtio' /> <serial > 6c5c6991-ca91-455d-835b-c3e0e9651ef6</serial > <address type ='pci' domain ='0x0000' bus ='0x00' slot ='0x06' function ='0x0' /> </disk > <controller type ='usb' index ='0' model ='piix3-uhci' > <address type ='pci' domain ='0x0000' bus ='0x00' slot ='0x01' function ='0x2' /> </controller > <controller type ='pci' index ='0' model ='pci-root' /> <interface type ='bridge' > <mac address ='fa:16:3e:66:ba:0c' /> <source bridge ='brq7f327278-8f' /> <target dev ='tapea75128c-89' /> <model type ='virtio' /> <driver name ='qemu' /> <mtu size ='1450' /> <address type ='pci' domain ='0x0000' bus ='0x00' slot ='0x03' function ='0x0' /> </interface > <serial type ='pty' > <log file ='/var/lib/nova/instances/e4bbad3e-499b-442b-9789-5fb386edfb3f/console.log' append ='off' /> <target type ='isa-serial' port ='0' > <model name ='isa-serial' /> </target > </serial > <console type ='pty' > <log file ='/var/lib/nova/instances/e4bbad3e-499b-442b-9789-5fb386edfb3f/console.log' append ='off' /> <target type ='serial' port ='0' /> </console > <input type ='tablet' bus ='usb' > <address type ='usb' bus ='0' port ='1' /> </input > <input type ='mouse' bus ='ps2' /> <input type ='keyboard' bus ='ps2' /> <graphics type ='vnc' port ='-1' autoport ='yes' listen ='0.0.0.0' > <listen type ='address' address ='0.0.0.0' /> </graphics > <video > <model type ='cirrus' vram ='16384' heads ='1' primary ='yes' /> <address type ='pci' domain ='0x0000' bus ='0x00' slot ='0x02' function ='0x0' /> </video > <memballoon model ='virtio' > <stats period ='10' /> <address type ='pci' domain ='0x0000' bus ='0x00' slot ='0x05' function ='0x0' /> </memballoon > </devices > </domain >
迁移会把实例整个内存状态也迁移过去,注意目标计算节点的空闲资源
迁移过程中实例会出现闪断,具体闪断时间跟实例内存大小有关
如果迁移出错,可以查看日志:控制节点 /var/log/nova/nova-conductor.log,或者计算节点 /var/log/nova/nova-compute.log
十五、负载均衡Octavia部署 更新 haproxy 配置 ha 高可用节点 /etc/haproxy/haproxy.cfg新增配置:
1 2 3 4 5 6 7 8 9 listen octavia_api_cluster bind 10.10 .10 .10 :9876 balance source option tcpka option httpchk option tcplog server controller01 10.10 .10 .31 :9876 check inter 2000 rise 2 fall 5 server controller02 10.10 .10 .32 :9876 check inter 2000 rise 2 fall 5 server controller03 10.10 .10 .33 :9876 check inter 2000 rise 2 fall 5
创建数据库 任意控制节点执行;
1 2 3 4 5 6 mysql - uroot - p123456 CREATE DATABASE octavia;GRANT ALL PRIVILEGES ON octavia.* TO 'octavia' @'localhost' IDENTIFIED BY '123456' ;GRANT ALL PRIVILEGES ON octavia.* TO 'octavia' @'%' IDENTIFIED BY '123456' ;flush privileges; exit;
创建octavia的keystone认证体系(用户、角色、endpoint) 任意控制节点执行;
1 2 3 4 5 6 7 8 . ~ / admin- openrc openstack user create #openstack role add openstack role add openstack service create openstack endpoint create openstack endpoint create openstack endpoint create
生成octavia-openrc,全部控制节点执行;
1 2 3 4 5 6 7 8 9 10 11 cat >> ~/octavia-openrc << EOF # octavia-openrc export OS_USERNAME=octaviaexport OS_PASSWORD=123456 export OS_PROJECT_NAME=serviceexport OS_USER_DOMAIN_NAME=Default export OS_PROJECT_DOMAIN_NAME=Default export OS_AUTH_URL=http:export OS_IDENTITY_API_VERSION=3 export OS_IMAGE_API_VERSION=2 EOF
安装软件包 全部控制节点执行;
1 yum install -y openstack-octavia-api openstack-octavia-common openstack-octavia-health-manager openstack-octavia-housekeeping openstack-octavia-worker openstack-octavia-diskimage-create python2-octaviaclient net-tools bridge-utils
or 第二种安装方法
1 2 3 git clone https://github.com/openstack/python-octaviaclient.git -b stable/train cd python-octaviaclientpip install -r requirements.txt -e .
制作Amphora镜像 官方教程: Building Octavia Amphora Images — octavia 9.1.0.dev16 documentation (openstack.org)
任意控制节点执行;
升级 git centos7.9使用yum安装的git最新版本也只是1.8,无-C参数,会报错
1 2 3 4 5 6 7 8 9 10 11 12 13 14 15 16 17 18 19 20 21 22 23 24 25 26 27 28 29 30 31 32 33 34 35 36 37 38 39 40 2021-11-18 02:52:31.402 | Unknown option: -C 2021-11-18 02:52:31.402 | usage: git [--version] [--help ] [-c name=value] 2021-11-18 02:52:31.402 | [--exec-path[=<path>]] [--html-path] [--man-path] [--info-path] 2021-11-18 02:52:31.402 | [-p|--paginate|--no-pager] [--no-replace-objects] [--bare] 2021-11-18 02:52:31.402 | [--git-dir=<path>] [--work-tree=<path>] [--namespace=<name>] 2021-11-18 02:52:31.402 | <command > [<args>] yum install gcc openssl-devel libcurl-devel expat-devel zlib-devel perl cpio gettext-devel xmlto docbook2X autoconf xmlto -y ln -s /usr/bin/db2x_docbook2texi /usr/bin/docbook2x-texicp asciidoc-8.5.2.tar.gz /root/srccd /root/srctar xvfz asciidoc-8.5.2.tar.gz cd asciidoc-8.5.2./configure make && make install git clone https://github.com/git/git cd gitmake prefix=/usr/local install install-doc install-html install-info cd /usr/binmv git{,.bak}mv git-receive-pack{,.bak}mv git-shell{,.bak}mv git-upload-archive{,.bak}mv git-upload-pack{,.bak}ln -s /usr/local/bin/git* /usr/bin/$ git --version git version 2.34.0
开始制作 1 2 3 4 5 6 7 8 9 10 11 12 13 14 15 16 17 18 19 20 21 22 23 yum install python-pip -y pip install pip==20.0.1 pip install virtualenv yum install python3 -y virtualenv -p /usr/bin/python3 octavia_disk_image_create source octavia_disk_image_create/bin/activategit config --global http.postBuffer 242800000 git clone https://github.com/openstack/octavia.git cd octavia/diskimage-create/pip install -r requirements.txt yum install qemu-img git e2fsprogs policycoreutils-python-utils -y ./diskimage-create.sh -i centos-minimal -t qcow2 -o amphora-x64-haproxy -s 5 $ ll total 1463100 drwxr-xr-x 3 root root 27 Nov 18 11:31 amphora-x64-haproxy.d -rw-r--r-- 1 root root 490209280 Nov 18 11:32 amphora-x64-haproxy.qcow2
-h 查看帮助,-i 设置发行系统,-r 指定 root 密码,生成环境不建议使用 root 密码
-s 大小最好和后面的 flavor 大小一样
制作镜像时脚本会去读取国外的源,网络环境不好的情况下会无法顺利创建镜像
注意这里不要加 -g stable/train,使用这个方式制作的镜像有问题,跑出来的amphora实例会如下错误:
1 2 3 4 5 6 7 8 9 10 11 12 13 14 15 16 17 18 19 20 21 22 23 24 25 26 27 [2021 -11 -19 06:09:16 +0000 ] [1086 ] [ERROR] Socket error processing request. Traceback (most recent call last): File "/opt/amphora-agent-venv/lib64/python3.6/site-packages/gunicorn/workers/sync.py" , line 133 , in handle req = next (parser) File "/opt/amphora-agent-venv/lib64/python3.6/site-packages/gunicorn/http/parser.py" , line 41 , in __next__ self.mesg = self.mesg_class(self.cfg, self.unreader, self.req_count) File "/opt/amphora-agent-venv/lib64/python3.6/site-packages/gunicorn/http/message.py" , line 180 , in __init__ super ().__init__(cfg, unreader)File "/opt/amphora-agent-venv/lib64/python3.6/site-packages/gunicorn/http/message.py" , line 53 , in __init__ unused = self.parse(self.unreader) File "/opt/amphora-agent-venv/lib64/python3.6/site-packages/gunicorn/http/message.py" , line 192 , in parse self.get_data(unreader, buf, stop=True ) File "/opt/amphora-agent-venv/lib64/python3.6/site-packages/gunicorn/http/message.py" , line 183 , in get_data data = unreader.read() File "/opt/amphora-agent-venv/lib64/python3.6/site-packages/gunicorn/http/unreader.py" , line 37 , in read d = self.chunk() File "/opt/amphora-agent-venv/lib64/python3.6/site-packages/gunicorn/http/unreader.py" , line 64 , in chunk return self.sock.recv(self.mxchunk)File "/usr/lib64/python3.6/ssl.py" , line 956 , in recv return self.read(buflen)File "/usr/lib64/python3.6/ssl.py" , line 833 , in read return self._sslobj.read(len , buffer)File "/usr/lib64/python3.6/ssl.py" , line 592 , in read v = self._sslobj.read(len ) OSError: [Errno 0 ] Error
自行下载centos镜像制作 前面的方式是脚本自动下载镜像,还可以自行提前下载好镜像
1 2 3 4 5 6 7 8 9 10 11 12 13 14 15 16 17 18 19 20 21 22 23 24 25 wget https://cloud.centos.org/centos/7/images/CentOS-7-x86_64-GenericCloud-2009.qcow2 yum install yum-utils -y yum install python3 -y pip3 install pyyaml pip3 install diskimage-builder cp /usr/bin/pip3 /usr/bin/pippip install --upgrade pip yum -y install libvirt libguestfs-tools systemctl start libvirtd export LIBGUESTFS_BACKEND=directvirt-customize -a CentOS-7-x86_64-GenericCloud-2009.qcow2 --selinux-relabel --run-command 'yum install -y centos-release-openstack-train' git config --global http.postBuffer 242800000 export DIB_REPOLOCATION_amphora_agent=/root/octaviaexport DIB_LOCAL_IMAGE=/root/octavia/diskimage-create/CentOS-7-x86_64-GenericCloud-2009.qcow2./diskimage-create.sh -i centos-minimal -t qcow2 -o amphora-x64-haproxy -s 5
导入镜像 任意控制节点执行;
1 2 3 4 5 6 7 8 9 10 11 $ . ~/octavia-openrc$ openstack image create --disk-format qcow2 --container-format bare --private --tag amphora --file amphora-x64-haproxy.qcow2 amphora-x64-haproxy$ openstack image list+--------------------------------------+---------------------+--------+ | ID | Name | Status | +--------------------------------------+---------------------+--------+ | 677 c0174-dffc-47 d8-828 b-26 aeb0ba44a5 | amphora-x64-haproxy | active | | c1f2829f-1 f52-48 c9-8 c23-689 f1a745ebd | cirros-qcow2 | active | | 4 ea7b60f-b7ed-4 b7e-8 f37-a02c85099ec5 | cirros-qcow2-0.5 .2 | active | +--------------------------------------+---------------------+--------+
镜像注册到其中一台控制节点,需要手动复制到其他控制节点上,并且修改镜像权限,否则会报错,使用 ceph 后不需要
1 2 3 4 5 6 7 8 9 10 11 12 13 14 15 16 17 [root@controller03 ~ ]# ls -l /var/lib/glance/images/ total 510596 -rw-r----- 1 glance glance 16300544 Nov 16 19 :49 4 ea7b60f-b7ed-4b 7e-8f 37-a02c85099ec5 -rw-r----- 1 glance glance 490209280 Nov 18 12 :20 677 c0174-dffc-47 d8-828b -26 aeb0ba44a5 -rw-r----- 1 glance glance 16338944 Nov 16 15 :42 c1f2829f-1f 52-48 c9-8 c23-689f 1a745ebd [root@controller03 ~ ]# [root@controller03 ~ ]# cd /var/lib/glance/images/ [root@controller03 ~ ]# [root@controller03 images ]# scp 677c0174-dffc-47d8-828b-26aeb0ba44a5 controller01:/var/lib/glance/images/ 677 c0174-dffc-47 d8-828b -26 aeb0ba44a5 100 % 468 MB 94.4 MB/s 00 :04 [root@controller03 images ]# [root@controller03 images ]# scp 677c0174-dffc-47d8-828b-26aeb0ba44a5 controller02:/var/lib/glance/images/ 677 c0174-dffc-47 d8-828b -26 aeb0ba44a5 100 % 468 MB 97.4 MB/s 00 :04 [root@controller01 ~ ]# chown -R glance:glance /var/lib/glance/images/* [root@controller02 ~ ]# chown -R glance:glance /var/lib/glance/images/*
创建实例模板 任意控制节点执行;
1 2 3 4 5 6 7 8 9 10 # 规则酌情修改,disk大小不能小于前面打包镜像是设置的- s大小 $ openstack flavor create $ openstack flavor list + | ID | Name | RAM | Disk | Ephemeral | VCPUs | Is Public | + | 0e97 b5a0-8 cca-4126 - baeb-9 d0194129985 | instance1 | 128 | 1 | 0 | 1 | True | | 200 | amphora | 1024 | 5 | 0 | 1 | False | | 9 b87cf02-6e3 a-4 b00- ac26-048 d3b611d97 | instance2 | 2048 | 10 | 0 | 4 | True | +
创建认证密钥 octavia controller与amphora通信的证书,双向认证
官方教程: Octavia Certificate Configuration Guide
任意控制节点执行;
创建目录
1 2 3 mkdir certschmod 700 certscd certs
创建证书配置文件 vi openssl.cnf
1 2 3 4 5 6 7 8 9 10 11 12 13 14 15 16 17 18 19 20 21 22 23 24 25 26 27 28 29 30 31 32 33 34 35 36 37 38 39 40 41 42 43 44 45 46 47 48 49 50 51 52 53 54 55 56 57 58 59 60 61 62 63 64 65 66 67 68 69 70 71 72 73 74 75 76 77 78 79 80 81 82 83 84 85 86 87 88 89 90 91 92 93 94 95 96 97 98 99 100 101 102 103 104 105 106 [ ca ] default_ca = CA_default[ CA_default ] dir = ./certs = $dir /certscrl_dir = $dir /crlnew_certs_dir = $dir /newcertsdatabase = $dir /index.txtserial = $dir /serialRANDFILE = $dir /private/.randprivate_key = $dir /private/ca.key.pemcertificate = $dir /certs/ca.cert.pemcrlnumber = $dir /crlnumbercrl = $dir /crl/ca.crl.pemcrl_extensions = crl_extdefault_crl_days = 30 default_md = sha256name_opt = ca_defaultcert_opt = ca_defaultdefault_days = 3650 preserve = no policy = policy_strict[ policy_strict ] countryName = matchstateOrProvinceName = matchorganizationName = matchorganizationalUnitName = optionalcommonName = suppliedemailAddress = optional[ req ] default_bits = 2048 distinguished_name = req_distinguished_namestring_mask = utf8onlydefault_md = sha256x509_extensions = v3_ca[ req_distinguished_name ] countryName = Country Name (2 letter code)stateOrProvinceName = State or Province NamelocalityName = Locality Name0.organizationName = Organization NameorganizationalUnitName = Organizational Unit NamecommonName = Common NameemailAddress = Email AddresscountryName_default = USstateOrProvinceName_default = OregonlocalityName_default =0.organizationName_default = OpenStackorganizationalUnitName_default = OctaviaemailAddress_default =commonName_default = example.org[ v3_ca ] subjectKeyIdentifier = hashauthorityKeyIdentifier = keyid:always,issuerbasicConstraints = critical, CA:true keyUsage = critical, digitalSignature, cRLSign, keyCertSign[ usr_cert ] basicConstraints = CA:FALSE nsCertType = client, emailnsComment = "OpenSSL Generated Client Certificate" subjectKeyIdentifier = hashauthorityKeyIdentifier = keyid,issuerkeyUsage = critical, nonRepudiation, digitalSignature, keyEnciphermentextendedKeyUsage = clientAuth, emailProtection[ server_cert ] basicConstraints = CA:FALSE nsCertType = servernsComment = "OpenSSL Generated Server Certificate" subjectKeyIdentifier = hashauthorityKeyIdentifier = keyid,issuer:alwayskeyUsage = critical, digitalSignature, keyEnciphermentextendedKeyUsage = serverAuth[ crl_ext ] authorityKeyIdentifier =keyid:always
从服务器证书颁发机构,准备服务器端 CA 密钥
1 2 3 4 5 6 7 8 9 10 11 12 mkdir client_camkdir server_cacd server_camkdir certs crl newcerts privatechmod 700 privatetouch index.txtecho 1000 > serialopenssl genrsa -aes256 -out private/ca.key.pem 4096 chmod 400 private/ca.key.pem
签发服务器端 CA 证书
1 2 3 4 5 6 7 8 9 10 11 12 13 14 15 16 17 $ openssl req -config ../openssl.cnf -key private /ca.key.pem -new -x509 -days 7300 -sha256 -extensions v3_ca -out certs/ca.cert.pem Enter pass phrase for private /ca.key.pem: You are about to be asked to enter information that will be incorporated into your certificate request. What you are about to enter is what is called a Distinguished Name or a DN. There are quite a few fields but you can leave some blank For some fields there will be a default value,If you enter '.' , the field will be left blank.----- Country Name (2 letter code) [US]:CN State or Province Name [Oregon]:SICHUAN Locality Name []:CHENGDU Organization Name [OpenStack]: Organizational Unit Name [Octavia]: Common Name [example.org]: Email Address []:
需要输入服务器端CA密钥的密码,也就是123456
注意:后面需要输入Country Name等信息的地方请保持和这里的一致
从服务器证书颁发机构,准备客户端 CA 密钥
1 2 3 4 5 6 7 8 9 10 cd ../client_camkdir certs crl csr newcerts privatechmod 700 privatetouch index.txtecho 1000 > serialopenssl genrsa -aes256 -out private/ca.key.pem 4096 chmod 400 private/ca.key.pem
签发客户端 CA 证书
1 2 3 4 5 6 7 8 9 10 11 12 13 14 15 16 17 $ openssl req -config ../openssl.cnf -key private /ca.key.pem -new -x509 -days 7300 -sha256 -extensions v3_ca -out certs/ca.cert.pem Enter pass phrase for private /ca.key.pem: You are about to be asked to enter information that will be incorporated into your certificate request. What you are about to enter is what is called a Distinguished Name or a DN. There are quite a few fields but you can leave some blank For some fields there will be a default value,If you enter '.' , the field will be left blank.----- Country Name (2 letter code) [US]:CN State or Province Name [Oregon]:SICHUAN Locality Name []:CHENGDU Organization Name [OpenStack]: Organizational Unit Name [Octavia]: Common Name [example.org]: Email Address []:
需要输入客户端 CA 密钥的密码,也就是123456
从服务器证书颁发机构,创建客户端连接密钥
1 2 # 需要输入密码,这里设置 123456 openssl genrsa -aes256 -out private /client.key.pem 2048
创建客户端连接签证请求
1 2 3 4 5 6 7 8 9 10 11 12 13 14 15 16 17 $ openssl req -config ../openssl.cnf -new -sha256 -key private /client.key.pem -out csr/client.csr.pem Enter pass phrase for private /client.key.pem: You are about to be asked to enter information that will be incorporated into your certificate request. What you are about to enter is what is called a Distinguished Name or a DN. There are quite a few fields but you can leave some blank For some fields there will be a default value,If you enter '.' , the field will be left blank.----- Country Name (2 letter code) [US]:CN State or Province Name [Oregon]:SICHUAN Locality Name []:CHENGDU Organization Name [OpenStack]: Organizational Unit Name [Octavia]: Common Name [example.org]: Email Address []:
签发客户端连接证书
1 openssl ca -config ../openssl.cnf -extensions usr_cert -days 7300 -notext -md sha256 -in csr/client.csr.pem -out certs/client.cert.pem
把客户端连接私钥和证书组合成一个文件
1 2 3 openssl rsa -in private/client.key.pem -out private/client.cert-and-key.pem cat certs/client.cert.pem >> private/client.cert-and-key.pem
复制相关证书到 Octavia 配置目录
1 2 3 4 5 6 7 8 9 10 cd ..mkdir -p /etc/octavia/certschmod 700 /etc/octavia/certscp server_ca/private/ca.key.pem /etc/octavia/certs/server_ca.key.pemchmod 700 /etc/octavia/certs/server_ca.key.pemcp server_ca/certs/ca.cert.pem /etc/octavia/certs/server_ca.cert.pemcp client_ca/certs/ca.cert.pem /etc/octavia/certs/client_ca.cert.pemcp client_ca/private/client.cert-and-key.pem /etc/octavia/certs/client.cert-and-key.pemchmod 700 /etc/octavia/certs/client.cert-and-key.pemchown -R octavia.octavia /etc/octavia/certs
然后把/etc/octavia/certs复制到所有其他控制节点,注意权限
1 2 3 4 5 6 7 8 9 10 11 12 13 14 15 16 17 ssh controller02 'mkdir -p /etc/octavia/certs' ssh controller03 'mkdir -p /etc/octavia/certs' scp /etc/octavia/certs/* controller02:/etc/octavia/certs/ scp /etc/octavia/certs/* controller03:/etc/octavia/certs/ ssh controller02 'chmod 700 /etc/octavia/certs' ssh controller03 'chmod 700 /etc/octavia/certs' ssh controller02 'chmod 700 /etc/octavia/certs/server_ca.key.pem' ssh controller03 'chmod 700 /etc/octavia/certs/server_ca.key.pem' ssh controller02 'chmod 700 /etc/octavia/certs/client.cert-and-key.pem' ssh controller03 'chmod 700 /etc/octavia/certs/client.cert-and-key.pem' ssh controller02 'chown -R octavia. /etc/octavia/certs' ssh controller03 'chown -R octavia. /etc/octavia/certs'
创建安全组 任意控制节点执行
1 2 3 4 5 6 7 8 9 10 11 12 13 14 15 . ~ / octavia- openrc # Amphora 虚拟机使用,LB Network 与 Amphora 通信 openstack security group create lb- mgmt- sec- grp openstack security group rule create openstack security group rule create openstack security group rule create openstack security group rule create # Amphora 虚拟机使用,Health Manager 与 Amphora 通信 openstack security group create lb- health- mgr- sec- grp openstack security group rule create openstack security group rule create openstack security group rule create openstack security group rule create
创建登陆 amphora 实例的 ssh key 任意控制节点执行;
1 2 3 4 5 6 7 8 9 10 11 . ~/octavia-openrc mkdir -p /etc/octavia/.sshssh-keygen -b 2048 -t rsa -N "" -f /etc/octavia/.ssh/octavia_ssh_key openstack keypair create --public-key /etc/octavia/.ssh/octavia_ssh_key.pub octavia_ssh_key chown -R octavia. /etc/octavia/.ssh/
然后把/etc/octavia/.ssh/复制到所有其他控制节点,注意权限
1 2 3 4 5 6 7 8 ssh controller02 'mkdir -p /etc/octavia/.ssh/' ssh controller03 'mkdir -p /etc/octavia/.ssh/' scp /etc/octavia/.ssh/* controller02:/etc/octavia/.ssh/ scp /etc/octavia/.ssh/* controller03:/etc/octavia/.ssh/ ssh controller02 'chown -R octavia. /etc/octavia/.ssh/' ssh controller03 'chown -R octavia. /etc/octavia/.ssh/'
创建 dhclient.conf 配置文件 全部控制节点执行;
1 2 3 4 cd ~git clone https://github.com/openstack/octavia.git mkdir -m755 -p /etc/dhcp/octaviacp octavia/etc/dhcp/dhclient.conf /etc/dhcp/octavia
创建网络 controller01执行 1 2 3 4 5 6 7 8 9 10 11 12 13 14 15 16 17 18 19 20 21 22 23 24 25 26 27 28 29 30 31 32 33 cd ~. ~/octavia-openrc OCTAVIA_MGMT_SUBNET=172.16 .0.0 /24 OCTAVIA_MGMT_SUBNET_START=172.16 .0.100 OCTAVIA_MGMT_SUBNET_END=172.16 .0.254 OCTAVIA_MGMT_PORT_IP=172.16 .0.2 openstack network create lb-mgmt-net openstack subnet create --subnet-range $OCTAVIA_MGMT_SUBNET --allocation-pool \ start =$OCTAVIA_MGMT_SUBNET_START ,end =$OCTAVIA_MGMT_SUBNET_END \--network lb-mgmt-net lb-mgmt-subnet SUBNET_ID=$ (openstack subnet show lb-mgmt-subnet -f value -c id) PORT_FIXED_IP="--fixed-ip subnet=$SUBNET_ID ,ip-address=$OCTAVIA_MGMT_PORT_IP " MGMT_PORT_ID=$ (openstack port create --security-group \ lb-health-mgr-sec-grp --device-owner Octavia:health-mgr \ --host =$ (hostname) -c id -f value --network lb-mgmt-net \$PORT_FIXED_IP octavia-health-manager-listen-port )MGMT_PORT_MAC=$ (openstack port show -c mac_address -f value $MGMT_PORT_ID ) echo "OCTAVIA_MGMT_PORT_IP: $OCTAVIA_MGMT_PORT_IP SUBNET_ID: $SUBNET_ID PORT_FIXED_IP: $PORT_FIXED_IP MGMT_PORT_ID: $MGMT_PORT_ID MGMT_PORT_MAC: $MGMT_PORT_MAC "
openvswitch方式 创建管理端口
1 2 3 4 5 6 7 8 9 10 11 12 13 14 15 16 17 18 19 20 21 22 23 24 25 26 27 28 29 30 31 32 33 34 35 36 37 38 39 40 41 42 43 44 45 46 47 48 49 50 51 52 53 54 55 56 57 58 59 60 61 62 63 64 65 66 67 ovs- vsctl ip link set dev o- hm0 address $MGMT_PORT_MAC ip link set dev o- hm0 up iptables - I INPUT - i o- hm0 - p udp # 获取刚才设置的 ip $ dhclient - v o- hm0 - cf / etc/ dhcp/ octavia Internet Systems Consortium DHCP Client 4.2 .5 Copyright 2004 -2013 Internet Systems Consortium. All rights reserved.For info, please visit https:/ / www.isc.org/ software/ dhcp/ Listening on LPF/ o- hm0/ fa:16 :3 e:3 c:17 :ee Sending on LPF/ o- hm0/ fa:16 :3 e:3 c:17 :ee Sending on Socket/ fallback DHCPDISCOVER on o- hm0 to 255.255 .255 .255 port 67 interval 6 (xid= 0x5cee3ddf ) DHCPREQUEST on o- hm0 to 255.255 .255 .255 port 67 (xid= 0x5cee3ddf ) DHCPOFFER from 172.16 .0 .100 DHCPACK from 172.16 .0 .100 (xid= 0x5cee3ddf ) bound to 172.16 .0 .2 $ ip a s dev o- hm0 13 : o- hm0@o - bhm0: < BROADCAST,MULTICAST,UP,LOWER_UP> mtu 1450 qdisc noqueue state UP group default qlen 1000 link/ ether fa:16 :3 e:3 c:17 :ee brd ff:ff:ff:ff:ff:ff inet 172.16 .0 .2 / 24 brd 172.16 .0 .255 scope global dynamic o- hm0 valid_lft 86292 sec preferred_lft 86292 sec inet6 fe80::f816:3 eff:fe3c:17 ee/ 64 scope link valid_lft forever preferred_lft forever # 使用 dhclient 获取到 ip 地址后,会设置一条默认路由 0.0 .0 .0 172.16 .0 .1 0.0 .0 .0 UG 0 0 0 o- hm0 # 这会和本机默认网关路由冲突,可能会导致本机连接外部网络,建议删除 # 并且还会设置本机 dns 地址为 172.16 .0 .0 / 24 网段的 dns 服务器地址,也需要改回来 [root@controller01 ~ ]# route - n Kernel IP routing table Destination Gateway Genmask Flags Metric Ref Use Iface 0.0 .0 .0 172.16 .0 .1 0.0 .0 .0 UG 0 0 0 o- hm00.0 .0 .0 10.10 .10 .2 0.0 .0 .0 UG 100 0 0 ens3310.10 .10 .0 0.0 .0 .0 255.255 .255 .0 U 100 0 0 ens3310.10 .20 .0 0.0 .0 .0 255.255 .255 .0 U 0 0 0 brq5ba4cced-83 10.10 .30 .0 0.0 .0 .0 255.255 .255 .0 U 102 0 0 ens35169.254 .169 .254 172.16 .0 .100 255.255 .255 .255 UGH 0 0 0 o- hm0172.16 .0 .0 0.0 .0 .0 255.255 .255 .0 U 0 0 0 o- hm0[root@controller01 ~ ]# route del default gw 172.16 .0 .1 [root@controller01 ~ ]# cat / etc/ resolv.conf ; generated by / usr/ sbin/ dhclient- script search openstacklocalnameserver 172.16 .0 .101 nameserver 172.16 .0 .100 [root@controller01 ~ ]# echo 'nameserver 10.10.10.2' > / etc/ resolv.conf [root@controller01 ~ ]# ping www.baidu.com PING www.a.shifen.com (14.215 .177 .39 ) 56 (84 ) bytes of data. 64 bytes from 14.215 .177 .39 (14.215 .177 .39 ): icmp_seq= 1 ttl= 128 time = 40.5 ms64 bytes from 14.215 .177 .39 (14.215 .177 .39 ): icmp_seq= 2 ttl= 128 time = 42.3 ms64 bytes from 14.215 .177 .39 (14.215 .177 .39 ): icmp_seq= 3 ttl= 128 time = 40.8 ms64 bytes from 14.215 .177 .39 (14.215 .177 .39 ): icmp_seq= 4 ttl= 128 time = 40.8 ms^ C5 packets transmitted, 5 received, 0 % packet loss, time 4007 msrtt min/ avg/ max/ mdev = 40.586 / 41.609 / 43.340 / 1.098 ms
设置开机启动
1 2 3 4 5 6 7 8 9 10 11 12 13 14 15 16 17 18 19 20 21 22 23 24 25 26 27 28 29 30 31 $ vi /opt/octavia-interface-start.sh set -xMAC="fa:16:3e:3c:17:ee" PORT_ID="6d83909a-33cd-43aa-8d3f-baaa3bf87daf" sleep 120sovs-vsctl --may-exist add-port br-int o-hm0 \ -- set Interface o-hm0 type =internal \ -- set Interface o-hm0 external-ids:iface-status=active \ -- set Interface o-hm0 external-ids:attached-mac=$MAC \ -- set Interface o-hm0 external-ids:iface-id=$PORT_ID ip link set dev o-hm0 address $MAC ip link set dev o-hm0 up iptables -I INPUT -i o-hm0 -p udp --dport 5555 -j ACCEPT dhclient -v o-hm0 -cf /etc/dhcp/octavia route del default gw 172.16.0.1 echo 'nameserver 10.10.10.2' > /etc/resolv.conf$ chmod +x /opt/octavia-interface-start.sh $ echo 'nohup sh /opt/octavia-interface-start.sh > /var/log/octavia-interface-start.log 2>&1 &' >> /etc/rc.d/rc.local $ chmod +x /etc/rc.d/rc.local
controller02执行 1 2 3 4 5 6 7 8 9 10 11 12 13 14 15 16 17 18 19 20 21 22 23 24 25 26 27 28 cd ~. ~/octavia-openrc OCTAVIA_MGMT_SUBNET=172.16 .0.0 /24 OCTAVIA_MGMT_SUBNET_START=172.16 .0.100 OCTAVIA_MGMT_SUBNET_END=172.16 .0.254 OCTAVIA_MGMT_PORT_IP=172.16 .0.3 SUBNET_ID=$ (openstack subnet show lb-mgmt-subnet -f value -c id) PORT_FIXED_IP="--fixed-ip subnet=$SUBNET_ID ,ip-address=$OCTAVIA_MGMT_PORT_IP " MGMT_PORT_ID=$ (openstack port create --security-group \ lb-health-mgr-sec-grp --device-owner Octavia:health-mgr \ --host =$ (hostname) -c id -f value --network lb-mgmt-net \$PORT_FIXED_IP octavia-health-manager-listen-port )MGMT_PORT_MAC=$ (openstack port show -c mac_address -f value $MGMT_PORT_ID ) echo "OCTAVIA_MGMT_PORT_IP: $OCTAVIA_MGMT_PORT_IP SUBNET_ID: $SUBNET_ID PORT_FIXED_IP: $PORT_FIXED_IP MGMT_PORT_ID: $MGMT_PORT_ID MGMT_PORT_MAC: $MGMT_PORT_MAC "
openvswitch方式 创建管理端口
1 2 3 4 5 6 7 8 9 10 11 12 13 14 15 16 17 18 19 20 21 22 23 24 25 26 27 28 29 30 31 32 33 34 35 36 37 38 39 40 41 42 43 44 45 46 47 48 49 50 51 52 53 54 55 56 57 58 59 60 61 62 63 64 65 66 67 ovs- vsctl ip link set dev o- hm0 address $MGMT_PORT_MAC ip link set dev o- hm0 up iptables - I INPUT - i o- hm0 - p udp # 获取刚才设置的 ip $ dhclient - v o- hm0 - cf / etc/ dhcp/ octavia Internet Systems Consortium DHCP Client 4.2 .5 Copyright 2004 -2013 Internet Systems Consortium. All rights reserved.For info, please visit https:/ / www.isc.org/ software/ dhcp/ Listening on LPF/ o- hm0/ fa:16 :3 e:3 c:17 :ee Sending on LPF/ o- hm0/ fa:16 :3 e:3 c:17 :ee Sending on Socket/ fallback DHCPDISCOVER on o- hm0 to 255.255 .255 .255 port 67 interval 6 (xid= 0x5cee3ddf ) DHCPREQUEST on o- hm0 to 255.255 .255 .255 port 67 (xid= 0x5cee3ddf ) DHCPOFFER from 172.16 .0 .100 DHCPACK from 172.16 .0 .100 (xid= 0x5cee3ddf ) bound to 172.16 .0 .3 $ ip a s dev o- hm0 13 : o- hm0@o - bhm0: < BROADCAST,MULTICAST,UP,LOWER_UP> mtu 1450 qdisc noqueue state UP group default qlen 1000 link/ ether fa:16 :3 e:3 c:17 :ee brd ff:ff:ff:ff:ff:ff inet 172.16 .0 .3 / 24 brd 172.16 .0 .255 scope global dynamic o- hm0 valid_lft 86292 sec preferred_lft 86292 sec inet6 fe80::f816:3 eff:fe3c:17 ee/ 64 scope link valid_lft forever preferred_lft forever # 使用 dhclient 获取到 ip 地址后,会设置一条默认路由 0.0 .0 .0 172.16 .0 .1 0.0 .0 .0 UG 0 0 0 o- hm0 # 这会和本机默认网关路由冲突,可能会导致本机连接外部网络,建议删除 # 并且还会设置本机 dns 地址为 172.16 .0 .0 / 24 网段的 dns 服务器地址,也需要改回来 [root@controller01 ~ ]# route - n Kernel IP routing table Destination Gateway Genmask Flags Metric Ref Use Iface 0.0 .0 .0 172.16 .0 .1 0.0 .0 .0 UG 0 0 0 o- hm00.0 .0 .0 10.10 .10 .2 0.0 .0 .0 UG 100 0 0 ens3310.10 .10 .0 0.0 .0 .0 255.255 .255 .0 U 100 0 0 ens3310.10 .20 .0 0.0 .0 .0 255.255 .255 .0 U 0 0 0 brq5ba4cced-83 10.10 .30 .0 0.0 .0 .0 255.255 .255 .0 U 102 0 0 ens35169.254 .169 .254 172.16 .0 .100 255.255 .255 .255 UGH 0 0 0 o- hm0172.16 .0 .0 0.0 .0 .0 255.255 .255 .0 U 0 0 0 o- hm0[root@controller01 ~ ]# route del default gw 172.16 .0 .1 [root@controller01 ~ ]# cat / etc/ resolv.conf ; generated by / usr/ sbin/ dhclient- script search openstacklocalnameserver 172.16 .0 .101 nameserver 172.16 .0 .100 [root@controller01 ~ ]# echo 'nameserver 10.10.10.2' > / etc/ resolv.conf [root@controller01 ~ ]# ping www.baidu.com PING www.a.shifen.com (14.215 .177 .39 ) 56 (84 ) bytes of data. 64 bytes from 14.215 .177 .39 (14.215 .177 .39 ): icmp_seq= 1 ttl= 128 time = 40.5 ms64 bytes from 14.215 .177 .39 (14.215 .177 .39 ): icmp_seq= 2 ttl= 128 time = 42.3 ms64 bytes from 14.215 .177 .39 (14.215 .177 .39 ): icmp_seq= 3 ttl= 128 time = 40.8 ms64 bytes from 14.215 .177 .39 (14.215 .177 .39 ): icmp_seq= 4 ttl= 128 time = 40.8 ms^ C5 packets transmitted, 5 received, 0 % packet loss, time 4007 msrtt min/ avg/ max/ mdev = 40.586 / 41.609 / 43.340 / 1.098 ms
设置开机启动
1 2 3 4 5 6 7 8 9 10 11 12 13 14 15 16 17 18 19 20 21 22 23 24 25 26 27 28 29 30 31 $ vi /opt/octavia-interface-start.sh set -xMAC="fa:16:3e:7c:57:19" PORT_ID="19964a42-8e06-4d87-9408-ce2348cfdf43" sleep 120sovs-vsctl --may-exist add-port br-int o-hm0 \ -- set Interface o-hm0 type =internal \ -- set Interface o-hm0 external-ids:iface-status=active \ -- set Interface o-hm0 external-ids:attached-mac=$MAC \ -- set Interface o-hm0 external-ids:iface-id=$PORT_ID ip link set dev o-hm0 address $MAC ip link set dev o-hm0 up iptables -I INPUT -i o-hm0 -p udp --dport 5555 -j ACCEPT dhclient -v o-hm0 -cf /etc/dhcp/octavia route del default gw 172.16.0.1 echo 'nameserver 10.10.10.2' > /etc/resolv.conf$ chmod +x /opt/octavia-interface-start.sh $ echo 'nohup sh /opt/octavia-interface-start.sh > /var/log/octavia-interface-start.log 2>&1 &' >> /etc/rc.d/rc.local $ chmod +x /etc/rc.d/rc.local
controller03执行 1 2 3 4 5 6 7 8 9 10 11 12 13 14 15 16 17 18 19 20 21 22 23 24 25 26 27 28 cd ~. ~/octavia-openrc OCTAVIA_MGMT_SUBNET=172.16 .0.0 /24 OCTAVIA_MGMT_SUBNET_START=172.16 .0.100 OCTAVIA_MGMT_SUBNET_END=172.16 .0.254 OCTAVIA_MGMT_PORT_IP=172.16 .0.4 SUBNET_ID=$ (openstack subnet show lb-mgmt-subnet -f value -c id) PORT_FIXED_IP="--fixed-ip subnet=$SUBNET_ID ,ip-address=$OCTAVIA_MGMT_PORT_IP " MGMT_PORT_ID=$ (openstack port create --security-group \ lb-health-mgr-sec-grp --device-owner Octavia:health-mgr \ --host =$ (hostname) -c id -f value --network lb-mgmt-net \$PORT_FIXED_IP octavia-health-manager-listen-port )MGMT_PORT_MAC=$ (openstack port show -c mac_address -f value $MGMT_PORT_ID ) echo "OCTAVIA_MGMT_PORT_IP: $OCTAVIA_MGMT_PORT_IP SUBNET_ID: $SUBNET_ID PORT_FIXED_IP: $PORT_FIXED_IP MGMT_PORT_ID: $MGMT_PORT_ID MGMT_PORT_MAC: $MGMT_PORT_MAC "
openvswitch方式 创建管理端口
1 2 3 4 5 6 7 8 9 10 11 12 13 14 15 16 17 18 19 20 21 22 23 24 25 26 27 28 29 30 31 32 33 34 35 36 37 38 39 40 41 42 43 44 45 46 47 48 49 50 51 52 53 54 55 56 57 58 59 60 61 62 63 64 65 66 67 ovs- vsctl ip link set dev o- hm0 address $MGMT_PORT_MAC ip link set dev o- hm0 up iptables - I INPUT - i o- hm0 - p udp # 获取刚才设置的 ip $ dhclient - v o- hm0 - cf / etc/ dhcp/ octavia Internet Systems Consortium DHCP Client 4.2 .5 Copyright 2004 -2013 Internet Systems Consortium. All rights reserved.For info, please visit https:/ / www.isc.org/ software/ dhcp/ Listening on LPF/ o- hm0/ fa:16 :3 e:3 c:17 :ee Sending on LPF/ o- hm0/ fa:16 :3 e:3 c:17 :ee Sending on Socket/ fallback DHCPDISCOVER on o- hm0 to 255.255 .255 .255 port 67 interval 6 (xid= 0x5cee3ddf ) DHCPREQUEST on o- hm0 to 255.255 .255 .255 port 67 (xid= 0x5cee3ddf ) DHCPOFFER from 172.16 .0 .100 DHCPACK from 172.16 .0 .100 (xid= 0x5cee3ddf ) bound to 172.16 .0 .2 $ ip a s dev o- hm0 13 : o- hm0@o - bhm0: < BROADCAST,MULTICAST,UP,LOWER_UP> mtu 1450 qdisc noqueue state UP group default qlen 1000 link/ ether fa:16 :3 e:3 c:17 :ee brd ff:ff:ff:ff:ff:ff inet 172.16 .0 .2 / 24 brd 172.16 .0 .255 scope global dynamic o- hm0 valid_lft 86292 sec preferred_lft 86292 sec inet6 fe80::f816:3 eff:fe3c:17 ee/ 64 scope link valid_lft forever preferred_lft forever # 使用 dhclient 获取到 ip 地址后,会设置一条默认路由 0.0 .0 .0 172.16 .0 .1 0.0 .0 .0 UG 0 0 0 o- hm0 # 这会和本机默认网关路由冲突,可能会导致本机连接外部网络,建议删除 # 并且还会设置本机 dns 地址为 172.16 .0 .0 / 24 网段的 dns 服务器地址,也需要改回来 [root@controller01 ~ ]# route - n Kernel IP routing table Destination Gateway Genmask Flags Metric Ref Use Iface 0.0 .0 .0 172.16 .0 .1 0.0 .0 .0 UG 0 0 0 o- hm00.0 .0 .0 10.10 .10 .2 0.0 .0 .0 UG 100 0 0 ens3310.10 .10 .0 0.0 .0 .0 255.255 .255 .0 U 100 0 0 ens3310.10 .20 .0 0.0 .0 .0 255.255 .255 .0 U 0 0 0 brq5ba4cced-83 10.10 .30 .0 0.0 .0 .0 255.255 .255 .0 U 102 0 0 ens35169.254 .169 .254 172.16 .0 .100 255.255 .255 .255 UGH 0 0 0 o- hm0172.16 .0 .0 0.0 .0 .0 255.255 .255 .0 U 0 0 0 o- hm0[root@controller01 ~ ]# route del default gw 172.16 .0 .1 [root@controller01 ~ ]# cat / etc/ resolv.conf ; generated by / usr/ sbin/ dhclient- script search openstacklocalnameserver 172.16 .0 .101 nameserver 172.16 .0 .100 [root@controller01 ~ ]# echo 'nameserver 10.10.10.2' > / etc/ resolv.conf [root@controller01 ~ ]# ping www.baidu.com PING www.a.shifen.com (14.215 .177 .39 ) 56 (84 ) bytes of data. 64 bytes from 14.215 .177 .39 (14.215 .177 .39 ): icmp_seq= 1 ttl= 128 time = 40.5 ms64 bytes from 14.215 .177 .39 (14.215 .177 .39 ): icmp_seq= 2 ttl= 128 time = 42.3 ms64 bytes from 14.215 .177 .39 (14.215 .177 .39 ): icmp_seq= 3 ttl= 128 time = 40.8 ms64 bytes from 14.215 .177 .39 (14.215 .177 .39 ): icmp_seq= 4 ttl= 128 time = 40.8 ms^ C5 packets transmitted, 5 received, 0 % packet loss, time 4007 msrtt min/ avg/ max/ mdev = 40.586 / 41.609 / 43.340 / 1.098 ms
设置开机启动
1 2 3 4 5 6 7 8 9 10 11 12 13 14 15 16 17 18 19 20 21 22 23 24 25 26 27 28 29 30 31 $ vi /opt/octavia-interface-start.sh set -xMAC="fa:16:3e:c5:d8:78" PORT_ID="c7112971-1252-4bc5-8ae6-67bda4153376" sleep 120sovs-vsctl --may-exist add-port br-int o-hm0 \ -- set Interface o-hm0 type =internal \ -- set Interface o-hm0 external-ids:iface-status=active \ -- set Interface o-hm0 external-ids:attached-mac=$MAC \ -- set Interface o-hm0 external-ids:iface-id=$PORT_ID ip link set dev o-hm0 address $MAC ip link set dev o-hm0 up iptables -I INPUT -i o-hm0 -p udp --dport 5555 -j ACCEPT dhclient -v o-hm0 -cf /etc/dhcp/octavia route del default gw 172.16.0.1 echo 'nameserver 10.10.10.2' > /etc/resolv.conf$ chmod +x /opt/octavia-interface-start.sh $ echo 'nohup sh /opt/octavia-interface-start.sh > /var/log/octavia-interface-start.log 2>&1 &' >> /etc/rc.d/rc.local $ chmod +x /etc/rc.d/rc.local
修改配置文件 全部控制节点执行,注意 bind_host;
1 2 3 cp /etc/octavia/octavia.conf{,.bak}egrep -v '^$|^#' /etc/octavia/octavia.conf.bak > /etc/octavia/octavia.conf
1 2 3 4 5 6 7 8 9 10 11 12 13 14 15 16 17 18 19 20 21 22 23 24 25 26 27 28 29 30 31 32 33 34 35 36 37 38 39 40 41 42 43 44 45 46 47 48 49 50 51 52 53 54 55 56 57 58 59 60 61 62 63 64 65 66 67 68 openstack-config --set /etc/octavia/octavia.conf DEFAULT transport_url rabbit://openstack:123456@controller01:5672,openstack:123456@controller02:5672,openstack:123456@controller03:5672 openstack-config --set /etc/octavia/octavia.conf database connection mysql+pymysql://octavia:[email protected] /octavia openstack-config --set /etc/octavia/octavia.conf api_settings bind_host 10.10.10.31 openstack-config --set /etc/octavia/octavia.conf api_settings bind_port 9876 openstack-config --set /etc/octavia/octavia.conf api_settings auth_strategy keystone openstack-config --set /etc/octavia/octavia.conf health_manager bind_port 5555 openstack-config --set /etc/octavia/octavia.conf health_manager bind_ip $OCTAVIA_MGMT_PORT_IP openstack-config --set /etc/octavia/octavia.conf health_manager controller_ip_port_list 172.16.0.2:5555,172.16.0.3:5555,172.16.0.4:5555 openstack-config --set /etc/octavia/octavia.conf keystone_authtoken www_authenticate_uri http://10.10.10.10:5000 openstack-config --set /etc/octavia/octavia.conf keystone_authtoken auth_url http://10.10.10.10:5000 openstack-config --set /etc/octavia/octavia.conf keystone_authtoken memcached_servers controller01:11211,controller02:11211,controller03:11211 openstack-config --set /etc/octavia/octavia.conf keystone_authtoken auth_type password openstack-config --set /etc/octavia/octavia.conf keystone_authtoken project_domain_name default openstack-config --set /etc/octavia/octavia.conf keystone_authtoken user_domain_name default openstack-config --set /etc/octavia/octavia.conf keystone_authtoken project_name service openstack-config --set /etc/octavia/octavia.conf keystone_authtoken username octavia openstack-config --set /etc/octavia/octavia.conf keystone_authtoken password 123456 openstack-config --set /etc/octavia/octavia.conf certificates cert_generator local_cert_generator openstack-config --set /etc/octavia/octavia.conf certificates ca_private_key_passphrase 123456 openstack-config --set /etc/octavia/octavia.conf certificates ca_private_key /etc/octavia/certs/server_ca.key.pem openstack-config --set /etc/octavia/octavia.conf certificates ca_certificate /etc/octavia/certs/server_ca.cert.pem openstack-config --set /etc/octavia/octavia.conf haproxy_amphora client_cert /etc/octavia/certs/client.cert-and-key.pem openstack-config --set /etc/octavia/octavia.conf haproxy_amphora server_ca /etc/octavia/certs/server_ca.cert.pem openstack-config --set /etc/octavia/octavia.conf haproxy_amphora key_path /etc/octavia/.ssh/octavia_ssh_key openstack-config --set /etc/octavia/octavia.conf haproxy_amphora base_path /var/lib/octavia openstack-config --set /etc/octavia/octavia.conf haproxy_amphora base_cert_dir /var/lib/octavia/certs openstack-config --set /etc/octavia/octavia.conf haproxy_amphora connection_max_retries 5500 openstack-config --set /etc/octavia/octavia.conf haproxy_amphora connection_retry_interval 5 openstack-config --set /etc/octavia/octavia.conf haproxy_amphora rest_request_conn_timeout 10 openstack-config --set /etc/octavia/octavia.conf haproxy_amphora rest_request_read_timeout 120 openstack-config --set /etc/octavia/octavia.conf oslo_messaging topic octavia_prov openstack-config --set /etc/octavia/octavia.conf oslo_messaging rpc_thread_pool_size 2 openstack-config --set /etc/octavia/octavia.conf house_keeping load_balancer_expiry_age 3600 openstack-config --set /etc/octavia/octavia.conf house_keeping amphora_expiry_age 3600 openstack-config --set /etc/octavia/octavia.conf service_auth auth_url http://10.10.10.10:5000 openstack-config --set /etc/octavia/octavia.conf service_auth memcached_servers controller01:11211,controller02:11211,controller03:11211 openstack-config --set /etc/octavia/octavia.conf service_auth auth_type password openstack-config --set /etc/octavia/octavia.conf service_auth project_domain_name default openstack-config --set /etc/octavia/octavia.conf service_auth user_domain_name default openstack-config --set /etc/octavia/octavia.conf service_auth project_name service openstack-config --set /etc/octavia/octavia.conf service_auth username octavia openstack-config --set /etc/octavia/octavia.conf service_auth password 123456 AMP_IMAGE_OWNER_ID=$(openstack project show service -c id -f value) AMP_SECGROUP_LIST=$(openstack security group show lb-mgmt-sec-grp -c id -f value) AMP_BOOT_NETWORK_LIST=$(openstack network show lb-mgmt-net -c id -f value) openstack-config --set /etc/octavia/octavia.conf controller_worker client_ca /etc/octavia/certs/client_ca.cert.pem openstack-config --set /etc/octavia/octavia.conf controller_worker amp_image_tag amphora openstack-config --set /etc/octavia/octavia.conf controller_worker amp_flavor_id 200 openstack-config --set /etc/octavia/octavia.conf controller_worker amp_image_owner_id $AMP_IMAGE_OWNER_ID openstack-config --set /etc/octavia/octavia.conf controller_worker amp_secgroup_list $AMP_SECGROUP_LIST openstack-config --set /etc/octavia/octavia.conf controller_worker amp_boot_network_list $AMP_BOOT_NETWORK_LIST openstack-config --set /etc/octavia/octavia.conf controller_worker amp_ssh_key_name octavia_ssh_key openstack-config --set /etc/octavia/octavia.conf controller_worker network_driver allowed_address_pairs_driver openstack-config --set /etc/octavia/octavia.conf controller_worker compute_driver compute_nova_driver openstack-config --set /etc/octavia/octavia.conf controller_worker amphora_driver amphora_haproxy_rest_driver openstack-config --set /etc/octavia/octavia.conf controller_worker workers 2 openstack-config --set /etc/octavia/octavia.conf controller_worker loadbalancer_topology ACTIVE_STANDBY
初始化数据库 任意控制节点执行;
1 octavia-db-manage --config-file /etc/octavia/octavia.conf upgrade head
启动服务 全部控制节点执行;
1 2 3 systemctl enable octavia-api.service octavia-health-manager.service octavia-housekeeping.service octavia-worker.service systemctl restart octavia-api.service octavia-health-manager.service octavia-housekeeping.service octavia-worker.service systemctl status octavia-api.service octavia-health-manager.service octavia-housekeeping.service octavia-worker.service
升级dashboard开启 全部控制节点执行;
1 2 3 4 5 6 7 8 9 10 git clone https://github.com/openstack/octavia-dashboard.git -b stable/train cd /root/octavia-dashboardpython setup.py install cd /root/octavia-dashboard/octavia_dashboard/enabledcp _1482_project_load_balancer_panel.py /usr/share/openstack-dashboard/openstack_dashboard/enabled/cd /usr/share/openstack-dashboardecho yes |./manage.py collectstatic./manage.py compress systemctl restart httpd systemctl status httpd
创建 loadbalancer
稍等一会,系统会自动创建两个 amphora-x64-haproxy 的实例,并且会分配后端服务的 vpc 的网络地址,如果后端服务器属于多个vpc,则会分配多个 vpc 的网络地址
1 2 3 4 5 6 7 8 9 [root@controller01 ~]# ssh -i /etc/octavia/.ssh/octavia_ssh_key cloud-user@172.16 .0.162 The authenticity of host ECDSA key fingerprint is SHA256:kAbm5G1FbZPZEmWGNbzvcYYubxeKlr6l456XEVr886o. ECDSA key fingerprint is MD5:3 c:87 :63 :e3:cc:e9:90 :f6:33 :5 a:06 :73 :1 e:6 d:b7:82 . Are you sure you want to continue connecting (yes/no)? yes Warning: Permanently added [cloud-user@amphora-65 ef42f2-ef2d-4e7d -bd48-a0de84a12e3a ~]$ [cloud-user@amphora-65 ef42f2-ef2d-4e7d -bd48-a0de84a12e3a ~]$ sudo su - [root@amphora-65 ef42f2-ef2d-4e7d -bd48-a0de84a12e3a ~]#
测试还发现:使用管理员把 amphora 实例手动删除后并不会自动重新创建
绑定一个浮动IP,测试是否能ssh过去
其他七层代理的具体设置就不赘述了,可自行研究
其他组件 其他 Ceilometer 、 Heat 、 Trove 、 VPNaaS 、 FWaaS 等组件,后期有空再研究。
错误记录 libvirtError: internal error: End of file from qemu monitor 创建loadbalancer时现在状态错误
查看计算节点日志 /var/log/nova/nova-compute.log ,发现报错 :
1 2 3 4 5 6 7 8 9 10 11 12 13 14 15 16 17 18 19 20 21 22 23 24 25 26 27 2021-11-24 15:08:24.462 3924 ERROR nova.virt.libvirt.driver [req-d6b447e9-d0c7-4529-afba-a162f34ca96b 4841c9405a204f608ea7c253f45c308f 1e92f7de5ed646c7a16d422bcbe040bb - default default ] [instance: c3282fab-d210-4b35-a8b5-7eee1f07943d ] detaching network adapter failed.: libvirtError: internal error: End of file from qemu monitor 2021-11-24 15:08:24.462 3924 ERROR nova.virt.libvirt.driver [instance: c3282fab-d210-4b35-a8b5-7eee1f07943d ] Traceback (most recent call last): 2021-11-24 15:08:24.462 3924 ERROR nova.virt.libvirt.driver [instance: c3282fab-d210-4b35-a8b5-7eee1f07943d ] File "/usr/lib/python2.7/site-packages/nova/virt/libvirt/driver.py" , line 2199 , in detach_interface 2021-11-24 15:08:24.462 3924 ERROR nova.virt.libvirt.driver [instance: c3282fab-d210-4b35-a8b5-7eee1f07943d ] supports_device_missing_error_code=supports_device_missing) 2021-11-24 15:08:24.462 3924 ERROR nova.virt.libvirt.driver [instance: c3282fab-d210-4b35-a8b5-7eee1f07943d ] File "/usr/lib/python2.7/site-packages/nova/virt/libvirt/guest.py" , line 455 , in detach_device_with_retry 2021-11-24 15:08:24.462 3924 ERROR nova.virt.libvirt.driver [instance: c3282fab-d210-4b35-a8b5-7eee1f07943d ] _try_detach_device(conf, persistent, live) 2021-11-24 15:08:24.462 3924 ERROR nova.virt.libvirt.driver [instance: c3282fab-d210-4b35-a8b5-7eee1f07943d ] File "/usr/lib/python2.7/site-packages/nova/virt/libvirt/guest.py" , line 444 , in _try_detach_device 2021-11-24 15:08:24.462 3924 ERROR nova.virt.libvirt.driver [instance: c3282fab-d210-4b35-a8b5-7eee1f07943d ] ctx.reraise = True 2021-11-24 15:08:24.462 3924 ERROR nova.virt.libvirt.driver [instance: c3282fab-d210-4b35-a8b5-7eee1f07943d ] File "/usr/lib/python2.7/site-packages/oslo_utils/excutils.py" , line 220 , in __exit__ 2021-11-24 15:08:24.462 3924 ERROR nova.virt.libvirt.driver [instance: c3282fab-d210-4b35-a8b5-7eee1f07943d ] self.force_reraise() 2021-11-24 15:08:24.462 3924 ERROR nova.virt.libvirt.driver [instance: c3282fab-d210-4b35-a8b5-7eee1f07943d ] File "/usr/lib/python2.7/site-packages/oslo_utils/excutils.py" , line 196 , in force_reraise 2021-11-24 15:08:24.462 3924 ERROR nova.virt.libvirt.driver [instance: c3282fab-d210-4b35-a8b5-7eee1f07943d ] six.reraise(self.type_, self.value, self.tb) 2021-11-24 15:08:24.462 3924 ERROR nova.virt.libvirt.driver [instance: c3282fab-d210-4b35-a8b5-7eee1f07943d ] File "/usr/lib/python2.7/site-packages/nova/virt/libvirt/guest.py" , line 408 , in _try_detach_device 2021-11-24 15:08:24.462 3924 ERROR nova.virt.libvirt.driver [instance: c3282fab-d210-4b35-a8b5-7eee1f07943d ] self.detach_device(conf, persistent=persistent, live=live) 2021-11-24 15:08:24.462 3924 ERROR nova.virt.libvirt.driver [instance: c3282fab-d210-4b35-a8b5-7eee1f07943d ] File "/usr/lib/python2.7/site-packages/nova/virt/libvirt/guest.py" , line 505 , in detach_device 2021-11-24 15:08:24.462 3924 ERROR nova.virt.libvirt.driver [instance: c3282fab-d210-4b35-a8b5-7eee1f07943d ] self._domain.detachDeviceFlags(device_xml, flags=flags) 2021-11-24 15:08:24.462 3924 ERROR nova.virt.libvirt.driver [instance: c3282fab-d210-4b35-a8b5-7eee1f07943d ] File "/usr/lib/python2.7/site-packages/eventlet/tpool.py" , line 190 , in doit 2021-11-24 15:08:24.462 3924 ERROR nova.virt.libvirt.driver [instance: c3282fab-d210-4b35-a8b5-7eee1f07943d ] result = proxy_call(self._autowrap, f, *args, **kwargs) 2021-11-24 15:08:24.462 3924 ERROR nova.virt.libvirt.driver [instance: c3282fab-d210-4b35-a8b5-7eee1f07943d ] File "/usr/lib/python2.7/site-packages/eventlet/tpool.py" , line 148 , in proxy_call 2021-11-24 15:08:24.462 3924 ERROR nova.virt.libvirt.driver [instance: c3282fab-d210-4b35-a8b5-7eee1f07943d ] rv = execute(f, *args, **kwargs) 2021-11-24 15:08:24.462 3924 ERROR nova.virt.libvirt.driver [instance: c3282fab-d210-4b35-a8b5-7eee1f07943d ] File "/usr/lib/python2.7/site-packages/eventlet/tpool.py" , line 129 , in execute 2021-11-24 15:08:24.462 3924 ERROR nova.virt.libvirt.driver [instance: c3282fab-d210-4b35-a8b5-7eee1f07943d ] six.reraise(c, e, tb) 2021-11-24 15:08:24.462 3924 ERROR nova.virt.libvirt.driver [instance: c3282fab-d210-4b35-a8b5-7eee1f07943d ] File "/usr/lib/python2.7/site-packages/eventlet/tpool.py" , line 83 , in tworker 2021-11-24 15:08:24.462 3924 ERROR nova.virt.libvirt.driver [instance: c3282fab-d210-4b35-a8b5-7eee1f07943d ] rv = meth(*args, **kwargs) 2021-11-24 15:08:24.462 3924 ERROR nova.virt.libvirt.driver [instance: c3282fab-d210-4b35-a8b5-7eee1f07943d ] File "/usr/lib64/python2.7/site-packages/libvirt.py" , line 1253 , in detachDeviceFlags 2021-11-24 15:08:24.462 3924 ERROR nova.virt.libvirt.driver [instance: c3282fab-d210-4b35-a8b5-7eee1f07943d ] if ret == -1 : raise libvirtError ('virDomainDetachDeviceFlags() failed', dom=self) 2021-11-24 15:08:24.462 3924 ERROR nova.virt.libvirt.driver [instance: c3282fab-d210-4b35-a8b5-7eee1f07943d ] libvirtError: internal error: End of file from qemu monitor
网上查了下,好像是 libvirt 的 bug,删除错误的负载均衡,重新创建一个就好了
Lost connection to MySQL server during query 集群种使用 mysql 的组件都有此报错:
1 2 3 4 5 6 7 8 9 10 11 12 13 14 15 16 17 18 19 20 21 22 23 24 25 26 27 28 29 30 31 32 33 34 35 36 37 2021 -11 -24 15 :40 :09.098 11394 ERROR oslo_db.sqlalchemy.engines Traceback (most recent call last):2021 -11 -24 15 :40 :09.098 11394 ERROR oslo_db.sqlalchemy.engines File "/usr/lib/python2.7/site-packages/oslo_db/sqlalchemy/engines.py" , line 73 , in _connect_ping_listener2021 -11 -24 15 :40 :09.098 11394 ERROR oslo_db.sqlalchemy.engines connection.scalar(select ([1 ]))2021 -11 -24 15 :40 :09.098 11394 ERROR oslo_db.sqlalchemy.engines File "/usr/lib64/python2.7/site-packages/sqlalchemy/engine/base.py" , line 912 , in scalar2021 -11 -24 15 :40 :09.098 11394 ERROR oslo_db.sqlalchemy.engines return self.execute(object_, *multiparams, **params).scalar()2021 -11 -24 15 :40 :09.098 11394 ERROR oslo_db.sqlalchemy.engines File "/usr/lib64/python2.7/site-packages/sqlalchemy/engine/base.py" , line 980 , in execute2021 -11 -24 15 :40 :09.098 11394 ERROR oslo_db.sqlalchemy.engines return meth(self, multiparams, params)2021 -11 -24 15 :40 :09.098 11394 ERROR oslo_db.sqlalchemy.engines File "/usr/lib64/python2.7/site-packages/sqlalchemy/sql/elements.py" , line 273 , in _execute_on_connection2021 -11 -24 15 :40 :09.098 11394 ERROR oslo_db.sqlalchemy.engines return connection._execute_clauseelement(self, multiparams, params)2021 -11 -24 15 :40 :09.098 11394 ERROR oslo_db.sqlalchemy.engines File "/usr/lib64/python2.7/site-packages/sqlalchemy/engine/base.py" , line 1099 , in _execute_clauseelement2021 -11 -24 15 :40 :09.098 11394 ERROR oslo_db.sqlalchemy.engines distilled_params,2021 -11 -24 15 :40 :09.098 11394 ERROR oslo_db.sqlalchemy.engines File "/usr/lib64/python2.7/site-packages/sqlalchemy/engine/base.py" , line 1240 , in _execute_context2021 -11 -24 15 :40 :09.098 11394 ERROR oslo_db.sqlalchemy.engines e, statement, parameters, cursor, context 2021 -11 -24 15 :40 :09.098 11394 ERROR oslo_db.sqlalchemy.engines File "/usr/lib64/python2.7/site-packages/sqlalchemy/engine/base.py" , line 1456 , in _handle_dbapi_exception2021 -11 -24 15 :40 :09.098 11394 ERROR oslo_db.sqlalchemy.engines util.raise_from_cause(newraise, exc_info)2021 -11 -24 15 :40 :09.098 11394 ERROR oslo_db.sqlalchemy.engines File "/usr/lib64/python2.7/site-packages/sqlalchemy/util/compat.py" , line 296 , in raise_from_cause2021 -11 -24 15 :40 :09.098 11394 ERROR oslo_db.sqlalchemy.engines reraise(type (exception), exception, tb=exc_tb, cause=cause)2021 -11 -24 15 :40 :09.098 11394 ERROR oslo_db.sqlalchemy.engines File "/usr/lib64/python2.7/site-packages/sqlalchemy/engine/base.py" , line 1236 , in _execute_context2021 -11 -24 15 :40 :09.098 11394 ERROR oslo_db.sqlalchemy.engines cursor, statement, parameters, context 2021 -11 -24 15 :40 :09.098 11394 ERROR oslo_db.sqlalchemy.engines File "/usr/lib64/python2.7/site-packages/sqlalchemy/engine/default.py" , line 536 , in do_execute2021 -11 -24 15 :40 :09.098 11394 ERROR oslo_db.sqlalchemy.engines cursor.execute(statement, parameters)2021 -11 -24 15 :40 :09.098 11394 ERROR oslo_db.sqlalchemy.engines File "/usr/lib/python2.7/site-packages/pymysql/cursors.py" , line 170 , in execute2021 -11 -24 15 :40 :09.098 11394 ERROR oslo_db.sqlalchemy.engines result = self._query(query)2021 -11 -24 15 :40 :09.098 11394 ERROR oslo_db.sqlalchemy.engines File "/usr/lib/python2.7/site-packages/pymysql/cursors.py" , line 328 , in _query2021 -11 -24 15 :40 :09.098 11394 ERROR oslo_db.sqlalchemy.engines conn.query(q)2021 -11 -24 15 :40 :09.098 11394 ERROR oslo_db.sqlalchemy.engines File "/usr/lib/python2.7/site-packages/pymysql/connections.py" , line 517 , in query2021 -11 -24 15 :40 :09.098 11394 ERROR oslo_db.sqlalchemy.engines self._affected_rows = self._read_query_result(unbuffered=unbuffered)2021 -11 -24 15 :40 :09.098 11394 ERROR oslo_db.sqlalchemy.engines File "/usr/lib/python2.7/site-packages/pymysql/connections.py" , line 732 , in _read_query_result2021 -11 -24 15 :40 :09.098 11394 ERROR oslo_db.sqlalchemy.engines result.read()2021 -11 -24 15 :40 :09.098 11394 ERROR oslo_db.sqlalchemy.engines File "/usr/lib/python2.7/site-packages/pymysql/connections.py" , line 1075 , in read2021 -11 -24 15 :40 :09.098 11394 ERROR oslo_db.sqlalchemy.engines first_packet = self.connection._read_packet()2021 -11 -24 15 :40 :09.098 11394 ERROR oslo_db.sqlalchemy.engines File "/usr/lib/python2.7/site-packages/pymysql/connections.py" , line 657 , in _read_packet2021 -11 -24 15 :40 :09.098 11394 ERROR oslo_db.sqlalchemy.engines packet_header = self._read_bytes(4 )2021 -11 -24 15 :40 :09.098 11394 ERROR oslo_db.sqlalchemy.engines File "/usr/lib/python2.7/site-packages/pymysql/connections.py" , line 707 , in _read_bytes2021 -11 -24 15 :40 :09.098 11394 ERROR oslo_db.sqlalchemy.engines CR.CR_SERVER_LOST, "Lost connection to MySQL server during query" )2021 -11 -24 15 :40 :09.098 11394 ERROR oslo_db.sqlalchemy.engines DBConnectionError: (pymysql.err.OperationalError) (2013 , 'Lost connection to MySQL server during query') [SQL: u'SELECT 1 '] (Background on this error at: http://sqlalche.me/e/e3q8)2021 -11 -24 15 :40 :09.098 11394 ERROR oslo_db.sqlalchemy.engines
查看 /var/log/mariadb/mariadb.log 发现大量 Warning
1 2 3 4 5 6 7 8 9 10 packets) 2021 -11 -25 14 :12 :13 1079 [Warning ] Aborted connection 1079 to db: 'neutron ' user: 'neutron ' host: 'ha01 ' (Got an error reading communication packets)2021 -11 -25 14 :12 :13 1080 [Warning ] Aborted connection 1080 to db: 'neutron ' user: 'neutron ' host: 'ha01 ' (Got an error reading communication packets)2021 -11 -25 14 :12 :13 1077 [Warning ] Aborted connection 1077 to db: 'neutron ' user: 'neutron ' host: 'ha01 ' (Got an error reading communication packets)2021 -11 -25 14 :12 :16 1081 [Warning ] Aborted connection 1081 to db: 'placement ' user: 'placement ' host: 'ha01 ' (Got an error reading communication packets)2021 -11 -25 14 :12 :55 1082 [Warning ] Aborted connection 1082 to db: 'placement ' user: 'placement ' host: 'ha01 ' (Got an error reading communication packets)2021 -11 -25 14 :13 :11 1085 [Warning ] Aborted connection 1085 to db: 'neutron ' user: 'neutron ' host: 'ha01 ' (Got an error reading communication packets)2021 -11 -25 14 :13 :11 1083 [Warning ] Aborted connection 1083 to db: 'neutron ' user: 'neutron ' host: 'ha01 ' (Got an error reading communication packets)2021 -11 -25 14 :13 :11 1084 [Warning ] Aborted connection 1084 to db: 'neutron ' user: 'neutron ' host: 'ha01 ' (Got an error reading communication packets)2021 -11 -25 14 :13 :17 1090 [Warning ] Aborted connection 1090 to db: 'placement ' user: 'placement ' host: 'ha01 ' (Got an error reading communication packets)
参考以下文章:
完美解决MySQL错误日志出现大量的 Got an error reading communication packets 报错_KangKangShenShen的博客-CSDN博客
mysql之Got an error reading communication packets排查 - 知乎 (zhihu.com)
mysql5.7碰到的坑 - 高权 - 博客园 (cnblogs.com)
做了相关设置,好像依然会报错,但是不影响集群使用,暂时忽略。
Could not sign the certificate request: Failed to load CA Certificate 创建 loadbalancer 时出错,查看控制节点日志:/var/log/octavia/worker.log ,发现报错
1 2 3 4 5 6 7 8 9 10 11 12 13 14 15 16 17 18 19 20 21 22 23 24 25 26 27 28 29 30 31 32 33 34 35 36 37 38 39 40 41 42 43 2021-11-23 21:46:48.844 23697 ERROR oslo_messaging.rpc.server Traceback (most recent call last): 2021-11-23 21:46:48.844 23697 ERROR oslo_messaging.rpc.server File "/usr/lib/python2.7/site-packages/oslo_messaging/rpc/server.py" , line 1 65 , in _process_incoming 2021-11-23 21:46:48.844 23697 ERROR oslo_messaging.rpc.server res = self.dispatcher.dispatch(message) 2021-11-23 21:46:48.844 23697 ERROR oslo_messaging.rpc.server File "/usr/lib/python2.7/site-packages/oslo_messaging/rpc/dispatcher.py" , li ne 274 , in dispatch 2021-11-23 21:46:48.844 23697 ERROR oslo_messaging.rpc.server return self._do_dispatch(endpoint, method, ctxt, args) 2021-11-23 21:46:48.844 23697 ERROR oslo_messaging.rpc.server File "/usr/lib/python2.7/site-packages/oslo_messaging/rpc/dispatcher.py" , li ne 194 , in _do_dispatch 2021-11-23 21:46:48.844 23697 ERROR oslo_messaging.rpc.server result = func(ctxt, **new_args) 2021-11-23 21:46:48.844 23697 ERROR oslo_messaging.rpc.server File "/usr/lib/python2.7/site-packages/octavia/controller/queue/v1/endpoints .py" , line 45 , in create_load_balancer 2021-11-23 21:46:48.844 23697 ERROR oslo_messaging.rpc.server self.worker.create_load_balancer(load_balancer_id, flavor) 2021-11-23 21:46:48.844 23697 ERROR oslo_messaging.rpc.server File "/usr/lib/python2.7/site-packages/tenacity/__init__.py" , line 292 , in w rapped_f 2021-11-23 21:46:48.844 23697 ERROR oslo_messaging.rpc.server return self.call(f, *args, **kw) 2021-11-23 21:46:48.844 23697 ERROR oslo_messaging.rpc.server File "/usr/lib/python2.7/site-packages/tenacity/__init__.py" , line 358 , in c all 2021-11-23 21:46:48.844 23697 ERROR oslo_messaging.rpc.server do = self.iter(retry_state=retry_state) 2021-11-23 21:46:48.844 23697 ERROR oslo_messaging.rpc.server File "/usr/lib/python2.7/site-packages/tenacity/__init__.py" , line 319 , in i ter 2021-11-23 21:46:48.844 23697 ERROR oslo_messaging.rpc.server return fut.result() 2021-11-23 21:46:48.844 23697 ERROR oslo_messaging.rpc.server File "/usr/lib/python2.7/site-packages/concurrent/futures/_base.py" , line 42 2 , in result 2021-11-23 21:46:48.844 23697 ERROR oslo_messaging.rpc.server return self.__get_result() 2021-11-23 21:46:48.844 23697 ERROR oslo_messaging.rpc.server File "/usr/lib/python2.7/site-packages/tenacity/__init__.py" , line 361 , in c all 2021-11-23 21:46:48.844 23697 ERROR oslo_messaging.rpc.server result = fn(*args, **kwargs) 2021-11-23 21:46:48.844 23697 ERROR oslo_messaging.rpc.server File "/usr/lib/python2.7/site-packages/octavia/controller/worker/v1/controll er_worker.py" , line 342 , in create_load_balancer 2021-11-23 21:46:48.844 23697 ERROR oslo_messaging.rpc.server create_lb_tf.run() 2021-11-23 21:46:48.844 23697 ERROR oslo_messaging.rpc.server File "/usr/lib/python2.7/site-packages/taskflow/engines/action_engine/engine .py" , line 247 , in run 2021-11-23 21:46:48.844 23697 ERROR oslo_messaging.rpc.server for _state in self.run_iter(timeout=timeout): 2021-11-23 21:46:48.844 23697 ERROR oslo_messaging.rpc.server File "/usr/lib/python2.7/site-packages/taskflow/engines/action_engine/engine .py" , line 340 , in run_iter 2021-11-23 21:46:48.844 23697 ERROR oslo_messaging.rpc.server failure.Failure.reraise_if_any(er_failures) 2021-11-23 21:46:48.844 23697 ERROR oslo_messaging.rpc.server File "/usr/lib/python2.7/site-packages/taskflow/types/failure.py" , line 341 , in reraise_if_any 2021-11-23 21:46:48.844 23697 ERROR oslo_messaging.rpc.server raise exc.WrappedFailure(failures) 2021-11-23 21:46:48.844 23697 ERROR oslo_messaging.rpc.server WrappedFailure: WrappedFailure: [Failure: octavia.common.exceptions.Certificat eGenerationException: Could not sign the certificate request: Failed to load CA Certificate /etc/octavia/certs/server_ca.cert.pem. , Failure: octavia.common.exceptions.CertificateGenerationException: Could not sign the certificate request: Failed to load CA Certificate /etc/octavia/certs/server_ca.cert.pem. ]
一般是证书有问题,重新生成所有控制节点的证书,然后重启 octavia 服务即可
1 2 systemctl restart octavia-api.service octavia-health-manager.service octavia-housekeeping.service octavia-worker.service systemctl status octavia-api.service octavia-health-manager.service octavia-housekeeping.service octavia-worker.service